SLA
Contents
- 1 Overview
- 2 Ticket’s Due Date Management
- 3 Assigning an SLA to a Ticket
- 4 Automatic Ticket Due Date Calculation
- 5 SLAs Window
- 6 SLA Types
- 7 Create SLA
- 8 Copy SLA
- 9 Delete SLA
- 10 Apply SLA to Ticket
- 11 Remove SLA from Ticket
- 12 Default SLA for Accounts and Contracts
- 13 Re-Apply SLAs
- 14 SLA Privileges
- 15 Working Hours Schedule
- 16 See Also
Overview
The SLA feature (phase I)* in RangerMSP helps you provide services to your customers within the time frame agreed with them. It provides an easy way to define the time-to-deliver of your Service-Level Agreements (SLA) with the customer and apply them to Tickets Due Date automatically.
SLA Features (phase I)*:
- Define rules for automatic calculation of the maximum delivery time agreed with the customer to handle and resolve different problems.
- Once an SLA is assigned to a Ticket, the system automatically manages the Ticket’s Due Date based on the Ticket’s properties and the rules configured for the SLA in RangerMSP.
- SLA Due Date calculation automatically takes into account the business actual working hours, as defined in the new customizable Working Hours Schedule feature.
- A default SLA can be set to Accounts or Contracts, thus automatically applied to Tickets created under the Account or Contract.
(*) Phase I: The SLA feature introduced in RangerMSP 6.0 is the first phase of the SLA implementation in RangerMSP. The current implementation includes automatic Due Date management. Due Date is managed according to the time frame agreed with the customer, as defined in the SLA rules, taking into consideration the business working hours. We have already received many suggestions and ideas of what should be included in the next phase. It turns out that different people see SLA as a different thing. If you have any thoughts or ideas you want to share with us please drop us an email.
Ticket’s Due Date Management
The Ticket’s Due Date field determines the maximum time for resolution of the Ticket. If the Due Date is reached, it will appear in red throughout the application, alerting users that this ticket is overdue. Tickets can also be sorted by the Due Date, showing the currently due Tickets at the top.
The Ticket’s Due Date can be managed in two ways:
- Manually (by the user) - when no SLA is assigned to the Ticket, the Due Date is not calculated automatically and the user can leave it empty or set it manually.
- Automatically (by the SLA) - once an SLA is assigned to a Ticket, the system automatically manages the Ticket’s Due Date field. The user cannot manually set the Due Date for Tickets with an SLA.
Assigning an SLA to a Ticket
All Tickets that are created in the system can be assigned with an SLA. This includes:
- Tickets created via the the client application.
- Tickets created via the Web Interface by customers or by employees.
- Tickets created via third-party applications via the RangerMSP API.
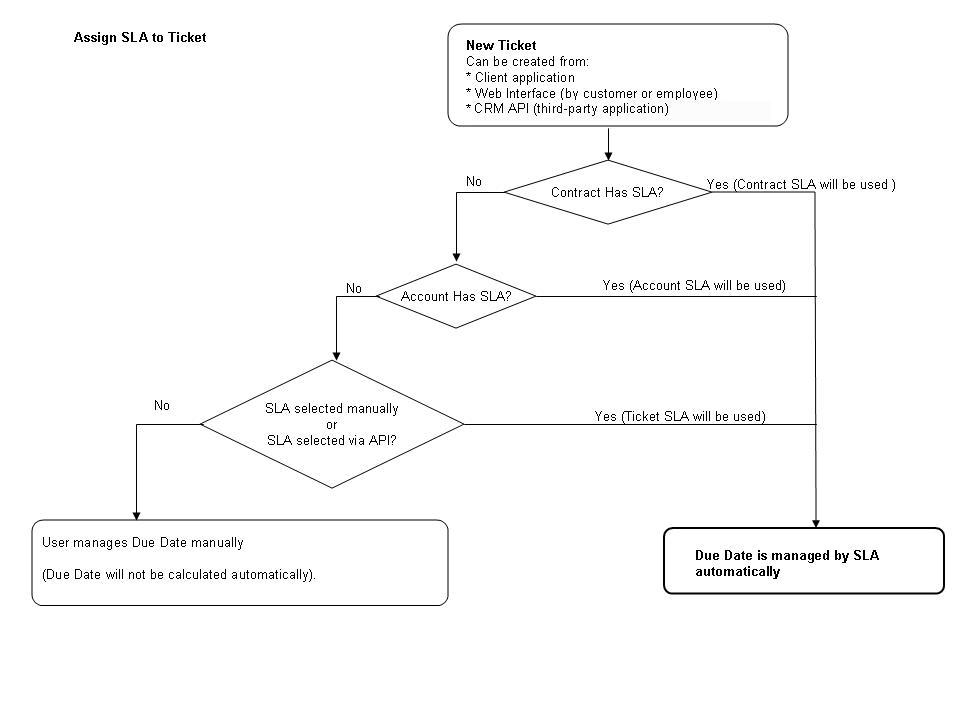
SLA can be automatically assigned to a Ticket in the following cases:
- When the Ticket’s Contract has a default SLA defined.
- When the Ticket’s Account has a default SLA defined.
- When a third-party applications assigns the SLA via the API.
Otherwise, the Ticket is not assigned with an SLA automatically, and the user can select the SLA in the Ticket window.
Note that the SLA can be removed from the Ticket at all times, thus leaving the Due Date management to the user.
The following diagram shows how RangerMSP assigns the SLA to a Ticket:
Automatic Ticket Due Date Calculation
A Ticket’s Due Date is automatically calculated only when the Ticket has an SLA assigned to it. Once an SLA is assigned to a Ticket, the system automatically manages the Ticket’s Due Date field. The user cannot manually set the Due Date for Tickets with an SLA.
Due Date calculation is performed when:
- New Ticket is created via the client application or Web Interface.
- Existing Ticket is saved via the client application or Web Interface.
- Ticket is being created or saved by third-party applications via the RangerMSP API.
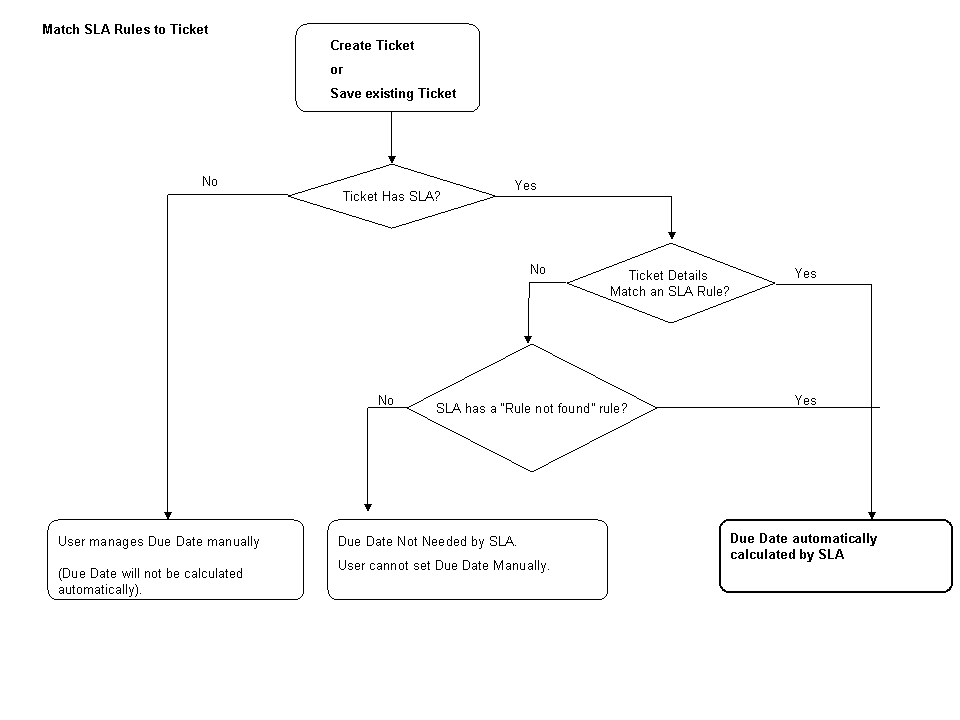
Due Date calculation adds to the Ticket creation date and time, the time interval defined in the SLA. The SLA rules are matched to the Ticket according to the Ticket data (such as the Ticket’s Priority, Type, Source, Category etc.).
Matching the correct SLA Rule is done in the following manner:
Notes:
- If no time frame is defined for a specific combination of Priority and Field value, Due Date is not set to Tickets with these values. If you want to enter a Due Date for this Ticket, you should remove the SLA first from the SLA field in the Ticket, and then enter the Due Date.
- The Due date for all new tickets will be calculated at the time of saving the Ticket. Note that the Due date is recalculated whenever the Ticket is updated (including via third-party applications via the RangerMSP API), to reflect the correct Due Date according to the recent Ticket data and SLA Settings.
SLAs Window
When opening the main SLA Settings window (from the main Settings > SLA menu option), the list of defined SLAs is displayed. In this window you can search for a SLA using the search panel at the top part of the window and view the results in the list.
Double-clicking a SLA opens the full SLA details window, where you can define the SLA rules.
SLA Types
RangerMSP provides four SLA types to choose from.
SLA Types include:
Possible SLA Types:
- Fixed Time - The fixed time SLA consists of a single time frame for resolution for all Tickets covered by this SLA.
- By Priority- In this SLA you can define the maximum time frame for resolution based on the current Ticket Priority.
- By Priority and Field - In this SLA you can define the maximum time frame for resolution, based on the current Ticket priority and the current value of a specified field (such as Ticket Type, Ticket Cause, etc.).
- By Field - In this SLA you can define the maximum time frame for resolution, based on the current value of a specified Ticket field (such as Ticket Type, Ticket Cause, etc.).
The following table shows the calculation formula per type:
| SLA Type | Due Date Formula | Comment |
|---|---|---|
| Fixed Time | Ticket Open Date/Time + Time defined in SLA | |
| By Priority | Ticket Open Date/Time + Time defined in SLA per Priority | When ticket Priority doesn't match any rule, no Due Date is set. See By Priority SLA |
| By Priority and Field | Ticket Open Date/Time + Time defined in SLA per Priority & Field value | When ticket details don't match any rule, use "When a rule not found" rule. See By Priority and Field SLA |
| By Field | Ticket Open Date/Time + Time defined in SLA per Field value | When ticket details don't match any rule, use "When a rule not found" rule. See By Field SLA. |
See more details per type in the following sections.
Fixed Time SLA
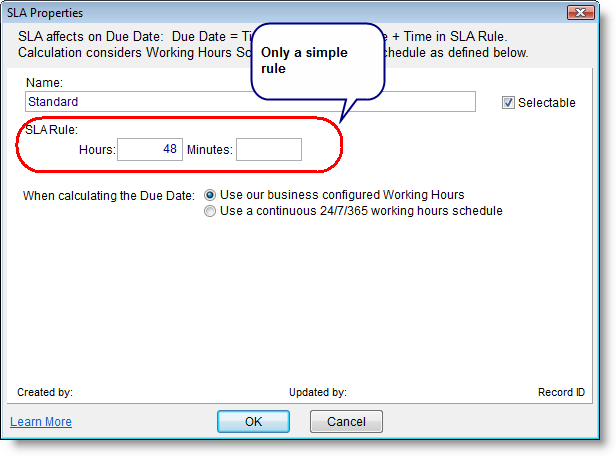
The Fixed Time SLA type allows users to define a simple rule for Due Date calculation. The only parameter for this rule is the time defined in the SLA.
To create a new Fixed Time SLA open the main SLAs Window from Settings > SLAs. Click New on the toolbar and select Fixed Time.
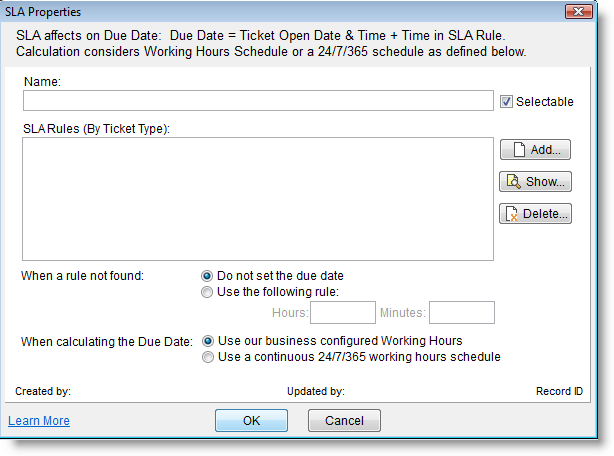
The following window appears:
Name: Enter the SLA Name. This name will appear when selecting an SLA from the list, so it should briefly reflect the SLA usage.
Selectable: Use this flag to determine wherther this SLA will be available for selection when choosing an SLA for a Ticket, Account or Contract. Leaving this option empty will remove this SLA from the selection lists.
SLA Rule: The SLA Rule determines the time frame for solution. In a Fixed Time SLA, the SLA includes only a single time frame that will be added to the Tickets creation time when calculating the Ticket’s Due Date.
Formula:
Due Date = Ticket Open Date/Time + Time defined in SLA
When calculating the Due Date:
- Use our business configured Working Hours Schedule - when choosing this option the calculation will rely on your Working Hours Schedule. See Working Hours Schedule.
- Use a continuous 24/7/365 working hours schedule - when choosing this option, calculation will ignore working hours, vacations, etc. and will apply on 24/7 days schedule, all year long.
By Priority SLA
The By Priority SLA type allows users to define rules for Due Date calculation, according to the Ticket priority. For each Ticket Priority value it is possible to define the time frame for resolution in the SLA.
To create a new By Priority SLA open the main SLAs Window from Settings > SLAs. Click New on the toolbar and select By Priority.
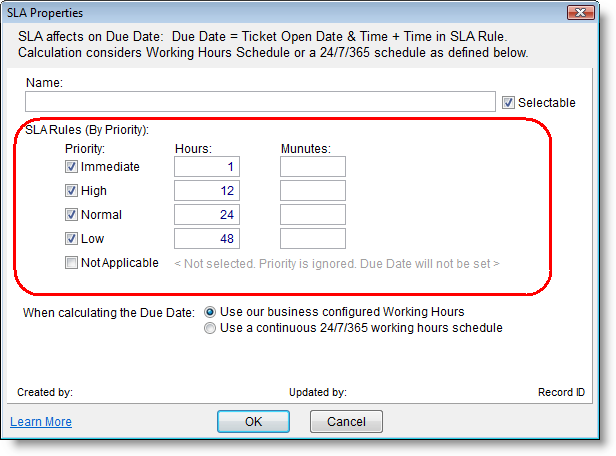
The following window appears:
Name: Enter the SLA Name. This name will appear when selecting an SLA from the list, so it should briefly reflect the SLA usage.
Selectable: Use this flag to determine wherther this SLA will be available for selection when choosing an SLA for a Ticket, Account or Contract. Leaving this option empty will remove this SLA from the selection lists.
SLA Rules: The Priority SLA contains a rule per Priority. Each SLA Rule is a defines the time frame for resolution. The time frame will be added to the Ticket creation time when calculating the Ticket’s Due Date.
By Priority SLA Rule Formula:
Due Date = Ticket Open Date/Time + Time defined in SLA per Priority
When calculating the Due Date:
- Use our business configured Working Hours Schedule - when choosing this option the calculation will rely on your Working Hours Schedule. See Working Hours Schedule.
- Use a continuous 24/7/365 working hours schedule - when choosing this option, calculation will ignore working hours, vacations, etc. and will apply on 24/7 days schedule, all year long.
When a Priority is not defined
If no time frame is defined for a specific Priority, Due Date is not set for Tickets with this Priority, and Due Date cannot be entered manually. Ticket Due Date will indicate “Not Needed (by SLA)”.
If you want to enter a Due Date for this Ticket, you should remove the SLA first from the SLA field in the Ticket, and then enter the Due Date.
By Priority and Field SLA
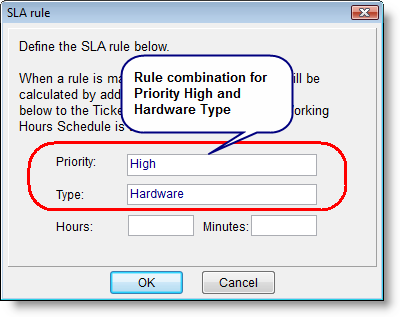
The By Priority and Field SLA type allows users to define rules for Due Date calculation, according to the Ticket priority and another Ticket field. For example, set a rule for Ticket with High Priority and Type “Hardware”.
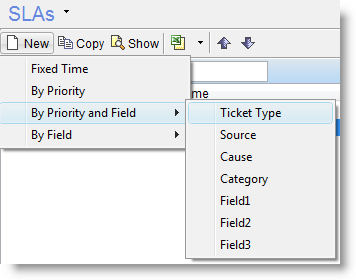
To create a new By Priority and Field SLA open the main SLAs Window from Settings > SLAs. Click New on the toolbar and select By Priority and Field.
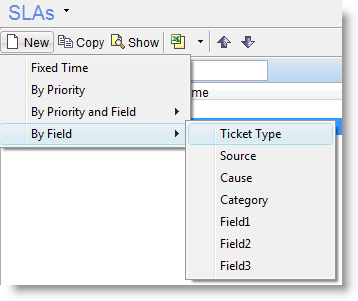
The following menu opens:
Note that the Field1-3 are customizable, and may appear with a different name in your system.
After you choose the Ticket Field you want to use in your SLA, the following window appears
In this window you should enter the information and rules for this SLA:
Name: Enter the SLA Name. This name will appear when selecting an SLA from the list, so it should briefly reflect the SLA usage.
Selectable: Use this flag to determine wherther this SLA will be available for selection when choosing an SLA for a Ticket, Account or Contract. Leaving this option empty will remove this SLA from the selection lists.
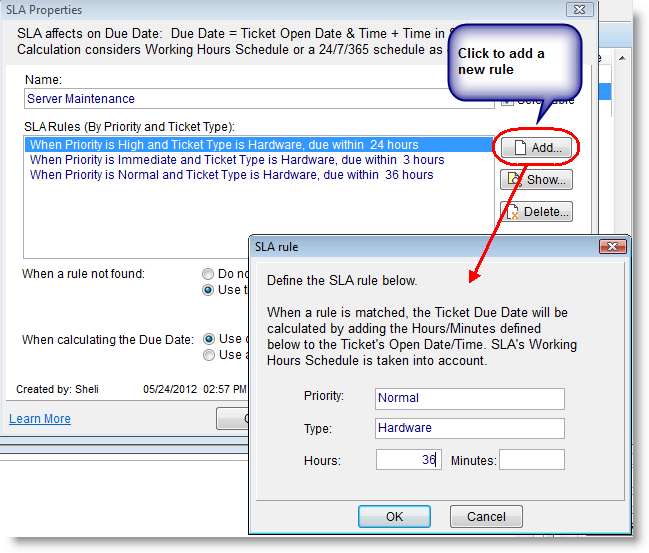
SLA Rules: The Priority and Field SLA can contain a list of rules. Each SLA Rule is a combination of Priority and Field value and time frame for resolution. The time frame will be added to the Ticket creation time when calculating the Ticket’s Due Date according to the values entered in the Ticket.
By Priority and Field SLA Rule Formula:
Due Date = Ticket Open Date/Time + Time defined in SLA per Priority & Field Value

if no match is found
Due Date = No Due Date or Fixed Time Frame defined in SLA.
Add: Click Add to add rules with time frames for resolution per Priority and Field value. In the example below, the SLA is by Priority and field is Ticket Type. Rules are added for “Hardware” Ticket Type. Per rule, enter the Hours and Minutes.
When a rule not found: When a Ticket is saved, the system checks the rules and tries to match the Ticket information with any of the rules. If no match is found, here is where you configure how the system should behave. In this option you should define a time-frame that will apply on Tickets that do not match any of the rule combinations.
Options are:
- Do not set a Due Date - when choosing this option, Due Date is not set and will indicate “Not Needed (by SLA)”. In this case, Due Date cannot be modified manually. If you want to enter a Due Date for this Ticket, you should remove the SLA first from the SLA field in the Ticket, and then enter the Due Date.
- Use the following rule - when choosing this option, Due Date is calculated using the time-frame provided in the rule.
When calculating the Due Date:
- Use our business configured Working Hours Schedule - when choosing this option the calculation will rely on your Working Hours Schedule. See Working Hours Schedule.
- Use a continuous 24/7/365 working hours schedule - when choosing this option, calculation will ignore working hours, vacations, etc. and will apply on 24/7 days schedule, all year long.
By Field SLA
The By Field SLA type allows users to define rules for Due Date calculation, according to a selected Ticket field. For example, set a rule for Ticket with Type “Hardware”.
To create a new By Field SLA open the main SLAs Window from Settings > SLAs. Click New on the toolbar and select By Field SLA.
The following menu appears:
Note that the Field1-3 are customizable, and may appear with a different name in your system.
After you choose the Ticket Field you want to use in your SLA, the following window appears:
Name: Enter the SLA Name. This name will appear when selecting an SLA from the list, so it should briefly reflect the SLA usage.
Selectable: Use this flag to determine wherther this SLA will be available for selection when choosing an SLA for a Ticket, Account or Contract. Leaving this option empty will remove this SLA from the selection lists.
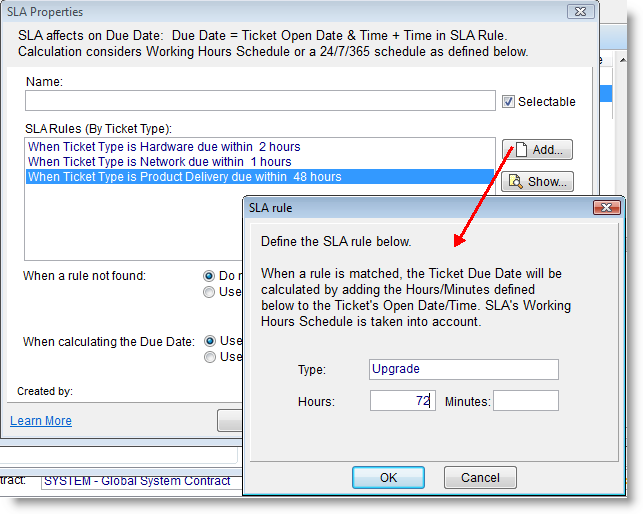
SLA Rules: The By Field SLA can contain a list of rules. Each SLA Rule is a defines the Field value and time frame for resolution. The time frame will be added to the Ticket creation time when calculating the Ticket’s Due Date according to the value entered in the Ticket.
By Field SLA Rule Formula:
Due Date = Ticket Open Date/Time + Time defined in SLA per Field Value
   if no rule is found = No Due Date or Fixed Time Frame defined in SLA.
Add: Click Add to add rules with time frames for resolution per Field value.
In the example below, the SLA field is Ticket Type. Rules are added for various Ticket Types. Per rule, enter the Hours and Minutes.
When a rule not found: When a Ticket is saved, the system checks the rules and tries to match the Ticket information with any of the rules. If no match is found, here is where you configure how the system should behave. In this option you should define a time-frame that will apply on Tickets that do not match any of the rule combinations. Options are:
- Do not set a Due Date - when choosing this option, Due Date is not set and will indicate “Not Needed (by SLA)”. In this case, Due Date cannot be modified manually. If you want to enter a Due Date for this Ticket, you should remove the SLA first from the SLA field in the Ticket, and then enter the Due Date.
- Use the following rule - when choosing this option, Due Date is calculated using the time-frame provided in the rule.
When calculating the Due Date:
- Use our business configured Working Hours Schedule - when choosing this option the calculation will rely on your Working Hours Schedule. See Working Hours Schedule.
- Use a continuous 24/7/365 working hours schedule - when choosing this option, calculation will ignore working hours, vacations, etc. and will apply on 24/7 days schedule, all year long.
Create SLA
To create a new SLA, open the main SLAs Window from Settings > SLAs. Click New on the toolbar and select the SLA Type you want to create. See more details per type in the following links:
Update SLA
To update an existing SLA:
- Open the main SLAs window from Settings > SLAs.
- Find the SLA you want to update and double-click to open the SLA details window.
- Update the desired details and rules. If you want to update an existing rule in a list, select the rule and click 'Show' to update the rule.
- Click OK to save your changes.
Important: After every SLA details update (e.g. changing a rule), all open Tickets under this SLA will automatically be updated/checked against the most recent SLA details that were just saved. This will recalculate all Due Dates when needed according to the new SLA details. You may see a quick progress bar showing you the Tickets update in progress. Once completed, all Tickets Due Dates will be up-to-date.
Copy SLA
To copy an existing SLA and create a new one:
- Open the main SLAs window from Settings > SLAs
- Select the SLA you want to copy.
- Click the Copy icon in the toolbar.
- A new SLA window opens.
- Copying the SLA copies all rules, including the “When a rule not found” rule if exists.
- Enter a name for the new SLA.
- Update any rules if you need to change the terms of the SLA.
- Click OK to save your changes.
Delete SLA
To delete an existing SLA and create a new one:
- Open the main SLAs window from Settings > SLAs
- Select the SLA you want to delete.
- From the main SLA menu, select Delete.
- If there are Tickets/Accounts/Contracts linked to this SLA, a message will appear to let you know it cannot be deleted. First remove the links to this SLA from all Tickets/Accounts/Contracts and then try to delete it again.
- If selected SLA was set as default SLA for new Accounts in Tools > Options > Accounts Tab – it cannot be deleted. Choose a different SLA as the default and then try to Delete again.
- If all above terms are met, the applications shows a deletion verification message. Click Yes to delete.
Apply SLA to Ticket
When applying an SLA to the Ticket, the Ticket's Due Date is automatically managed according to the SLA rules. The user cannot modify the Due Date manually.
The SLA can be assigned to the Ticket upon creation manually or automatically, e.g. when the Account or Contract have a default SLA defined.
See more details about the ways the system automatically assigns the SLA in Assigning an SLA to a Ticket.
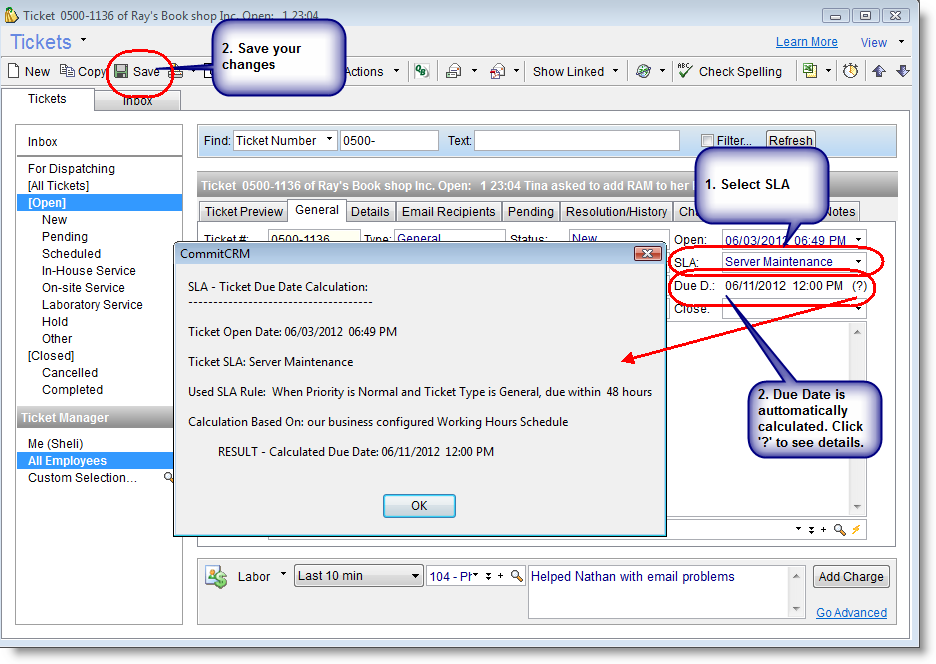
To manually apply the SLA to the Ticket:
- Open the Ticket General tab.
- In the SLA field select the SLA you want to use.
- Due Date now shows <set on save>.
- Save your changes to have the Due Date calculated.
- Due Date shows the result according to the SLA. Click the question mark '?' to see details about the Due Date result.
Remove SLA from Ticket
Removing an SLA from the Ticket will stop any automatic Due Date calculation and the Due Date will be manually managed by the user.
To remove a selected SLA from a Ticket:
- Open the Ticket Genreal tab.
- In the SLA field, select <Not Selected>.
- Due Date is now editable and can be modified manually by the user.
Default SLA for Accounts and Contracts
Accounts and Contracts can have a default SLA defined, and any Tickets created under them will automatically be assigned with this SLA.
See more details about the ways the system automatically assigns the SLA in Assigning an SLA to a Ticket.
To assign a default SLA to an Account:
- Open the Account Service tab.
- Select the SLA you want to use in the SLA field.
- Click Save to save your changes.
To assign a default SLA to a Contract:
- Open the Contract Details tab.
- Select the SLA you want to use in the 'Detault SLA for new Tickets' field.
- Click Save to save your changes.
Note:
Contract settings override Account settings. So, if both the Account and the Contract have a default SLA defined, Tickets created under this Contract will be assigned with Contract's SLA. Account SLA will be ignored in this case.
Default SLA for new Accounts
You can define a default SLA that will be assigned automatically to all new Accounts being created.
To define a default SLA for new Accounts:
- Open Tools > Options > Accounts.
- Under 'Default SLa for New Accounts' select the SLA.
- Click OK to save your changes.
New Accounts that will be created from this point will have the SLA assigned by default.
Default SLA for Automated Tickets
Tickets that are created automatically by the system (e.g. by the Email Connector), can be automatically assigned to an SLA by defining a default SLA for the Account or for the default Contract of this Account (see How does the system select a Default Contract?).
If a default SLA is defined (see Default SLA for Accounts and Contracts), the ticket created by Email Connector will be automatically assigned to it.
Re-Apply SLAs
Re-Applying SLAs will recalculate all Due Dates for all open Tickets based on the SLA assigned to them. The batch Re-Apply option shouldn’t be used on a regular basis, and should only be used by administrators.
By default when updating a SLA, Working Hours Schedule or a Ticket, the due date is recalculated always. Only in rare cases Tickets may not be up-to-date with the correct Due Date, for example, if the Ticket is currently being updated by another user and the update is then canceled.
The batch Re-Apply SLAs option should only by used by system administrators,and only when instructed by the RangerMSP support team.
SLA Privileges
In order to create or edit SLAs, users must be assigned certain privileges.
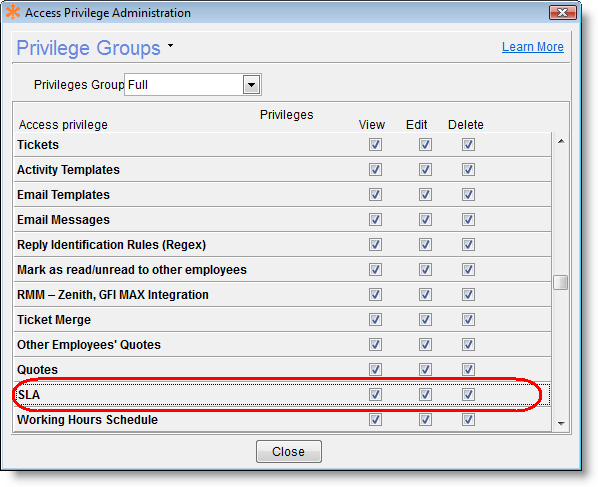
A system administrator can assign these privileges by going to File > User & Privileges > Privileges.
The Privileges window lists a separate line for SLA. Like all privileges in the RangerMSP system (click here for general information on using privileges in RangerMSP), the system administrator can assign the user privileges to View, Edit, or Delete. Below is an explanation of what these privileges mean in reference to SLA privilege:
- View: The user can view SLA but not update them..
- Edit: The user can create or update SLAs.
- Delete: The user can delete SLAs.
Users with no SLA privileges will be able to apply an SLA to Tickets. They will not be allowed to open the SLA settings window and view SLA settings.
Working Hours Schedule
Working Hours Schedule is your way to organize your business working hours information, and define holidays, scheduled days off, official business hours etc.
When defining SLAs, you can tell the system to use the Working Hours Schedule as your actual working hours. This way, the actual business hours are taken into account in the calculation.
For example:
Ticket opened date: June 1 at 16:00
SLA rule: Ticket is due in 2 hours.
Working Hours Schedule: working hours 8:00am to 5:00pm
Due Date Result: June 2 at 9:00pm
Define Working Hours Schedule
To define your business working hours schedule go to Settings > Working Hours Schedule.
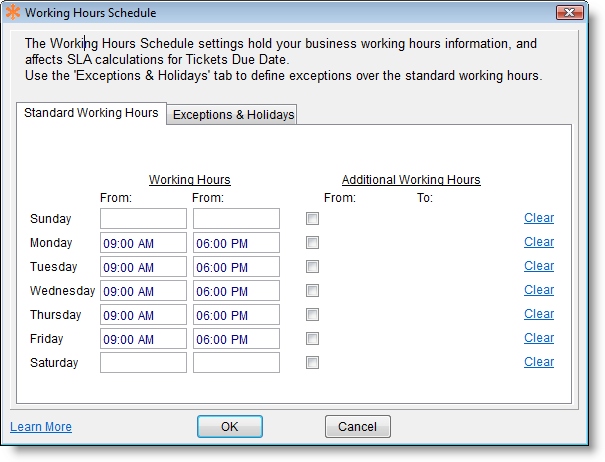
In the window that opens, you have two tabs: Standard Working Hours and Exceptions and Holidays.
Standard Working Hours - Here you define your standard working hours time range. Days that are non-working days should stay empty, with no hours defined for them. You also have an option to define ‘Additional Working Hours’ when needed, e.g. when providing night-shift hours. To define additional working hours, check the check-box and enter the time-range.
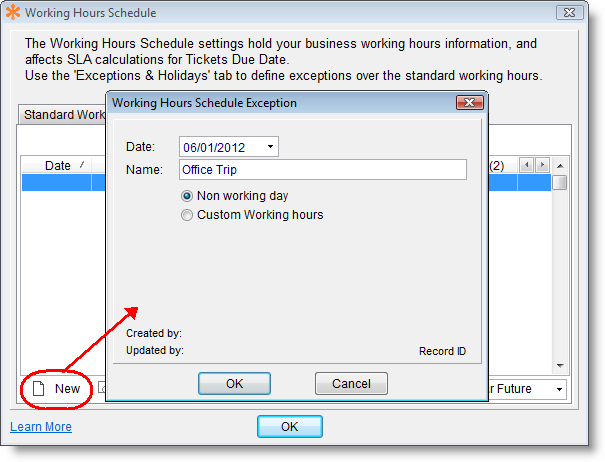
Exceptions and Holidays - The Exceptions and Holiday tab is where you define vacations, holidays, office day-off etc. To add an exception, click the Add button. The following window appears:
Date - Enter the holiday/exception date Name - Enter the name describing the nature of this exception. Time Frame - Each exception or holiday can be:
- Non working day - a complete non-working day.
- Custom Working hours - use this when you want to define partial working hours which will be considered as actual working hours for calculation purposes. The custom working hours allow defining two time-frames for the day.
Export/Import Exceptions
It is possible to export and import the working Hours Schedule Exceptions list to Text file.
The import/export format is as follows: "date","type","from time1","to time1","from time2","to time2","name"
Where:
Date format: YYYYMMDD
Time format: HH:MM (24Hours)
Type: N = Non Working Day, C = Customer Working hours.
Examlpe:
"20111122","C","08:00","10:00","13:00","14:00","working day"
"20120312","N","00:00","00:00","00:00","00:00","non working day"
To Export exceptions:
- Open the Exceptions & Holidays tab.
- Right-click the list and from the popup menu select Export.
- Enter the output file name and click Save.
To Import exceptions:
- Open the Exceptions & Holidays tab.
- Right-click the list and from the popup menu select Import.
- Select the input file and click Open.
Update Working Hours Schedule
To update your working hours schedule, open Settings > Working Hours Schedule and update the details in the window that opens (see Define Working Hours Schedule)
Important: Updating Working Hours Schedule (e.g. adding exceptions, changing the standard hours, etc.), may affect Tickets that are linked to SLAs that rely on Working Hours Schedule for their calculations. Therefore, when changing the Working Hours Schedule, all Open Tickets assigned to the relevant SLAs will be recalculated and their Due Date is modified – if needed. You may see a quick progress bar showing you the Tickets update in progress. Once completed, all Tickets Due Dates will be up-to-date.
