Contracts

From RangerMSP Wiki - PSA software for MSPs and IT services providers
Jump to: navigation, search
User Manuals | Billing | Contracts

A Contract in RangerMSP defines the service agreement with your customer, which helps you manage the way you charge your customer for services and track the status of the agreement. Each Contract is always related to an Account.


RangerMSP Contracts are categorized according to their type:

  • Global
  • Block of Time
  • Block of Tickets
  • Block of Money

The Contract is created based on the Billing Plan that defines the contract type, billing settings and pricing.

RangerMSP automatically tracks the status of a Contract according to the type selected. You can read more about contract types and their statuses in Tracking the Contract Status.
Each Account can have one or more Contracts at a time for different purposes. For example, you can have a Block of Time service agreement for on-site support at the customer site, and also a Global Contract for phone support.

Each Contract also has a Start date and End date which determines when the Contract is valid or expired (i.e. out of date). RangerMSP automatically selects the most valid Contract – see How does the system choose the Contract to be used. To view Contracts which are about to expire, go to the Reports window, select the Contracts category and generate the 'Contract List by Type and Expiration' report.

Note that using Contracts is optional, and should only be used if needed – see the next section, When to use Contracts.

If you don't have special contract terms with your customers and you bill according to ad-hoc charges per activity, you can simply use the Global System Contract which allows you to skip the Contract definition step and go straight to Charges. This System Contract is a global Contract which is automatically created for each Account so you can avoid having to create and manage contracts yourself.


When to use Contracts

Contracts are optional. RangerMSP Contracts are useful for managing your service contracts and tracking their statuses in the following cases:

  1. You have a service agreement which needs a Contract (for example a Block of Time contract, a Block of Money contract, etc.)
  2. You use recurring service agreements, such as monthly billing. See a more detailed explanation in Recurring Contracts.
  3. You manage complex Projects which include various Tasks and Charges. For example, you are building a new network infrastructure for a customer with various hardware and software installations.

For more information and advanced usage tips for Contracts, see Managing Projects using Contracts and How to use Recurring Contracts.


Contract Fields

The following table explains the Contract fields and their usage:

Field Description
Contract Type (mandatory) A Contract can be created under one of the following types:
  • Global
  • Block of Time
  • Block of Tickets
  • Block of Money

The contract type is set when you create a new Contract, and the system automatically tracks the status of contracts according to their type. Read more about Tracking the Contract Status|Tracking the Contract Status.

When adding Charges for a Contract, the Billing flag will be automatically set according to the Contract type. You can read more in How is the 'Billable flag' determined.

Contract Code (mandatory) The Code field is the unique ID of a Contract, which can contain numbers and letters as desired.

The Code field is used for the following:

  • Easily selecting a Contract for Charges, Ticket etc. by typing its code in the Contract field, rather than clicking on the magnifying glass and searching for it
  • If you use a sortable notation for the codes, you can easily sort your Contracts and Charge reports. For example, you can group several contracts of an Account (like 1550-P001 and 1550-P002) so that you can see them together or print Charge reports together (note that Charge reports can be filtered by a Contract Code Range – this can be very helpful in many cases)
  • You can use the Contract's sub-code to differentiate between identical contracts for differing date ranges (see Recurring Contracts).
Contract Name (mandatory) The Name field describes the purpose of the Contract. This field is displayed whenever viewing the Contract in various windows (e.g. when creating a new Ticket).

The Contract Name is a non-unique identifier (you may have several Contracts with the same name).

Start Date (mandatory) Indicates the date the Contract starts being active and can be used for Charges/Tickets..
End Date (mandatory) Indicates the date the Contract stops being active and should not be used for Charges anymore. The system will warn the user when an expired Contract is being used for a Ticket/Charge.

Also, the system will automatically select the most appropriate Contract according to the relevant dates. Read more about How does the system select a default Contract.

Description The Description (Desc.) field holds the description of this specific Contract. The Description is displayed whenever selecting to use this Contract (in a new Ticket window) and in the Ticket's Contract/Asset tab.
Internal The Internal field holds internal comments about the Contract, which will be displayed only to employees (Customers viewing the Contract via the Web Interface will not see this field).

The Internal comments are displayed when a Contract is selected for use (in a new Ticket window), and in a Ticket's Contract/Asset tab.

Status The status field may contain the following possible values:
  • Active
  • Suspended
  • Canceled
  • Completed

In a typical lifecycle, a contract will start as Active, and when it passes the End Date, it will be set as Completed by the employee handling the Account.

By default, only Active Contracts are displayed when choosing a Contract in windows such as Charge, Ticket, etc. It is still possible to use Contracts which are not active by clicking the magnifying glass when choosing a Contract.

The selection list by status default behavior is managed from Tools > Options > Charges & Contracts > Hide inactive Contracts from Contract selection fields.

Suspended and Canceled statuses are to be used for special cases. For example, if a customer has not yet paid a debt and should not be receiving regular support, or if the payment agreement has been modified and a new Contract has been issued instead. If any of these statuses are set, the system will warn you when attempting to use this Contract for new Tickets/Charges.

Default Items It is possible to set default Items (per Parts, Labor or Expense) to be used when adding Charges to the Contract. Using default Items streamlines adding new Charges - the default Item will be automatically selected when creating a new Charge. The user can then modify the Item if needed.
Linked Activity Template Each contract in the RangerMSP system can be assigned a "Linked Activity Template." This template can be linked to a contract and applied whenever a user copies this contract to a new date range or creates a new contract based on the contract to which the template is assigned. See the Activity Templates user guide for more details.
Used x out of y When the Contract is a "Block of…" contract, the field next to the Contract status will show the status of the block. For example, a Block of Time Contract will display the amount of used hours out of the block (for example "Used 3 out of 15 hours").

When the Contract exceeds it's terms, this text will appear in red.

Contract-Price Charges The Contract Price allows you to define charges which are the actual contract payment for the contract itself. This way you can invoice your customer for the contract from within RangerMSP. You can read more about this in Contract-Price Charge section.
Custom Pricing If you define Custom Pricing for a Contract, each time you create a Charge for this Contract, RangerMSP automatically pulls up the correct custom price for it. Contract's Custom Pricing replaces the Account's Custom Pricing (if defined). You can read more about this in Custom Pricing section.


Setting up Recurring Contracts

RangerMSP Contracts can be configured to renew automatically.

Technical note
Recurring Contracts are automatically renewed and created by the 'CRM Server' Windows service that should be installed and running on your server. In case you already use the Email Connector or Alerts Server then you can skip this section as the CRM Server service is already installed and there is nothing more you need to do besides to create a recurring Contract. For installation instructions please review the Service Setup Guide.

Recurring Contract based on a Billing Plan

Click the New button to launch the New Contract wizard and select the Plan you want to based it on from the list of predefined Plans (e.g. Managed Services MSP) or create your own Billing Plans to base new Contracts on.

*For non-recurring/one-off Contracts select a Project/One-off Plan.

New contract wizard step1.png


Click Next to select an Account and to set the Contract Code and Name:

New contract wizard step2.png


Click Next to define Contract period settings:

New contract wizard step3.png


Period settings for Recurring Contracts:

  • Auto complete & renew - with this option selected, when a Contract expires, the system will automatically complete it and create a new Contract for the next period.
  • Auto renew - with this option selected, when a Contract expires, the system will automatically create a new Contract for the next period.
    The expired Contract can be completed manually by changing its status to ‘Completed’ or using the Batch Complete Contracts tool.
  • Manual renew - with this option selected the Contracts will not be automatically renewed. Such contracts can nevertheless be renewed manually by copying it to the next period or by using the manual Batch Renewal Wizard option.


New contract wizard step3 1.png

Click Next to set the Contract Price and define items that reflect the price of the contract. These items will be added as Contract-Price Charges thus reflecting the contract’s total price. Such Charges are automatically added when Contracts are renewed for the next period.


New contract wizard step4.png


Click Finish to create the Contract.


Msp recurring contract sample.png


New custom Contract

The Contract can be created without the Billing Plan. It is useful in case the Contract Prices and Settings should be set specifically at the Contract without inheriting those from the Plan.

Click the New drop down in the Contracts window and select New Contract (custom):


New custom contract option1.png


OR

use the option New - Custom under the Contracts menu:


New custom contract option2.png

Assign an existing Contract to a Billing Plan

Click Assign Plan link under the Contract General tab and select the Billing Plan from the list:


Assign plan to contract.png


Changing the Billing Plan for Contracts

Click the arrow to change the Plan for the Contract or unassign the Plan from the Contract:


Change plan on contract.png


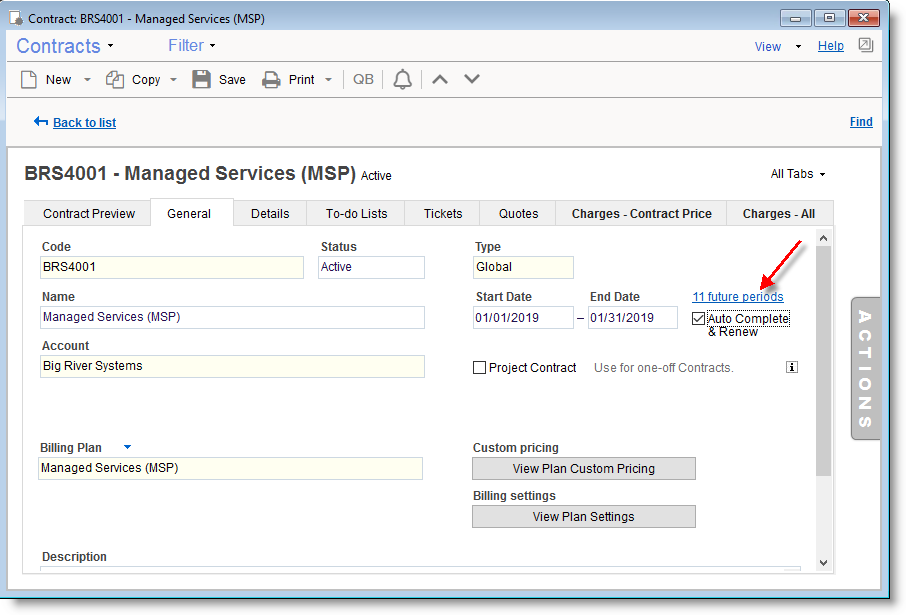
Setting an existing Contract to auto-renew

Select the option Auto Complete & Renew under the Contract General Tab:


Set contract as auto renew.png


Configure the Contract Renewal Settings:


Contract renewal settings.png


Manage Contract Recurrence Settings

  • Use the link to open the renewal settings window:

    Manage contract renewal.png
  • Use the Add Periods link to add more periods.
  • Use Delete link to delete last/all periods
  • Set the Contract to Auto Renew only or Auto Complete & Renew.


Manage contract renewal2.png


Contract-Price Charges

Contract-price Charges provide an easy-to-use and innovative way to ensure that clients get billed for the service contracts you have signed with them, whether they are recurring contracts or ad-hoc contracts/projects.

Contract-price Charges are used to charge for an amount agreed upon in a contract. For example, let’s say you sign a 50-hour (block-of-time) contract with a customer for a price of $1,000. You can then create a Contract-price Charge to represent this amount ($1,000) in the RangerMSP system. A Contract-price Charge only represents an amount listed for a contract—it does not represent a fee for specific work performed under a contract.

Contract-price Charges work much like other charges in RangerMSP: they are included in reports; they can be defined as Billable; and they are included in invoices. However, since Contract-price Charges do not represent specific work, they do not affect the balance of a contract block. For further explanation, see Contract-Price Charges Features below.

See Contract-Price Charges.


Tracking the Contract Status

An Active Contract can exceed the Contract terms, depending on the Contract type. Each Contract type has its own limitations and once the Charges or Tickets added to the Contract exceeds the limit, the system warns the user before adding any more Charges/Tickets.

The Contract Type is set when you create a new Contract, and the system automatically tracks the status of contracts according to their type:

  1. Global - The Global Contract allows the use of an unlimited number of Charges of any type. The only limitation for Global Contracts is the contract end date. A typical usage for this type would be a phone service contract which is valid for one year.
  2. Block of Time - Block of Time Contracts are suitable for contracts that agree upon a limited and predefined block of service time. Each Charge added to this Contract will decrease the time remaining for this Account.
  3. Block of Money - Block of Money Contracts are suitable for contracts that agree upon a limited and predefined sum of Money or for "all-included" service agreements. Each Charge added to this Contract will be deducted from the original sum of money.
  4. Block of Tickets - Block of Tickets Contracts are suitable for contracts that agree upon a limited and predefined block of service Tickets. Each Ticket added to this Contract will subtract one Ticket from the original block of Tickets.

Certain charges will automatically be deducted from the contract, such as the addition of a new Charge to a Block of Time Contract, which will reduce the remaining time in the Contract. This also applies to money in a Block of Money contract, and so on.

When you create a Ticket under an active Contract, the system will warn you if the contract terms are out of date, for example, if the Block of Time allocated has already been used or if the end date has passed.

You can see the current status of the Contract in the Contract General tab, near the Status field (for example "Used 3 of 12 Hours"). In case the Contract has exceeded its terms, the status will appear in red (for example "Used 13 of 12 Hours").

Custom Pricing for Contracts

Custom Pricing lets you set special pricing for different Accounts, Billing Plans or Contracts.

For Contract assigned to a Billing Plan, custom pricing can be managed as part of the Plan and overrides system settings. In cases where the plan custom pricing is not used, the relevant customer’s custom pricing settings apply. For more information see Plan Custom Pricing.

Once you define custom prices for an Account, a Billing Plan or a Contract, these prices will be used automatically for every charge logged for Accounts or Contracts. You can also manually adjust the prices while creating a charge.

You can read more about this under Custom Pricing.


Custom Settings for Contracts

The Custom Settings for Contracts provide much more flexibility when defining your contracts. The variations and options can help you to provide better service, with a more accurate and easier billing workflow (e.g. better MSP coverage for recurring Contracts). The Custom Settings for Contracts include: Item Group permissions and Billable flag settings for Global Contracts.

For Contracts assigned to a Billing Plan, custom pricing can be managed as part of the Plan. You can read about Billing Plan Setting here.


Item Group permissions
The Item settings allow you to select which Items can or cannot be logged for Charges under this Contract. The settings include whether Labor, Expense or Part Item groups are allowed or not. Exceptions for specific Items can be added.

Billable Flag Settings for Global Contracts
You can set default values for the Billable flag, based on the Item group. This way you can choose which items are covered by the contract, and which are not, and should be billed. Note that for other Contract types (i.e. block contracts), the billable flag is determined automatically by the system according to the contract type.

Usage example:
You offer a monthly recurring Contract for services you provide. The contract covers phone and remote support but does not cover on-site work, nor any expenses or parts. Defining your contract:

  1. Contract defined: Global Contract.
  2. Define the recurring price using Contract-Price Charges .
  3. Do not allow Parts and Expense Items to be used.
  4. Allow Labor Items.
  5. Set the contract’s Billable flag behavior for Labor Items to – Billable.
  6. Then add two Labor Item exceptions for ‘Phone Support’ and ‘Remote Support’ and set their Billable flag to ‘Not Billable’ (i.e. covered).

This way, parts and expense Items cannot be logged as Charges under this contract. The phone/remote support services will be covered while any other type of labor charges will be billed.

To define Custom Contract settings go to the Contract’s Custom Settings tab:
Custom settings for contract.png

Default SLA for Contracts

The SLA feature in RangerMSP helps you provide services to your customers within the time frame agreed with them. It provides an easy way to define the time-to-deliver of your Service-Level Agreements (SLA) with the customer and apply them to Tickets Due Date automatically.

A default SLA can be set to Accounts or Contracts, thus automatically applied to Tickets created under the Account or Contract.

To assign a default SLA to a Contract:

  1. Open the Contract Details tab.
  2. Select the SLA you want to use in the 'Detault SLA for new Tickets' field.
  3. Click Save to save your changes.


Note: Contract settings override Account settings. So, if both the Account and the Contract have a default SLA defined, Tickets created under this Contract will be assigned with Contract's SLA. Account SLA will be ignored in this case.

See Default SLA for Accounts and Contracts in the main SLA user guide for more details.

Activity Templates for Contracts

Each contract in the RangerMSP system can be assigned a "Linked Activity Template." This template can be linked to a contract and applied whenever a user copies this contract to a new date range or creates a new contract based on the contract to which the template is assigned.


When should it be used?
Linked Activity Templates can be useful for situations in which you want to copy a contract with all its data (the block terms, contract-price, etc.) along with a set of activities that are typical to this contract.

For example, if you have a monthly service contract that requires you to perform the same actions each month (on-site visit for preventative maintenance, server checkup, etc.), you can simply assign a Linked Activity Template to that contract. By attaching the template, every time you renew the contract for the following month, all of the monthly Tasks, Tickets, and Appointments associated with this template can be automatically created as well.

Another possible use for Linked Activity Templates would be in preparing predefined plans to offer to new and existing customers. Each plan can be defined as a Contract, linked to your business account record. Whenever a customer purchases a plan, you can simply copy the predefined contract, including all the predefined terms and activities, and create an actual contract for the customer.

Each of these predefined contracts would already include all of the plan terms—custom pricing, default items, special internal terms, block size, etc., as well as a linked activity template, which defines all the activities that needs to be done once an actual contract based on this predefined one is signed. All you would need to do is copy the predefined contract to a new one and apply the Linked Activity Template.

See the Activity Templates user guide for more details.

How does the system select a Default Contract?

When adding a new Ticket or Charge for an Account, the system will automatically select a Contract for the new Ticket/Charge. The parameters which the system considers when trying to find the valid contract are the Start and End Dates of the Contract.

This feature saves you time and helps you enter new Charges and Tickets quickly, without the need to manually select a Contract.

In order for the system to automatically select a contract by date, the Account should be set to 'Automatic' default Contract selection (this is the default behavior for new Accounts).

When no Contracts have been created for an Account, or when there are no other active Contracts, the 'Global System Contract' will be used automatically. This is a Contract that is created for each Account by default.

Note that this is especially useful for recurring contracts (e.g. Monthly Contracts), because RangerMSP will use a new copy of the previous Contract (which is valid for the next date range (see Recurring Contracts). In this case, the Account will have several copies of the Contract with different date ranges. The system will only start automatically selecting the Contract with the new date ranges when the previous Contract expires.

Note: The system does not select a Project Contract if there is another active and current Contract for an Account. Project Contracts are not considered as relevant active contracts for routing billing.


Forcing a Default Contract for an Account

You can set a default Contract for an Account, which will always be used by default when adding new Tickets or Charges to the Account. This option should be used only in cases where you always want to use the selected contract. We do not recommend using this option unless necessary.

To manually set the default contract for an Account, open the Accounts window, navigate to the relevant Account record, click on the Contracts tab, select the Contract you want to set as default, right-click on it > Default Contract > Set selected contract as the default contract for this account.


Set default contract for account.png


Setting a Contract series as the default Contract for the Account

You can set a Contract series as the default for the Account and RangerMSP will automatically pick the correct Contract from the series when adding new Ticket or Charges to the Account.

To manually set the default contract for an Account, open the Accounts window, navigate to the relevant Account record, click on the Contracts tab, select the Contract you want to set as default, right-click on it > Default Contract > Set the selected contract series as the default contract for this account.


Set default contract series for account.png


Closing a Contract forcefully marked as the Default

RangerMSP will not let you mark a default contract for an account as closed, since closed contracts cannot be default contracts for Accounts. In order to select a different default contract for these accounts, you will need to follow these steps:

  • Go to the Accounts screen.
  • Choose Select an account.
  • Choose Contracts tab.
  • Select a new contract.
  • Right click the new Contract.
  • Select Default Contract.
  • Choose Set Selected Contract or Automatically Select.


Once you’ve selected a different contract than the one you’re closing as the default contract for that account, you’ll be able to mark the contracts you were trying to close as closed.

  • As an alternative to selecting a specific contract as the default contract, you can set the option to have the system automatically choose the relevant contract based on time and f other valid contracts are available.


Copying Contracts

Copying contracts is useful for renewing a completed contract or for using a pre-existing contract with another customer who receives similar terms.

When copying the contract, this copies the following data:

  1. The contract's basic data, such as the contract terms, the linked account, etc.
  2. The contract's Contract-price Charges
  3. The contract's default activity template, while applying the activities for the newly created contract

Copying contracts can be done in two ways: Using the Batch Copy Wizard or copying a single Contract. In both cases the Contract general details and linked information (such as Contract-Price Charges and Activity Templates) can be copied to the new Contract.

To copy a Single Contract, open the Contract window and click the Copy button from the toolbar.
To use the batch copy, go to Contracts > Batch Copy Contract for New Date Range.

Additional information about copying Contracts:


Renewing Contracts With the Batch Copy Wizard

The Batch Copy Wizard copies a group of contracts to the next date ranges. This method is generally used to renew contracts for the same customers.

To learn more about renewing Contracts:


Deleting Contracts

Normally if you used Contract you probably do not want to delete it, in order to keep you database complete with all of your history.
Best practice in case you don't want to use a Contract anymore is simply to deactivate it by changing the Contract Status field from the General tab.


Having said that, if you do want to delete a Contract (for example, if it is a test Contract that you do not want to affect your database), select the Contract in the list, and use Contracts > Delete option.

Important Note: Contracts that are linked to existing Charges cannot be deleted, to keep the data integrity.

In this case, to delete a Contract, you should first delete all linked Charges. To find which Charges are linked to this Contract:

  1. Open the Contract window.
  2. Click the Charges - All tab.
  3. All Charge records linking to this Contract will be displayed and you can delete them one by one.

Only after deleting all the Charges that were created with this Contract, the system will let you delete the Contract.

Batch Complete Contracts

The Batch Complete Contracts tool completes a group of selected Contracts. Use this option to complete Contracts which are expired either because their date has expired or because the block is empty. The Contracts should usually be completed only after renewing them (when managing recurring Contracts).

Related topics:


To run the Batch Complete Contracts utility, go to the Contracts window and from the menu bar choose Contracts > Batch Complete Contracts.

The following window opens:

Batch complete contracts.gif

In this window, you can filter the Contracts list either by End Date or an empty block, select the Contracts you wish to complete and then confirm to perform the action.

See more details in the steps process below.

  • Show Contracts of Type - You must first choose the Contract type you wish to update. The filtering criteria changes according to the Contract type.
  • Filter completed Contracts by -
    • End Date – Contracts with an End Date smaller or equal to the date you choose.
    • Block Empty – Available for block Contracts: Block of Time, Block of Money and Block of Tickets.
    • Block is Empty and by End Date – Also available for block Contracts only.
  • Hide Contracts that were not renewed yet – Select this option if you want to Complete only Contracts that have already been renewed.
    Note: If a Contract is completed, and there are no new contracts valid for this Account, the system will automatically default to the System Global Contract without alerting you that the Account has no current valid Contracts. Leaving such Contracts open until you take care of the renewal means you will be alerted when using such an expired Contract.
  • Click Refresh or hit Enter to see the results in the Contracts list.
  • Choose the Contracts you actually want to complete from the filtered list. You can use the Select All and Clear All buttons for quick selection.
  • Click OK to perform the action and complete all the chosen Contracts. This action will update the Status to Completed for all the chosen Contracts.

Once done, all the Contracts in the list will be updated and their status will be set as 'Completed'.


Labels

Contracts can have default Labels defined so that all Tickets created under a specific Contract will have the default labels applied automatically. See full details on default Labels here.


See Also