Employees
Introduction
Employees in RangerMSP are unique Account records that use slightly different data which is specific for an Employee Account. You can view Employees as part of the Accounts list or under the Employees window which shows a list of employees only.
Contents
Create New Employee
- Open the Employees window and click on the New icon on the toolbar. The New Employee window will open.
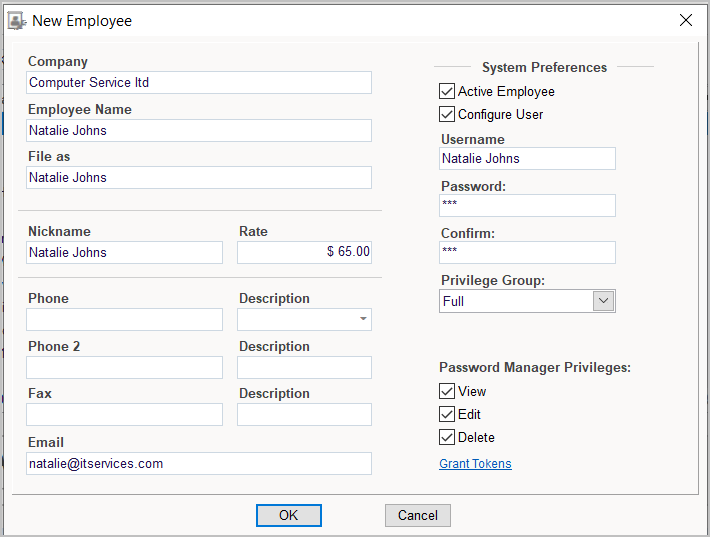
- You can enter some of the details in the this window, such as name, phone numbers, and more (see more details below).
- Click OK.
- The employee window will open. The Employee tab will be selected, and you can now setup some more parameters:
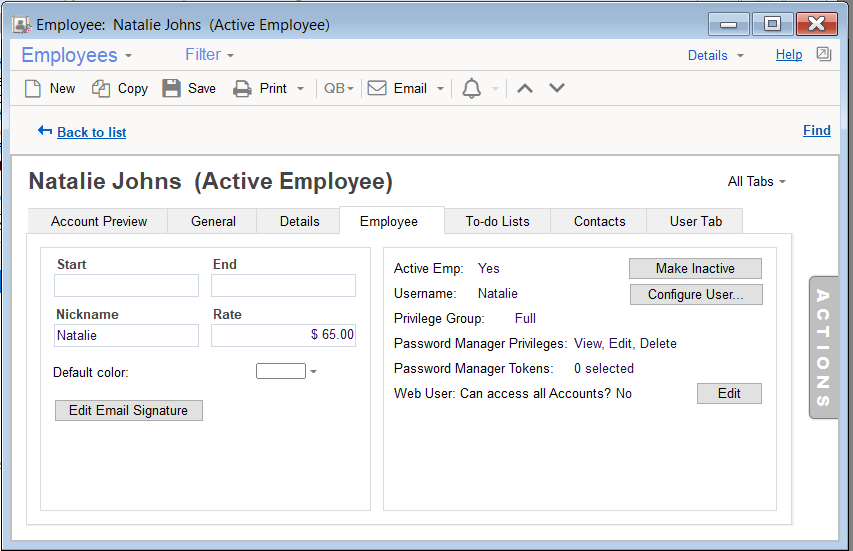
- Set the employee's Hourly Labor Rate. This rate will be used when this employee adds charges to the system.
- By using the Default Color for New Appointments option, you can set a default color to be used for all Appointments created by or assigned to this employee. After entering this setting, all Appointments created for this employee automatically appear in this color on the Calendar or the Dispatcher window. You can also choose to override this setting when actually creating the Appointment for the employee.
- Each employee user can define their own Email Signature to be used when sending an email from within the application. Click Edit Email signature to configure the signature. You can read more about editing the signature and using it in Email Templates in the Email Signature section.
- Note the employee is currently Active; you can change the status to Inactive by clicking the Make Inactive button. Read more about this in the Make Active/Inactive section.
- To allow the employee to log in to RangerMSP, click the Configure User button and set the employee’s password.
- Select the desired privileges group. You can read more about the employee privileges in the Employee Privileges Group section.
- Click Configure Web User to add credentials for a Web user to be used in the RangerMSP Web Interface.
- If this is a restricted Employee (e.g. a Subcontractor), you can restrict this employee to only specific Accounts. See more details in Limiting Account Access.
- Save the new details (click the Save button on the tool bar)


Employee Hourly Labor Rates
Each employee can be assigned an hourly rate for calculating the price for time based Labor Charges.
Before charging customers for labor performed by employees, the hourly rate of each employee should be set in accordance with their skills and role. This is set in the New Employee window or on the Employee tab when viewing employee details.
Once you have set a rate for each employee, it is automatically used to calculate charges every time a labor charge is entered, or charges are calculated for Labor Items with set prices based on the employee rate.
Make Active/Inactive
You can set an employee as Active or Inactive by clicking the Make Active/Make Inactive button in the Employee tab when the employee's details are displayed.
Inactive employees are usually employees that have stopped working. Therefore, such employees no longer need to be managed in the system (i.e. they cannot be assigned to Tickets, cannot be used for labor charges, cannot be dispatched for on-site visits for open Tickets, etc.).
Setting the employee to Inactive will release one active employee license for use by another employee.
You can tell whether an employee is active by visiting their Employee tab or by viewing it in the relevant column when displaying a list of all employees.
Employee Privileges Group
When creating users in RangerMSP, you can assign predefined privilege groups (SysAdmin, Full, Partial, Limited or Subcontractos) or you can assign a privilege group you've created yourself. See complete information about Privileges Groups in Employee Privileges.
See also the Privileges FAQ for more tips about using privileges in RangerMSP.
Deleting Employees
In order to keep data integrity in the database Employees cannot be deleted, because they can have linked data history already created in the system.
If you do not want to use an Employee anymore, a System Administrator can deactivate the employee from the Employee Tab > Make Inactive option. This way this Employee will no longer use an Active Employee license, however, you will be able to find old records linked to it, like Charges, Tickets, etc.
If this is a test employee which was created only for testing (e.g. while in trial), you may consider renaming the Employee and start using it for a real employee. For example, if a new employee joins the team you can rename it to reflect this employee instead of creating a new employee record. This is not recommended on a regular basis but it's possible.
Make sure to delete all old history linked to this test employee (e.g. tickets, charges, etc.) prior to making this step, to avoid having old test history linked to the real employee.