Accounts
Contents
- 1 Creating Accounts
- 2 Importing Accounts
- 3 Account Popup
- 4 Accounts Custom Pricing
- 5 Default SLA for Accounts
- 6 Alerts To Customers
- 7 Creating Activity Template Entries for Accounts
- 8 Account Merge
- 9 Secondary Contact Merge
- 10 Batch Update Account Tax Settings
- 11 Changing Your Own Business Address
- 12 Labels
- 13 Account Structured Note
- 14 Set Contacts as Default Email Recipients
- 15 See Also
Creating Accounts
Accounts in RangerMSP help you manage all of your contact information. You can create Accounts for your customers, vendors, employees and more. To create Accounts you can either import the Accounts (see below) or create them manually.
To create an Account manually:
- From the Accounts Window, click the New icon .
- Fill in the Account details.
- Choose the Account Manager, which is the employee who is in charge of this Account. The Account Manager can choose to receive email alerts on any new activity relevant to this Account (e.g. new Tickets, new Appointments, etc.) when using RangerMSP Alerts Server.
- Click OK to save.
Importing Accounts
Accounts can be imported into RangerMSP from various data sources:
- Imported from Excel® files, CSV files, Outlook® contacts, QuickBooks® and others. See more details in Import and Export.
- Imported (or synchronized) from Outlook®. See more details in RangerMSP-Outlook Sync.
- When RangerMSP-QuickBooks Link is in use, Accounts can be synchronized between RangerMSP and QuickBooks. See more details in RangerMSP-QuickBooks Link.
Account Popup
Each Account contains a 'Popup' field in the Account's Details tab. The Account 'Popup' field lets you define a popup message, which will be displayed when attempting to use this Account. This feature is helpful if you want to be reminded about money issues or any other matter with a customer whenever viewing their details or choosing the Account.
The Popup message is displayed whenever manually selecting the Account in any window, such as when selecting the Account for a Charge, Ticket, Contract, etc. It will also be displayed when using the QuickBooks Invoice Creation Wizard and the related Account has a Popup defined.
How to define a Popup Message for an Account:
To define a Popup Message for an Account:
- Go to the Account window > Details tab.
- Mark the checkbox next to the Popup label.
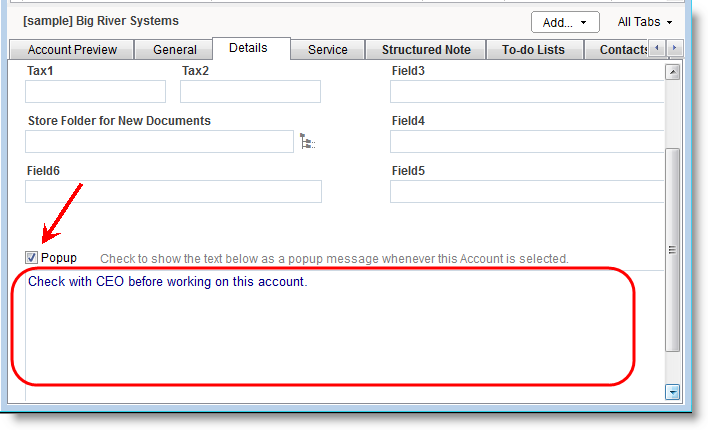
- Click where is says "Click here to Add Popup Message".
- In the window that opens enter your message and click OK to save your changes.

The popup message lets you enter as much text as you need, include space lines and format the textual message for your needs.
Note: Make sure the feature is activated via Tools > Options > Accounts > "Show me account popup alerts when I manually select accounts or scroll the Accounts list and details".
Accounts Custom Pricing
Custom Pricing lets you set unique prices for different Accounts or Contracts. Once you define custom prices for an Account or Contract, these prices will be used automatically for every charge logged for Accounts or Contracts.
You can also manually adjust the prices while creating a Charge. This sections explain how to define Custom Pricing.
When should I use Custom Pricing?
By default, the standard employee hourly rates and item prices will be used automatically.
You should use custom pricing only when you want to use a different set of prices or rates for a specific Account or Contract. For example, custom pricing may be used to set a global 10% discount for a customer, or to set unique hourly rates for employees for a specific Account. To do so, set a Custom Price for the Account or Contract and define the adjustments. Once set, the system will automatically use the custom prices or rates instead of the standard ones when Charges are logged under this Account or Contract. When defining Custom Pricing, you can choose between a global custom price level or a per-item price.
Account level vs. Contract level Custom Pricing
Custom Pricing can be defined at the Account level or Contract level.
When custom prices are defined for the Contract, the Account's custom pricing settings are ignored, and the Contract's price settings are used. You can read more about this under Contract Level vs. Account Level Custom Pricing.
Global Settings vs. Exception Rules
The global price/rate settings determine the price/rate adjustment for all employees, or for Items for a specific Account or Contract. For example, a specific Account may enjoy a 10% discount off all products, or a reduced hourly rate of $100/hour for all employee time, etc.
In addition to global settings, you can define rule exceptions for specific employees or Items to override the global settings and be used when the system needs to determine the price/rate for that specific item/employee. For example, Natalie's hourly rate may be set as $80, and this will override Natalie's standard hourly rate, and the global employee hourly rate.
Standard prices
The custom price settings replace the standard item/employee rate.
Standard employee rate - the employee's rate as defined in the employee tab
Standard item price - the Item's price as defined in the Item record.
See more details in Custom Pricing.
Default SLA for Accounts
The SLA feature in RangerMSP helps you provide services to your customers within the time frame agreed with them. It provides an easy way to define the time-to-deliver of your Service-Level Agreements (SLA) with the customer and apply them to Tickets Due Date automatically.
A default SLA can be set to Accounts or Contracts, thus automatically applied to Tickets created under the Account or Contract.
To assign a default SLA to an Account:
- Open the Account Service tab.
- Select the SLA you want to use in the SLA field.
- Click Save to save your changes.
Note:
Contract settings override Account settings. So, if both the Account and the Contract have a default SLA defined, Tickets created under this Contract will be assigned with Contract's SLA. Account SLA will be ignored in this case.
See Default SLA for Accounts and Contracts in the main SLA user guide for more details.
Alerts To Customers
Using RangerMSP Alerts Server, users have the option to send email alerts to customers.
The Alerts to Customers feature sends automatic email alerts to customers when:
- A new ticket is created
- A ticket is closed
See more details in Alerts to Customers.
Disable Alerts To Selected Accounts
In some cases, users may want to disable the automatic email alerts for specific customers.
To control the Alerts to Customers settings per Account, see Disable Alerts To Selected Accounts.
Creating Activity Template Entries for Accounts
An Activity Template in the RangerMSP system is a file that contains a group of pre-programmed activities—such as Tasks, Appointments, or Tickets—that can be applied to different parts of the system, including Accounts, Assets, Contracts, and Sales Opportunities. Users can create Activity Templates for projects that their company commonly performs and which require a similar set of tasks, regardless of the client. Using the right template can get you and your team started on a project more quickly and efficiently, increasing productivity and streamlining your work.
See more details in Activity Templates.
Account Merge
The Account Merge utility helps you merge two Accounts into one. The merge operation copies the data from one Account to the other (the Master Account) and deletes the redundant Account.
All data linked to the redundant Account will be moved to the Master Account. This includes Charges, Contracts, Tickets, History Notes, Contacts, Sales Opportunities, Quotes, Appointments, Tasks, Assets, Documents, Messages and Web Users.
The redundant Account details, such as name, phone number and main contact name, are not copied to the Master Account and only the Master Account details are kept. However, the redundant Account details are not lost and they are logged as an Audit History Note under the Master Account's History tab.
The Account Merge action performs a massive database update transaction that cannot be undone, and therefore should be performed carefully.
Before performing the Account Merge:
- Verify that no one on your network is running RangerMSP.
- Stop RangerMSP services on your server if installed (CRM Web Interface, CRM Server and CRM RMM Server services).
- Stop any third-party services or programs accessing RangerMSP database.
- Backup your entire RangerMSP database (do not proceed without a backup!).
To activate the Account Merge option, first close all internal Windows within RangerMSP. Then go to Tools > Data Tools > Account Merge.
The following window opens:

In this window, choose the redundant and master Accounts for the merge operation. Note that the redundant Account will be deleted at the end of this operation.
Use the following fields:
- Merge From - Redundant Account - To be merged and then deleted.
Linked Data will be moved to the Master Account and the Account details will be added to the History tab of the Master Account. The Account will be deleted. - Merge To - Master Account - Receives all data from the redundant Account.
Notes:
- All Documents are transferred to the Master Account; however, the document files remain in their original folder.
- The Account Merge includes massive database transaction. In case of an error you may be required to restore the database from a backup. In such cases an appropriate message will be displayed. Make sure to backup your database before performing the Account Merge.
See Also:
Secondary Contact Merge
The Secondary Contact utility helps you merge two Contacts of the same Account into one. All data linked to the selected Contact will be moved to the selected Master Contact. This includes Charges, Contracts, Tickets, History Notes, Quotes, Appointments, Tasks, Sales Opportunities, Assets, Documents and Messages.
The Secondary Contact Merge action performs a massive database update transaction that cannot be undone, and therefore should be performed carefully.
Before performing the Secondary Contact Merge:
- Verify that no one on your network is running RangerMSP.
- Stop RangerMSP services on your server if installed (CRM Web Interface, CRM Server and CRM RMM Server services).
- Stop any third-party services or programs accessing RangerMSP database.
- Backup your entire RangerMSP database (do not proceed without a backup!).
To activate the Secondary Contact Merge option, first close all internal Windows within RangerMSP. Then go to Tools > Data Tools > Secondary Contact Merge.
The following window opens:

In this window, choose the following fields:
- Account - the Account whose selected Contacts will be merged
- Merge From - Redundant Contact - To be merged and then deleted.
Linked Data will be moved to the Master Contact and the Contact details will be added to the History tab of the Account. - Merge To - Master Contact - Receives all data from the redundant Contact.
Note that the redundant Contact will be deleted at the end of this operation.
Batch Update Account Tax Settings
The Batch Update Tax Settings utility allows updating the Tax field settings for many Accounts at once.
The Batch Update Tax Settings utility lets you set the Tax fields settings for a list of Accounts, either by setting completely new tax settings, removing a tax code or replacing a certain tax code with another.
The new tax settings will be applied to all Accounts in the Account window. Note that this action is irreversible so we recommend that you make sure the Account list is filtered correctly before performing the action. It is also recommended to backup your database before proceeding.
To activate the utility:
- In the Accounts window, filter the Account list to show only the Accounts you want to update.
- Then and go to Accounts > Tools > Batch Update Tax Settings.
The following window opens:

In this window you can choose between the following options:
- Set new tax settings and overwrite any existing settings.
Choosing this option will allow you to choose two Tax codes to be applied to all Accounts in the list. This will overwrite any existing Tax settings for these Accounts. - Replace a selected tax with another one.
Choosing this option will allow you to choose a specific Tax code to be removed, and choose a new Tax code to replace it. This will replace the tax code settings for all Accounts in the list which have the chosen tax code defined for them. - Remove a selected tax.
Choosing this option will allow you to choose a tax code to be removed from all Accounts which have this code defined for them.
Remember to backup your database before performing this action.
>> Click to learn more about backing up your database.
Changing Your Own Business Address
Your own business' Account is created automatically when running the application for the first time. Entering the Address details will automatically add the address to the report headers as well.
Changing the address should be done in two places:
- Your main business Account's address in the General/Address tab.
- To change the Address displayed in reports, go to Tools > Options > Reports > Edit Header. Make your changes and click OK. You may need to restart the client in order for the new address to appear in the reports.
Labels
Accounts can have default Labels defined so that all Tickets created under a specific Account will have the default labels applied automatically. See full details on default Labels here.
Account Structured Note
A Structured Note is basically a way to easily store custom data. You can create a Structured Note containing any data you want in whatever data entry sections you need, and you can save it as a template to reuse again and again. You can even have multiple Structured Note sections applied to each Account.
See more details and usage instructions in Account Structured Note.
Set Contacts as Default Email Recipients
You can set an Email address for an Account or Contact as the default recipient for all new Tickets created under the Account. You can also choose to use either 'Email' or 'Email 2' from the Account or 'Email' from the Contact for this default recipient.
To configure this for an Account:
- Go to the General/Address tab for the Account
- Check the box next to the Email or Email 2 fields.
- For a Secondary Contact, edit the Contact and check the box next to Email field.
