MSP Integration Setup
RangerMSP integrates with several MSP systems, via different platforms.
Supported MSP systems (by alphabetical order):
- GFI MAX Link - Using 'CRM RMM Server' service for Ticket integration.
- Kaseya™ - Using RangerMSP Email Connector's Automated Emails.
- Level Platforms™ Managed Workplace™ - Using RangerMSP Email Connector's Automated Emails.
- N-able™ N-central™ - Using RangerMSP Email Connector's Automated Emails.
- Zenith/Continuum Link - Using 'CRM RMM Server' service for two-ways Ticket integration.
Contents
Kaseya™
The RangerMSP integration with Kaseya includes Ticket creation out of incoming email alerts from Kaseya. This is done using RangerMSP Email Connector's Automated Emails which allows analyzing the incoming alert's subject to find the customer in the RangerMSP database. This is a one-way path Kaseya alert email is interpreted and creates a RangerMSP ticket.
Kaseya email alerts are received from a single "From" email address (e.g. alert@mykaseyadomain.com), and should be configured to contain the customer ID in the email's subject.
You should also let the system know how to detect the Account name in the email subject. Make sure to use the exact same name as it appears in the Account's File As field in RangerMSP.
Kaseya Settings for working with RangerMSP
- Setup Kaseya alerts to send the email to your RangerMSP support Public Email Address so it will arrive at the RangerMSP Email Connector for processing.
- In Kaseya go to each of the areas listed below, select Email Format, and add the following to the subject of each email template:
“Site:<gr>.”
Where:
- <gr> is the Kaseya variable for the Group ID.
- You can change “.” To “:” if you wish to use Kaseya sub groups to link to the RangerMSP account ie “site1.location5”
Perform the Email Format update in the following areas:
- Monitor – Alerts (for each alert type in the pull down)
- Monitor – Assign Monitoring
- Patch Mgmt – Patch Alert
- Backup – Backup Alert
- Security – Security Alarms

RangerMSP Email Connector Settings for working with Kaseya™
In RangerMSP Email Connector settings, you need to set the system to identify Kaseya automated emails by the Sender/From email address you've set for your Kaseya system as well as by looking for a word in the email subject.
To set this up use the serverconfig program to configure RangerMSP's Email Connector:
- Run ServerConfig from <server>\RangerMSP\Server
- Go the Email Connector tab
- Scroll down to Email Processing Settings and select the Automated Emails tab.
- Set System State to On and click Automated Email Settings.
- Add a rule at the top in “Rules for detecting and identifying incoming emails as automated” and enter the email address your Kaseya uses for the From field of alerts and hit OK.

- Skip down to Account Record Detection Rules and create a rule:
Account Name (file As … field )
Located: between
The Word/Phrase: “Site:”
And “.” (replace “.” With “:” if using subgroups)
- Skip down to Account Record Detection Rules and create a rule:

- Modify the File As Field in the RangerMSP Account to contain the primary Kaseya group for the client:
- In RangerMSP go to the Account's General tab.
- Update the File As field to contain the Kaseya group ID.
Note that “.” Is used to terminate the subject search, subgroups in the <gr> will be ignored and should not be included in the File As field (.ie if <gr> = site1.location5 the rule above will return a File As value of site1). Case is significant!
Level Platforms™ Managed Workplace™
The integration described here includes Ticket creation out of incoming email alerts from the MSP system. This is done using the RangerMSP Email Connector's Automated Emails which allow analyzing the incoming alert's subject to find the customer in the RangerMSP database.
Level Plaforms™ email alerts are received from a single "From" email address (e.g. alert@mylevelplatformsdomain.com), and contain the customer name in the email's subject.
Level Platforms™ Managed Workplace™ settings
There are no special settings required in Level Plaforms™ side.
RangerMSP Email Connector Settings for working with Level Platforms™
In RangerMSP Email Connector settings, set the system to identify Level Platforms automated emails by the Sender/From email address you've set for your Level Platforms system as well as by looking for a word in the email subject.
You should also let the system know how to detect the Account name in the email subject. Make sure to use the exact same name as it appears in the Account's File As field in RangerMSP.
| Rules category | Rules |
|---|---|
| Automated Emails Detection Rules | 1.Sender Email Address = alert@levelplatforms.com 2.Word/phrase = Alert for Site. |
| Skip Rules | Ignore Alerts which contain Alert Self Healed in the subject |
| Automated Emails Detection Rules | 1.Take the Account name from the email's subject: between "Alert for Site" and "," |

In order to work with Level Plaforms™ alerts, we recommend defining the following rules:
- In the Automated Emails Detection Rules, add a new rule and set the Sender Email Address as alert@mylevelplatformsdomain.com, and the word/phrase to “Alert for Site”
- In the Skip Rules section, add a new rule to ignore alerts which contain "Alert Self Healed" (do not open a new Ticket for these email alerts)
- In the Account Record Detection Rules section, add a rule to take the Account name from the email's subject: between “Alert for Site” and “,”. The system will search for the Account in RangerMSP and open a Ticket from this alert for this Account.
N-able™ N-central™
The integration described here includes Ticket creation out of incoming email alerts from the MSP system. This is done using the RangerMSP Email Connector's Automated Emails which allow analyzing the incoming alert's subject to find the customer in the RangerMSP database.
|
To setup the Ticket creation process via RangerMSP Email Connector, you should follow customization steps both in RangerMSP and N-able™.
Follow the setup instructions according to the N-central™ version you use:
Using N-able™ N-central™ version 6 or later
In order for the RangerMSP Email Connector to identify the RangerMSP Account for the incoming N-central Email notification, you should include the External Customer ID field in the email notification Subject. The External Customer ID in N-central will be used to store the parallel RangerMSP Account' RecordID per customer.
To do this, customize the N-central Email template for notifications to include the External Customer ID in the email subject automatically.
See more details in Using N-central™ version 6 or later
Using N-able™ N-central™ versions older than 6
When using older versions of N-central, you may consider two alternative options for setting up the email alerts in order for the RangerMSP Email Connector to analyze them correctly.
Option 1
For the RangerMSP Email Connector to identify the customer for the incoming email alert, the customer's ID must be in the email subject.
For each customer, hard-code the RangerMSP Account's Record ID in the email template subject so the Email Connector will be able to detect the Account when processing the email.
Option 2
This option allows setting the customer's email address as the "From" email address of the incoming alert and use it as the customer's identifier for the RangerMSP Email Connector.
Set the alert's "From" email address per customer to contain the customer's email address (as it has been entered in RangerMSP). You can then teach the RangerMSP Email Connector to detect these alerts and open Tickets for the Account in RangerMSP based on the "From" email address.
This option requires your N-able™ server to allow relay in order for it to be able to send emails which will "originate" from the customer's email address. If your servers do not support relay, you should use the first option.
See more details under Using N-central™ versions older than 6
Using N-central™ version 6 or later
In order for the RangerMSP Email Connector to identify the RangerMSP Account for the incoming N-central Email alert, you should include the External Customer ID field in the email alert subject. The External Customer ID in N-central will be used to store the parallel RangerMSP Account RecordID per customer.
This requires setting up RangerMSP and N-able:
N-central™ settings
To set up N-central, you should modify the default N-central Email template for notifications to include the External Customer ID in the email subject automatically.
When using templates, it is possible to add the {{ExternalCustomerID}} variable to the email subject templates. This will propagate the customer ID to the email alert's subject.
Here are the recommended steps for non-hosted N-able users:
- Login to the Admin console of your N-central server (i.e. https://192.168.1.1/admin)
- Define the Notification settings. In order for the notifications to be automatically processed by RangerMSP Email connector, make the following adjustments:
- Sender Email Address - set as the "N-able" email (e.g. n-central@n-able.com)
- Subject - create a template which will include:
- A word/phrase which you can associate with alerts (e.g. "Alert:")
- A word/phrase which you can associate with the External Customer ID (e.g. "RECID:")
For example:
Alert {{CustomerName}} RECID:{{ExternalCustomerID}}, Device: {{DeviceName}}... etc.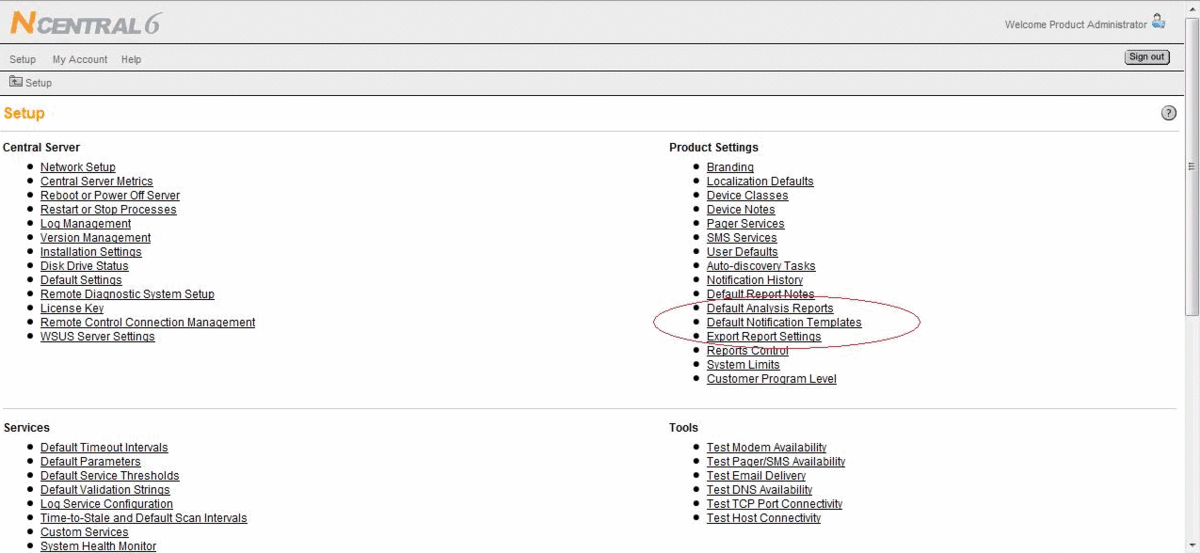
- Under the Product Settings section, click on Default Notification Templates and edit the templates.
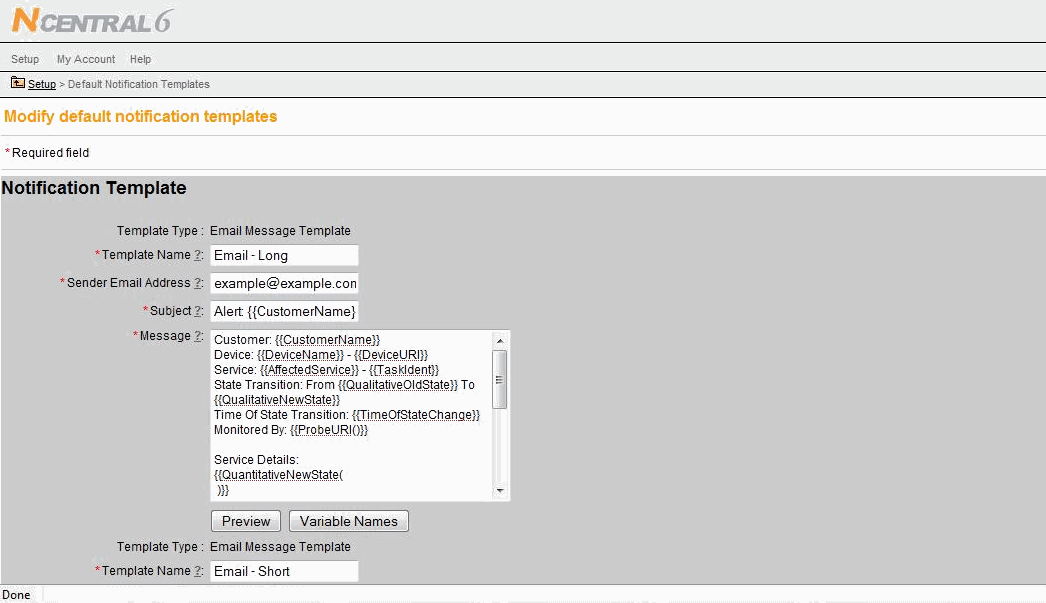
- Add the {{ExternalCustomerID}} to the email Subject in both the "Email – Long" and "Email – Short" notification templates
- Click Save and Propagate
- Make sure to define the RangerMSP RecID in each Customer record in N-central. The Account's Rec ID from RangerMSP. The RecID can be found on the Account's Notes tab, and can be taken by right-clicking the RecID label, and copying the Rec ID. Then paste it somewhere in the email subject template, with a phrase which will identify it, like "RECID: CRDIF9FPDJ4IHUMU2VWI."


RangerMSP Email Connector Settings for working with N-able™ version 6 or later
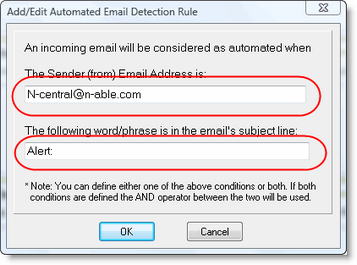
In the RangerMSP Email Connector settings, set the system to identify automated emails according to the sender's email address and the word/phrase in the subject. Then, let the system know how to identify the Account Record ID.
| Rules category | Rules |
|---|---|
| Automated Emails Detection Rules | 1.Sender Email Address = N-central@n-able.com 2.Word/phrase = The phrase you setup in the Alert subject template in N-central™. |
| Account Record Detection Rules | 1. Search for: Record ID 2. between RECID: and , (same as you defined in the n-able template). |
Using N-central™ versions older than 6
When using older versions of N-central, you may consider two alternative options for setting up the email alerts in order for the RangerMSP Email Connector to analyze them correctly.
Option 1
In order for the RangerMSP Email Connector to identify the customer for the incoming email alert, this requires including the customer's ID in the email subject.
For each customer your should hard-code the RangerMSP Account's Record Id in the email template subject, so the email connector will be able to detect the Account when processing the email.
See more details under Use Customer's ID.
Option 2
This option allows setting the customer's email address as the "from" email address of the incoming alert, and use it as the customer's identifier for the RangerMSP Email Connector.
In this option you should set the alert's "From" email address per customer to contain the customer's email address (as it has been entered in RangerMSP). You can then teach the RangerMSP Email Connector to detect these alerts and open Tickets for the Account in RangerMSP based on the "From" email address.
This option is less recommended, and it requires your N-able™ server to allow relay in order for it to be able to send emails which will "originate" from the customer's email address. If your servers don't support this, you should use the first option.
See more details under Use Customer's Email Address.
Use Customer's ID
N-central™ settings
Customize the customer email notification in N-able™ to use the customer's email address in the "From" email address and set an identifying word/phrase in the subject. This is so that the system will know this is an alert, and not a "regular" email from the customer:
- Go to the Main company settings
- Open the Customers window (Setup > Customers)
- Click each customer, and go to the Notification tab.
- Here you define the Notification settings for alerts. In order for the notifications to be automatically processed by RangerMSP Email connector, make the following adjustments:
- Sender Email Address - set as the "N-able" email (e.g. n-central@n-able.com)
- Subject - create a template which will include:
- A word/phrase which you can associate with alerts (e.g. "Alert:")
- The Account's Rec ID from RangerMSP. The RecID can be found on the Account's Notes tab, and can be taken by right-clicking the RecID label, and copying the Rec ID. Then paste it somewhere in the email subject template, with a phrase which will identify it, like "RECID: CRDIF9FPDJ4IHUMU2VWI."

RangerMSP Email Connector Settings for working with N-able™
In the RangerMSP Email Connector settings, set the system to identify automated emails according to the sender's email address and the word/phrase in the subject. Then, let the system know how to identify the Account Record ID.
| Rules category | Rules |
|---|---|
| Automated Emails Detection Rules | 1.Sender Email Address = N-central@n-able.com 2.Word/phrase = The phrase you setup in the Alert subject template in N-central™. |
| Account Record Detection Rules | 1.Search for: Record ID 2. between RECID: and , (same as you defined in the n-able template). |
Go to ServerConfig > Email Connector > Automated Emails:
- In the Automated Email Detection Rules, add a new rule and set the Sender email address as empty, and the word/phrase as the word/phrase you set in the Alert subject template in N-central™.
- Add a Account Record Detection Rule by the Record ID, between "RECID" and "," (same as you defined in the n-able template above).


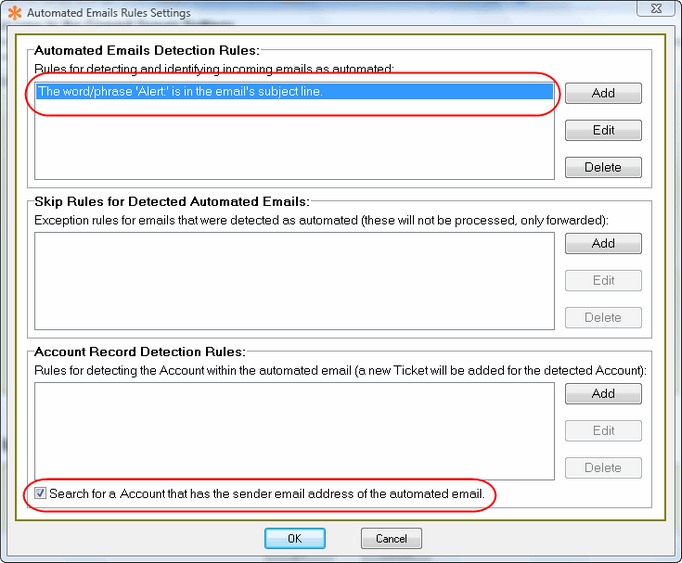
After you define all the rules, the rules window should look like this:

Use Customer's Email Address
n this option, you should set N-able™ email alerts to use the customer's email address as the "From" email address, and tell the system that this is the Account identification.
N-central™ settings Customize the customer email notification in N-able™ to use the customer's email address in the "From" email address and set an identifying word/phrase in the subject, so the system will know this is an alert, and not a "regular" email from this customer:
- Go to the Main company settings
- Open the Customers window (Setup > Customers)
- Click each customer, and go to the Notification tab.
- Define the Notification settings for alerts. In order for the notifications to be automatically processed by RangerMSP Email connector, make the following adjustments:
- Sender Email Address - set this to be the Customer's email address (rather than generic "n-able email")
- Subject - create a template which will include a word/phrase which you can associate with alerts (e.g. "Alert:")

RangerMSP Email Connector Settings for Working with N-able™
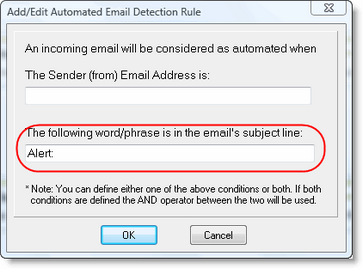
In the RangerMSP Email Connector settings, set the system to accept automated emails with the customer's email address in the "From" email address, and tell the system how to detect the automated email subject.
| Rules category | Rules |
|---|---|
| Automated Emails Detection Rules | 1.Sender Email Address = N/A 2.Word/phrase = The phrase you setup in the Alert subject template in N-central™. |
| Account Record Detection Rules | Check the Search for a RangerMSP Account that has the sender email address of the automated emails flag. |
Go to ServerConfig > Email Connector > Automated Emails:
- In the Automated Email Detection Rules, add a new rule and set the Sender email address as empty, and the word/phrase as the word/phrase you set in the Alert subject template in N-central™.
- Select "Search for a RangerMSP Account that has the sender email address of the automated emails".


Zenith/Continuum Link
The RangerMSP-Continuum Integration automatically creates tickets in RangerMSP from alerts and service tickets generated by the Continuum system, or from tickets created manually by the Continuum NOC. Users can then close the Ticket in RangerMSP, and it will be closed in Continuum. The integration works via 'CRM RMM Server' service which runs on your RangerMSP server.
The RangerMSP integration with Continuum includes:
- Two-ways Ticket Integration.
- The ability to link Account to Site in Continuum or create Account from Site.
- The ability to link Asset to Device in Continuum or create Asset from Device.
>> Click for complete Continuum Link setup guide.
GFI MAX Link
RangerMSP-GFI MAX Link module provides an integration with the remote monitoring and management (RMM) solution designed for managed services providers (MSP) offered by GFI.
The RangerMSP-GFI MAX Link automatically opens Tickets in RangerMSP for failed checks from GFI MAX. Any updates to the ticket (i.e. check failed again or check succeeded) are automatically logged as Notes in the Ticket History in RangerMSP. When a failed check is resolved in GFI MAX (i.e. it does not fail anymore), it automatically updates the Ticket with a relevant note, and the Ticket in RangerMSP can be closed.
Each Ticket update that is a result of a check status change in GFI MAX pushes the Ticket into the Tickets Inbox, so technicians can easily see the updates. This integration helps you make sure you do not miss any events and always provide your customers with the best service.
The RangerMSP integration with GFI MAX includes:
- Ticket creation from GFI MAX failed checks.
- Link Accounts to Sites in GFI MAX or create Account from Site.
- Link Assets to Products in GFI MAX or create Asset from Product.
>> Click for complete GFI MAX Link setup guide.