Ticket Management
Scope
This document covers new concepts and features regarding Ticket Management introduced with the release of RangerMSP version 5.3. The main features include New Ticket Navigation, New Ticket Inbox View and enhanced Email Correspondence Management.
Other Ticket related references:
- Ticket Workflow - This user guide covers the basic Ticket life cycle, from creating a new Ticket until it is completed and billed to the customer.
Contents
- 1 Scope
- 2 Introduction
- 3 Ticket Information
- 4 Ticket Navigation Pane
- 5 Ticket History
- 6 Ticket Recipients
- 7 Email Correspondence Settings
- 8 Advanced Ticket Options
- 9 Ticket Privileges
- 10 See Also
Introduction
Tickets in RangerMSP provide a comprehensive ticketing system to help you record all the information for a call including status, priority, nature of the issue, and time-to-resolution.
Each ticket can support multiple activities for ongoing projects and complex service tickets, as well as access contract/billing information to determine required charging information.
Tickets are the communication point with your customers. This means customers can access Ticket information via RangerMSP Web Interface, or communicate about a specific Ticket using email. All email communication can be logged in the Ticket. See more details in Email Correspondence.
Ticket Information
Each Ticket in RangerMSP holds information which is relevant for the service call. It keeps information such as the Ticket description, status, due date and more. This information is displayed in the Ticket's General tab and Details tab.
In addition to the general Ticket data, each Ticket can store related information to provide quick access to all data linked to this Ticket.
The Ticket data linked to the Ticket includes:
- Account – The Account which is linked to this Ticket.
- Asset – The Asset which is linked to this Ticket.
- Contract – The Service Contract under which the Ticket was created, and to which the Charges will be billed.
- Tasks – Pending Tasks for this Ticket (under the Pending tab).
- Appointments – Pending Appointments for this Ticket (under the Pending tab).
- Charges – Charges logged for this Ticket for work, expenses and parts.
- Messages – Internal RangerMSP messages between employees, linked to this Ticket.
- Email Correspondence – All email communication performed for this Ticket (see more details in Email Correspondence).
- Documents – Files linked to this Ticket.
- History – All of the activity performed for the Ticket – updates audit, done appointments and tasks, history notes, emails, documents, etc.
Each Tab shows relevant linked information, and most data can be accessed directly from the Ticket by right-clicking the relevant object or simply double-clicking it.
The main Ticket window displays Tickets by Status. To view all Tickets with a specific Status, simply click the relevant Status in the left pane.
There are also other views available, such as Inbox or Dispatcher (see more details in Inbox and Dispatcher). Using these views will show the relevant Tickets, regardless of their Status.
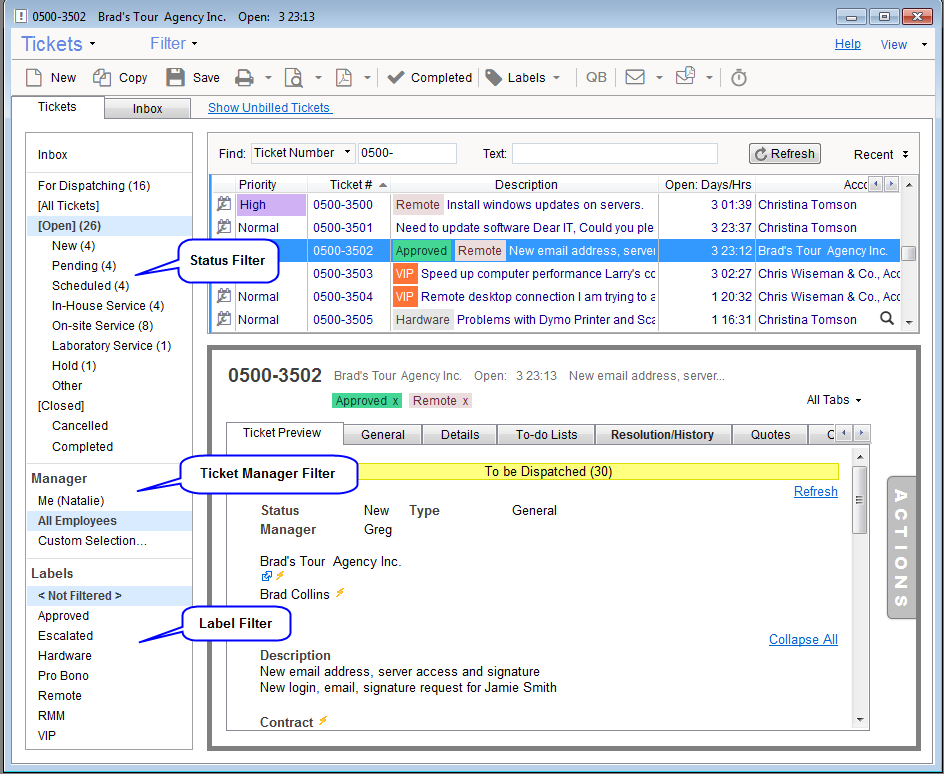
The Ticket Navigation Pane provides the following views:
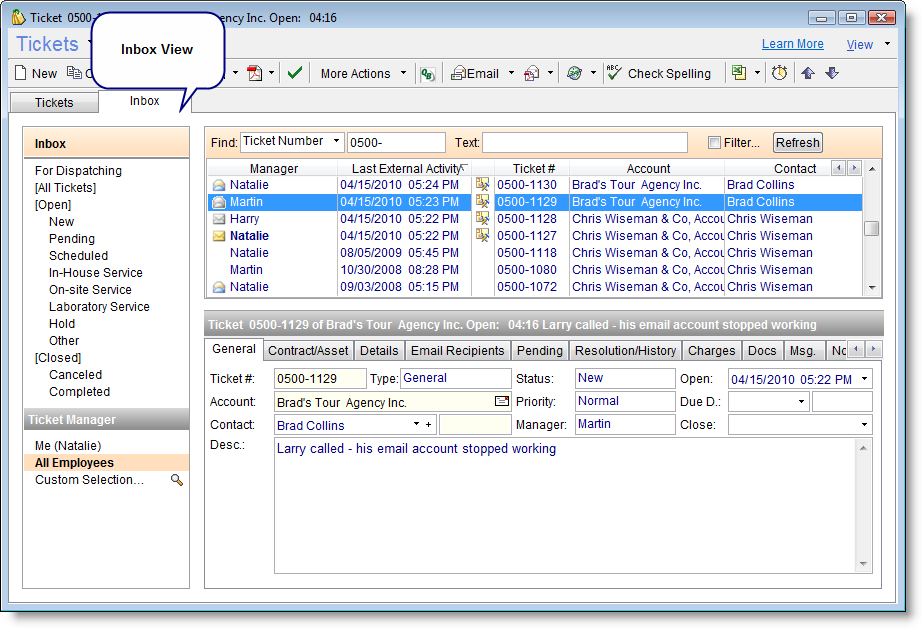
- Inbox - The Inbox view shows all tickets in your Inbox, meaning they have been updated by a customer. Customer updates can happen via the Customer Web Interface or when a new email arrives for this Ticket from a Customer or from an external application (via RangerMSP API). Tickets can also be added manually, using the Move To Inbox option when right-clicking a Ticket. See more details in Inbox. Note that the Inbox view has a tab of it's own in the Ticket Navigation pane, and all filters set in the Ticket Navigation pane apply to the Inbox only.
- For Dispatching - The Dispatching view shows all Tickets waiting to be dispatched to technicians. The same list is displayed when viewing the main Dispatcher window. See more details in Dispatching Tickets.
- All - This view shows all tickets, with all statuses, regardless of whether they are or closed.
- Open (by status) - The main Open view shows all open tickets, i.e. tickets that have a Status considered "open" (such as New, Scheduled, etc.). Clicking any of the statuses below it will show only tickets with this status.
- Closed (by status)- The main Closed view shows all closed tickets (i.e. Canceled or Completed). Clicking any of the statuses below it will show only tickets with this status.
Note that you can change a Ticket's status by dragging the Ticket from the list to any status in the Ticket tree view. This will automatically change the Ticket status and remove it from the current list. If the Ticket is in the Inbox, it will also automatically archive it and remove it from the Inbox.
When needed, the Navigation Pane can be hidden by pressing Alt+F1. Pressing Alt+F1 again will display the pane again.
Ticket Manager Filter
Users who are privileged to view other users' tickets have the option to filter tickets by the Employee managing these Tickets. The Employee managing a Ticket can be seen in Ticket window > General tab > Manager Field.
The Employee filter appears at the bottom of the tree. This filter shows tickets managed by the selected Employee. The Employee filter works on top of the status filter.
Employee Filter options are:
- Me - show only tickets managed by the current logged-in user.
- All - show all tickets.
- Choose specific employees
Label Filter
The Tickets list can be filtered by label, for example, to ALL Tickets which are of ‘VIP’ customers. The users can list all Tickets by a specific label by clicking the label in the sidebar. The users can also very easily Label a Ticket just by dragging the Ticket to the Label on the sidebar.
For Dispatching
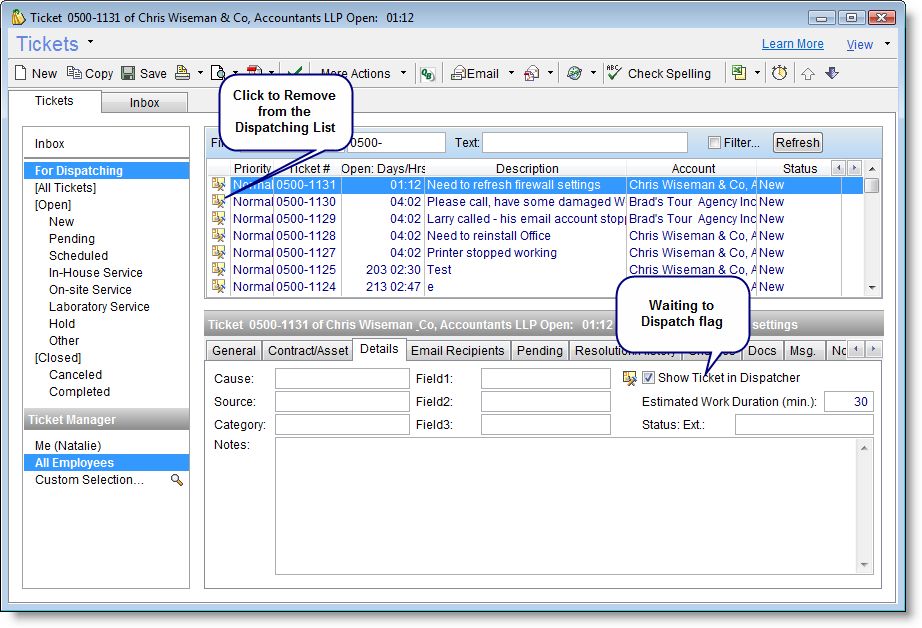
The Dispatcher view within the Ticket window displays the list of Tickets pending dispatch. Tickets can be marked for dispatching using the "Waiting for Dispatching" flag in the Ticket details. Tickets can be easily removed from the Dispatch board by clicking the "Dispatch" column on the left.
The Dispatcher view within the main Ticket Tree provides a quick glance at the Tickets pending dispatch. In order to actually dispatch the Ticket to technicians go to the Applications Navigation Pane > Dispatcher window. The main Dispatcher window lets you create appointments to this Ticket. See more details in Dispatching Tickets.
Inbox
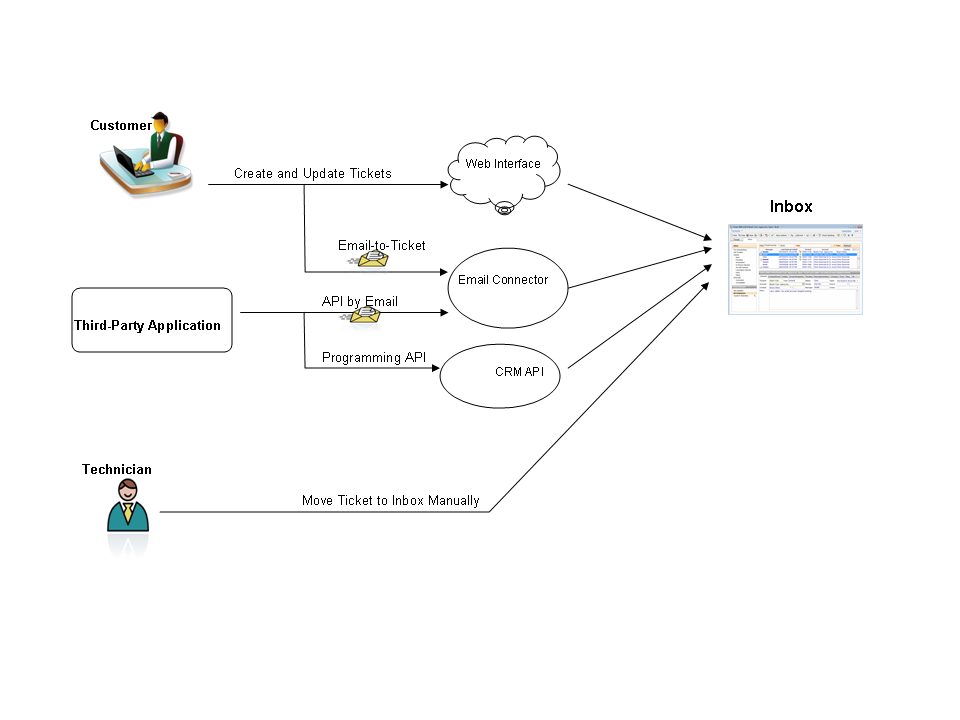
The Inbox view in the Ticket window shows all tickets which are in the Inbox. These tickets have been created or modified by a customer or by a third-party application. Tickets can also be moved to the Inbox manually when needed, to allow better tracking of those specific Tickets.
Ticket updates can be performed by:
- Customers via the Customer Web Interface.
- Customers sending emails via RangerMSP Email Connector.
- Third-party applications updating or creating Tickets using RangerMSP API. This can be done via RangerMSP Email Connector (API by Email) or directly via the database (using the Programming API). See more details in the RangerMSP API User Guide.
All updates which cause the ticket to appear in the Inbox are documented in the Ticket's History tab.
The Inbox is global, meaning all users see the same Inbox and any changes made by one user will affect all users. For example, if a user removes a Ticket from the Inbox, it will be removed for all users viewing the Inbox.
Note that the Ticket Navigation pane contains two separate tabs for the main Ticket navigation, and for Inbox. When viewing the Inbox, filters set in the Ticket Navigation pane apply only to the Inbox view, and the pane color changes to indicate that it is currently in the Inbox view.
Ticket Updates
Ticket updates that trigger the Ticket to appear in the Inbox include:
- New Tickets
- Web Interface: Customer adds new Tickets via the Web Interface.
- Email-to-Ticket: Customer sends emails that create new Tickets by RangerMSP Email Connector.
- RangerMSP API: Third-party program creates Ticket via the API
- Ticket Updates
- Web Interface: Customer updates Ticket details or adds history notes via RangerMSP Web Interface.
- RangerMSP API: Third-party program updates Ticket via the API
- Email-to-Ticket: Customer replies on emails concerning existing Tickets.
Read/Unread indications
To see which Ticket updates were already read/unread, two indications are used:
- Open/Closed envelope
- Bold indication (for the current logged-in user)
Both indications appear in all Ticket views, not only in the Inbox view. The indications appears for Tickets updated by an external party (i.e. customer, using the RangerMSP API). In addition the indications will be displayed for Tickets created manually by one employees and assigned to another employee. If a customer updates such a Ticket using the Customer Web Portal or via the email, or if a user explicitly marks a Ticket as Unread, then these indications will take place.
Envelope Indication
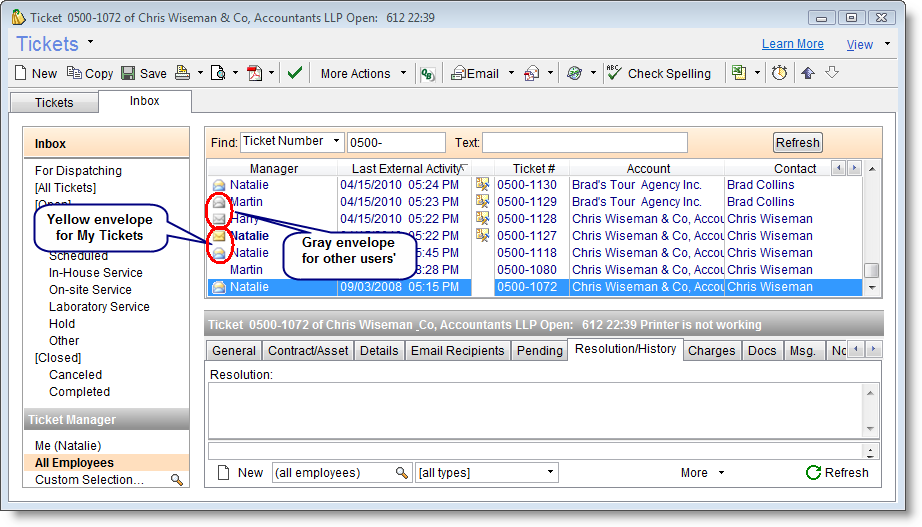
In addition to the bold indication (used for the currently logged in user), the Ticket List also shows a global envelope indication next to the Ticket Manager name. The envelope shows whether this customer update was viewed by the Ticket Manager. The envelope indication appears next to the Ticket Manager in the list and visible to anyone who is privileged to view the Tickets.
The envelope icon varies between a closed envelope (not read) and an open one (read). The system will display a slightly different icon for the currently logged-in user's Tickets (My Tickets), and for other users' Tickets. This way, each user can tell which Tickets have pending updates that were not viewed by the Ticket Manager yet, even if the Ticket is not assigned to them.
Bold Indication
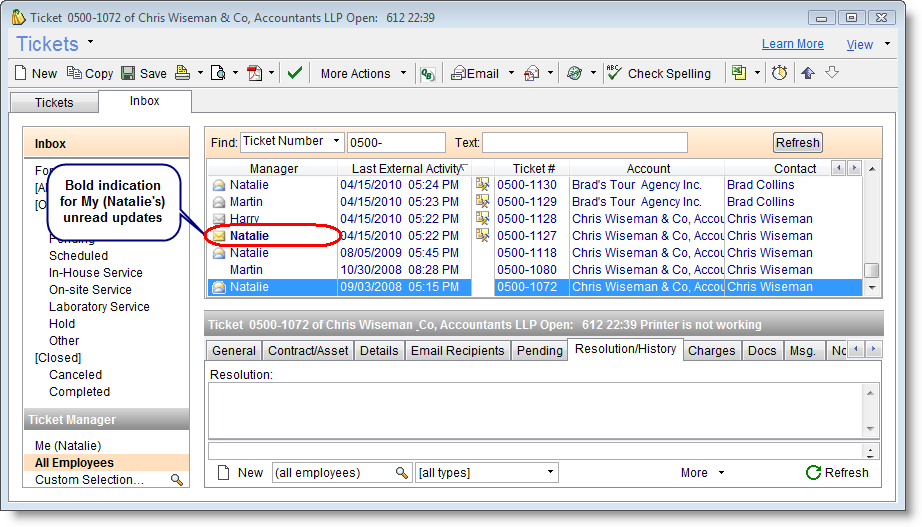
For new updates in the Inbox, the Ticket Manager column in the Tickets list appears in bold until the Ticket is marked as "read". The bold indication is personal and appears only when logged in as the Ticket Manager for this Ticket.
Marking Tickets as Read
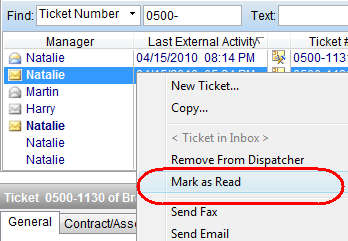
The Ticket Manager must go through the new items in order to remove the bold indication. This can be done either by viewing the Ticket for a few seconds, or by explicitly marking the Ticket as "read" using right-click > Mark as Read.
Marking the Tickets as read is a personal option which can be performed only by the Ticket Manager. Note that privileged users can mark Tickets which are managed by other users as read (see Email Correspondence Settings).
Adding Tickets to the Inbox
Updates performed by Customers trigger the Ticket to automatically appear in the Inbox. Tickets are automatically added to the Inbox in the following cases:
- Customer adds a new Ticket via RangerMSP Web Interface.
- Customer updates an existing Ticket via RangerMSP Web Interface.
- Customer adds a History Note to a Ticket via RangerMSP Web Interface.
- Customer replies by email to a Ticket via RangerMSP Email Connector.
- Ticket is added or updated via RangerMSP API (i.e. by a third-party program).
Tickets can also be moved to the Inbox manually. This can be done by right-clicking the Ticket and choosing "Move to Inbox". This can be useful to draw attention to a Ticket which requires handling by the Ticket Manager.
Removing Tickets from the Inbox
Tickets can be removed from the Inbox manually in two ways:
- Right-click the Ticket and choosing the Remove From Inbox” option.
- Drag the Ticket from the Inbox to any other status in the Ticket tree view. This will automatically change the Ticket status and remove it from the Inbox.
Removing a Ticket from the Inbox will take effect for all users.
Tickets can be removed in bulk from the Inbox by any Employee with appropriate privileges, by going to Tickets > Tools > Batch Remove Tickets from Inbox.
Tickets Board Views
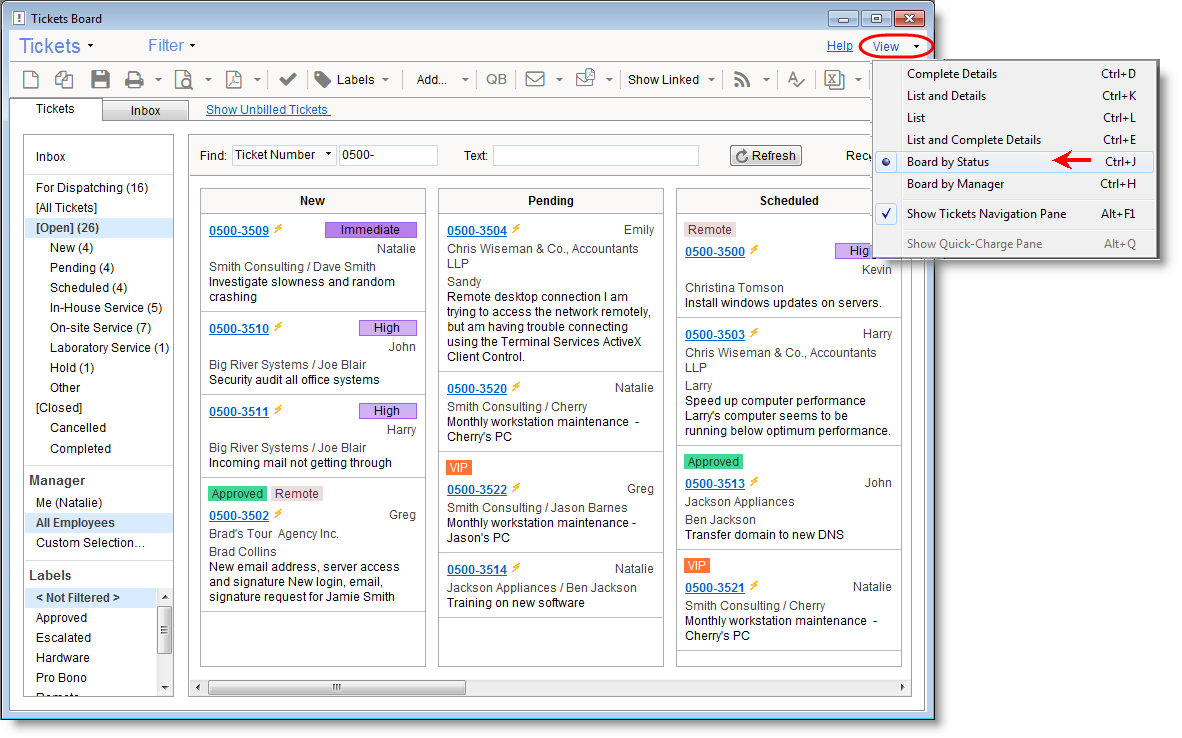
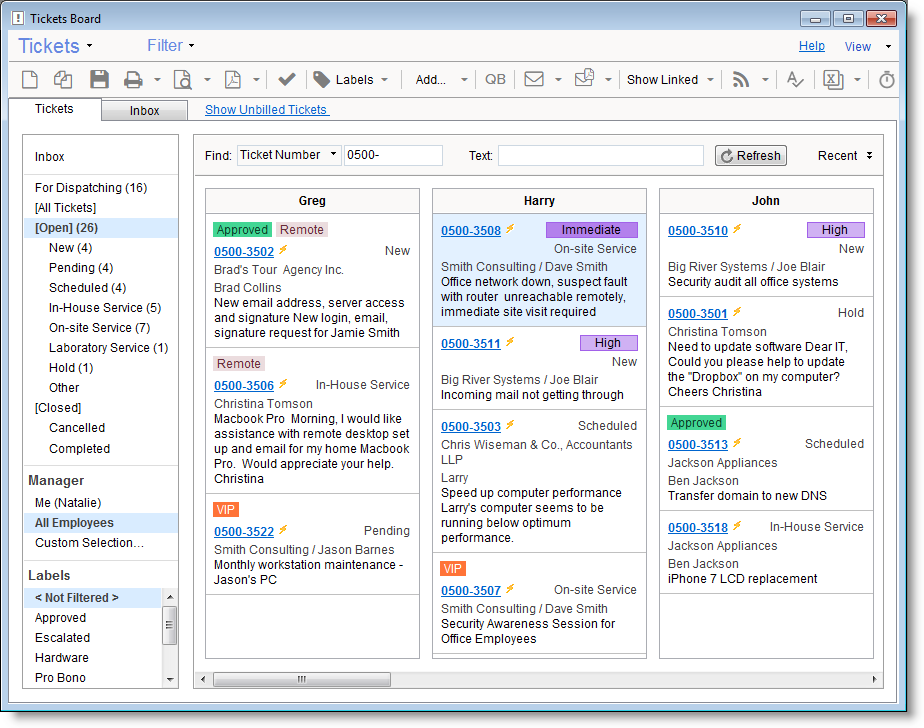
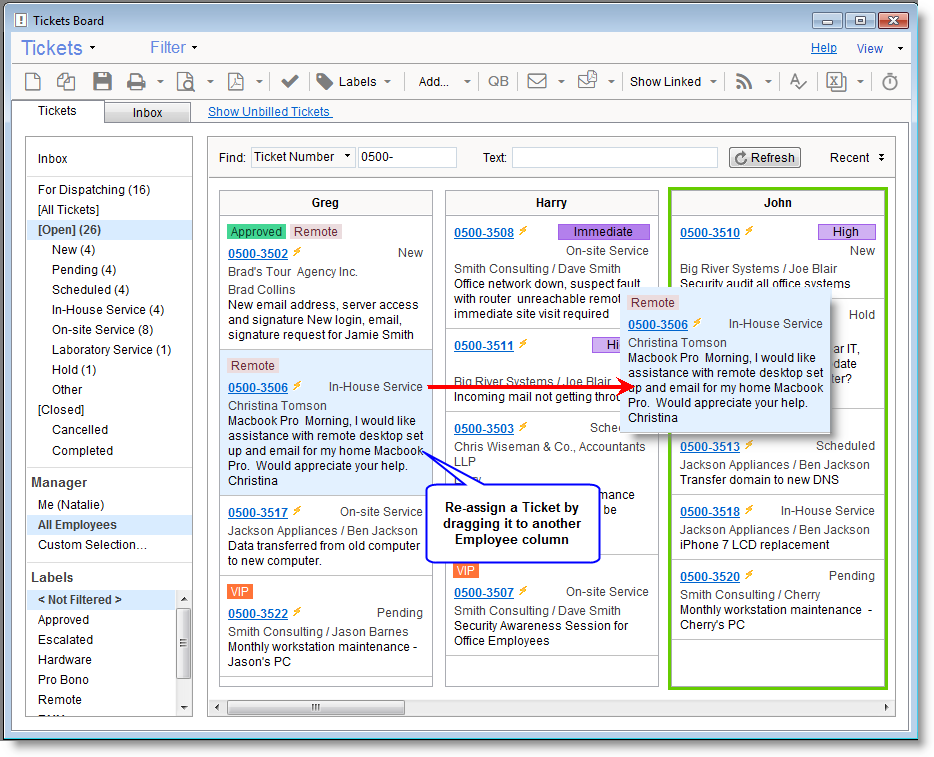
The Tickets Board views allow easily assess the workload by employee or the current state of tickets by statuses.
Two Tickets Board views are available:
1. Tickets Board by Status – This view shows tickets listed under each Status column.
2. Tickets Board by Manager – This view shows tickets listed under each employee column.
In order to switch to the board view, use the View menu or the following keyboard shortcuts:
- Tickets Board by Status – CTRL+J
- Tickets Board by Manager – CTRL+H
Drag & Drop is fully supported the Ticket status can be changed or the Ticket can be reassigned to someone else simply by dragging it to the relevant column.
The Ticket Board view columns order can be re-organized by dragging the column.
Ticket History
Working with tickets in RangerMSP provides a great way to track all activity for a Ticket from a single point. The Ticket gets updated all the time, by Employees (technicians) or by Customers, and this activity is automatically logged under the Ticket History tab.
Ticket updates can be performed via various channels:
- Customer:
- Updates Ticket details or adds History Notes via RangerMSP Web Interface.
- Sends email regarding the Ticket using RangerMSP Email Connector.
- Employee:
- Updates the Ticket via the RangerMSP client application or RangerMSP Web Interface.
- Sends email regarding the Ticket.
- Third-party Application:
- External third-party application can use RangerMSP API to update the Ticket.
Ticket updates may include:
- Ticket details update (priority, status, etc.)
- New History Notes regarding Ticket
- Email correspondence added to the Ticket
- Done Appointments or Tasks updates
- New Charges, Documents, Messages added to the Ticket
All Ticket updates and email correspondence sent from RangerMSP is automatically logged in the Ticket History and can be viewed via the client application or the Web Interface.
In addition, when using RangerMSP Alerts Server, all Ticket updates are sent to employees via automatic email alerts. See more details in RangerMSP Alerts Server.
Email Correspondence
Email correspondence for Tickets can be managed via the RangerMSP application on two levels:
- Tracking email history regarding a Ticket.
- Managing Ticket Recipients, i.e. defining who should receive a copy of emails being sent regarding a Ticket.
Email Correspondence can be tracked in RangerMSP in two ways: Standard and using RangerMSP Email Connector.
Standard Email Correspondence
- The Standard email correspondence tracks outgoing emails sent via RangerMSP.
- When sending an email from RangerMSP, the Ticket Recipients are automatically copied as Email Recipients.
- Emails are logged as RangerMSP Documents in the Ticket History, and can be viewed by double-clicking the document.
Email Correspondence Using RangerMSP Email Connector
- All email correspondence is managed by RangerMSP Email Connector.
- RangerMSP Email Connector tracks both incoming and outgoing emails automatically.
- When sending an email from RangerMSP, RangerMSP Email Connector's email address(*) is used as the email recipient.
- RangerMSP Email Connector distributes emails to the Ticket Recipients.
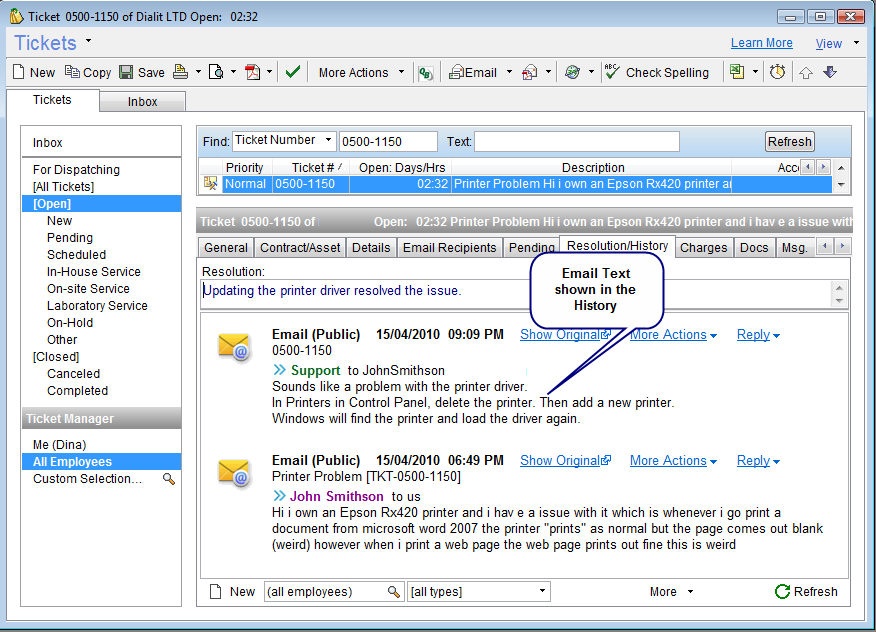
- Emails are logged as Email Messages in the Ticket History and can be viewed in the history pane directly.
- Employees can reply on emails directly from the Ticket History's Email Message
(*) For details regarding RangerMSP Email Connector terminology see RangerMSP Email Connector user guide.
The following table compares email correspondence tracking capabilities in both modes.
Email Correspondence Features
| Feature | Standard | Using RangerMSP Email Connector |
|---|---|---|
| Send Email from RangerMSP | The Recipients defined for the Ticket are automatically copied to the email. | The Support Public Email Address of RangerMSP Email Connector is automatically copied to the email's To: address. Only RangerMSP Email Connector distributes it to the Recipients defined for the Ticket. |
| Click Reply Email in RangerMSP | N/A | Employees can reply on emails directly from the Ticket History's Email Message. Reply is sent to RangerMSP Email Connector, which distributes it to the Recipients defined for the Ticket. |
| Handle Incoming emails | N/A | Incoming emails (from customers or employees) arrive at RangerMSP Email Connector. Email Connector then:
|
| Send emails via any email application | N/A | Employees can send emails from anywhere to RangerMSP Email Connector which:
|
| View email correspondence in Ticket History | Only outgoing Emails are logged in the Ticket history as RangerMSP Documents. Email text can be viewed by double-clicking the Document. | Incoming and Outgoing emails are logged by RangerMSP Email Connector as an Email Message in the Ticket History. Email Text is displayed in the History pane directly. |
Benefits in using RangerMSP Email Connector for email correspondence:
- Easier history view: The email text itself appears in the History tab, providing a quick review of all email correspondence.
- Incoming and Outgoing email in History: Provides a complete view of all correspondence for the Ticket.
- Emails can be sent from anywhere via RangerMSP Email Connector: Technicians can reply on emails regarding Tickets from any email application, by sending it through RangerMSP Email Connector. This way the reply will be automatically logged in the Ticket history and will reach all External Recipients and Employee Recipients.
- Internal Email Distribution: Emails coming from Employees or Customers are distributed to all Employee Recipients defined for the Ticket, providing better control over the activity in the Ticket. This also provides quick and efficient distribution of service related information to all employees involved in a Ticket.
For more information regarding the email correspondence using RangerMSP Email Connector, see Email Distribution via Email Connector.
In both cases, the Recipients defined for the Ticket are used to send the email to the relevant people. See more details in Ticket Recipients.
Email Distribution via Email Connector
Starting with RangerMSP 5.3 RangerMSP Email Connector provides an improved platform for managing all email correspondence for Tickets from RangerMSP. The new email correspondence management requires changing the way you currently work.
New Concept
When using the new RangerMSP Email Connector, all emails (incoming and outgoing) are sent to the Support Public Email Address, rather than sending the email directly to the recipients. The email is then processed by RangerMSP Email Connector, distributed to the Recipients defined for the Ticket, and logged in the Ticket history automatically.
Users not familiar with RangerMSP Email Connector terminology, should read the RangerMSP Email Connector User Guide for better understanding of this section.
For users already working with emails in RangerMSP (before RangerMSP 5.3), following are the main differences:
- When emailing from a Ticket window, the email will be sent to Support@yourdomain.com and will automatically reach all the Recipients listed in the Email Recipients tab.
- The recipient will see From: Employee Name <support@yourdomain.com>.
- When the recipient replies, the reply goes to RangerMSP Email Connector, which distributes to all Ticket recipients.
- The emails are stored in RangerMSP in the Resolution/History tab rather than in the Docs tab.
- Internal emails can be sent between employees only. See more details in Sending Internal Emails.
How does it work?
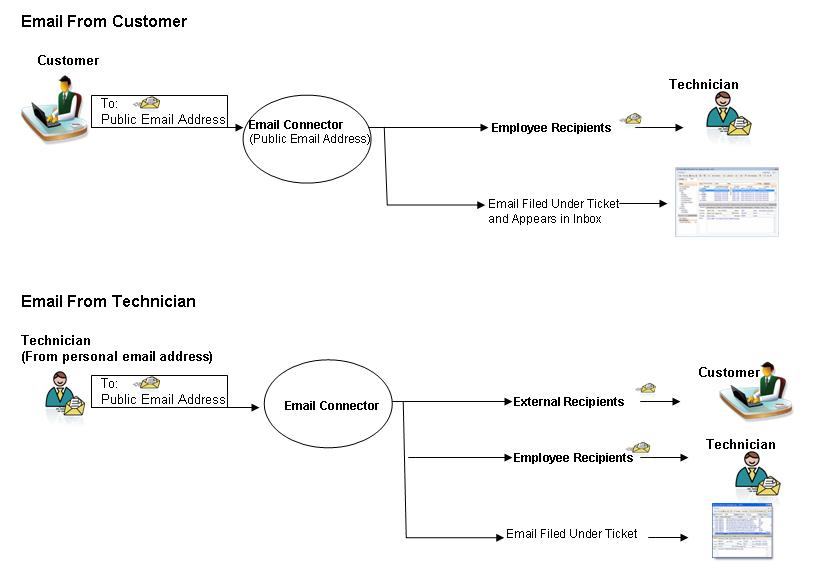
The following chart demonstrates the workflow when managing email correspondence using RangerMSP Email Connector:
When working with RangerMSP Email Connector in RangerMSP 5.3 and later, employees must always send emails from their personal email address to the support email address (the Public Email Address defined for RangerMSP Email Connector). Customers should also send all emails to the support email address so all emails arrive at RangerMSP Email Connector.
RangerMSP Email Connector processes all incoming emails from customers and from employees and performs the following actions:
- Logs the email under the Ticket history (according to the Ticket Number in the subject).
- Distributes the email to the Recipients defined for the Ticket.
- Optionally - automatically scan processed email message headers to find relevant email recipients (To and Cc) and automatically add them as Recipients in the relevant Ticket in RangerMSP. See Automatically Add Ticket Email Recipients.
When emails coming from employees are distributed to customers, the "From" email address is the Support Public Email Address (rather than the employee's personal email), so when the customer replies, the reply goes to RangerMSP Email Connector first.
The full workflow includes the following:
- A Customer sends an email to the Public Email Address defined for RangerMSP Email Connector.
- RangerMSP Email Connector processes the email and creates a Ticket in the system for new emails (Email-to-Ticket).
- An automatic email response for the new Ticket is sent to the Customer and to relevant Employees:
- The automatic response email contains the Ticket Number in the email subject
- The Reply-to address points back to RangerMSP Email Connector, so when a customer replies, the reply goes back to RangerMSP Email Connector.
- From this point on – all email correspondence are sent to and handled by RangerMSP Email Connector.
- RangerMSP Email Connector processes all incoming emails from customers and from employees and performs the following actions:
- Logs the email under the Ticket history (according to the Ticket Number in the subject).
- Distributes the email to the Recipients defined for the Ticket.
Important Note: Employees who send emails from their personal email addresses must have their email address defined in the employee's record in RangerMSP. This way the system can identify the email as coming from an employee and handle it accordingly (see Employee Correspondence).
New Procedures
Once you begin to use the RangerMSP Email Connector all email distribution goes through it.
To ensure that the email distribution to works properly, make sure that you:
- Define Personal Email Addresses –
Define all personal email addresses used by employees in RangerMSP (in the Employee window > General Tab > Email or in the Address tab > Email-2). The employee's email address is used by the system to identify the email as coming from an Employee.
- Send all emails to RangerMSP Email Connector –
Always send emails to RangerMSP Email Connector (e.g. to support@yourdomain.com). RangerMSP Email Connector will then distribute the email to the Ticket Recipients. If you want to send an email internally use Cc or Bcc – see more details below.
- Verify Email Subject contains Ticket Number –
Always make sure the email subject contains the Ticket number. This is how the system attaches the email to an existing Ticket.
- Use Cc or Bcc for Internal Emails –
If you want to send an email internally without distributing to External Recipients, use Cc or Bcc for the Support Public Email Address. This will file the email in the Ticket History, and will send it only to the Employee Recipients. See more details in Sending Internal Emails.
Email Messages View in Ticket History
Email Messages which are automatically logged in the Ticket History show the actual email text in the main history view. The history entry shows an email icon, and the text appears next to it.
The email icon indicates that this is an actual Email Message (as opposed to an email Document), and the email itself can be opened by clicking Show or by right-clicking the icon itself, and choosing Open Original.
When attachments exist in the original email, the icon will indicate this, and when opening the original email, it will open with the attachments.
Note: RangerMSP Email Connector saves the original emails in a basic email format (.eml), which can be opened via Outlook Express. Eml files are not compatible with Outlook®, however, it is possible to override this and allow Outlook to open these files. For more details, see this suggested workaround.
Customer Correspondence
Customers should send all emails to RangerMSP Email Connector.
For emails creating new Tickets, the email will be distributed to the new Ticket's default Employee Recipients.
When a customer replies an email for an existing Ticket, the system identifies the Ticket (according to the Ticket Number in the subject line). The email is then filed under the Ticket history and is distributed internally to the Ticket's Employee Recipients. See more details in Ticket Recipients.
Note that customers should not send emails to employees' personal email address. To make sure this happens, employees should always send emails to customers via RangerMSP Email Connector. This way, the "Reply To" address will go back to RangerMSP Email Connector. See more details in Employee Correspondence.
Employee Correspondence
Employees can communicate with customers directly from within RangerMSP application or from any email client.
Employees can send emails in the following ways:
- Send Email from RangerMSP: Press the Send Email button from the Ticket window.
- Reply Email from RangerMSP: Press the Reply button from within the Email Message in the Ticket History.
- Send email or reply from any email application: Send the email or reply on a email regarding a Ticket from any email application.
Employees should send emails from an email address which is defined for an Employee in RangerMSP. This means that if sending from the main support email address (such as support@yourdomain.com) rather than a personal email address (such as johndoe@yourdomain.com) the support email address must also be defined for an Employee in RangerMSP.
All emails sent by employees are sent via RangerMSP Email Connector, i.e. sent to the Support Public Email Address. The email is identified as coming from an Employee according to the "From" email address, and the email is then distributed to all Recipients defined for the Ticket (External Recipients and Employee Recipients) and is filed under the Ticket history
This way all of the emails are logged in the Ticket history automatically and customers receive all emails from the Support email address (not the employee's personal addresses).
It actually doesn't matter where the email comes from as long as:
- The email is sent to the Support Public Email Address for RangerMSP Email Connector to process
- The email Subject contains the Ticket number in a predefined format which is used to identify the email as relating an existing Ticket.
- The email "From" address is the same as the email address defined in the Employee's record in RangerMSP.
For example, the following email will be filed under Ticket number 0500-1000 and distributed to the recipients defined for this Ticket:
From: johndoe@yourdomain.com (defined as the Email for Employee John Doe in RangerMSP)
To: Support@yourdomain.com
Subject containing: Ticket [0500-1000]
Important Notes:
- Employee emails arriving at RangerMSP Email Connector are not handled the same way as Customer emails. In order for the system to identify the sender as an Employee, the "from" email address of the email must be unique in the RangerMSP database, i.e. only one Employee can have this email specified in their Employee record. The address is compared to the employee's email address stored in the Employee Account under Email1 or Email2.
- Only active Employees will trigger email distribution by RangerMSP Email Connector.
- Emails are never distributed to the employee who has sent the email, even if defined as a Recipient for this Ticket. Employees can see the emails they sent in the Ticket history and in their Sent Items.
- See how the system determines who receives the email in the To, Cc and Bcc in Ticket Recipients.
Sending Internal Emails
Internal Emails are handled in the following way by the Email Connector;
- The emails are distributed only to the Employee Recipients. External Recipients (i.e customers) will not receive these emails.
- The system files the email in the Ticket history and automatically marks it as Not Public (i.e. private) so customers will not be able to see this email when viewing the Ticket history via the Web Interface. When needed, the email can be marked as Public via the history tab. See more details in Email Public Flag.
If you want to send an internal email, you can use one of the following options:
- Use a Predefined Keyword (recommended):
Include a predefined keyword in the email subject, which indicates to the system that this email should be treated as an internal email.
Administrators can define which keyword is the one to be used (default is *123*, including the asterisk). To learn how to change the default keyword, see Changing the Default Keyword for Internal Emailing.
- Use Cc or Bcc only:
Enter the Support Public Email Address (e.g. support@yourdomain.com) in the Cc or Bcc fields only. Emails arriving from employees with an empty 'To' field will be handled as internal.
Notes:- Using Cc or Bcc for internal emails works only for emails arriving from an Employee email address. Customers emails who use Cc or Bcc to send to RangerMSP Email Connector will be handled as if they were sent using To:.
- When replying to an internal email which was distributed by Email Connector, note that your email client will automatically put the Email Connector's address in the 'To' field. You should in this case remove the email address from the 'To' field to and put it in the 'Cc' or 'Bcc' fields. If left in the 'To' field, this email will be distributed to External Recipients. We therefore generally recommend on using Option A (using the keyword in the subject line) to avoid mistakes when replying on internal emails.
- Using Cc or Bcc for internal emails works only for emails arriving from an Employee email address. Customers emails who use Cc or Bcc to send to RangerMSP Email Connector will be handled as if they were sent using To:.
Changing the Default Keyword for Internal Emailing
It is generally recommended to keep the default value provided with the system (which is: *123*).
In case you need to change the keyword being used for internal emails, make sure the keyword you choose is unique, because it will always indicate an internal email, and will never distribute it to customers, no matter what appears in the 'To' field.
To change the keyword which indicates internal emails:
- Edit the file: <Server>\CmtEmailConnector.ini
- Under the token:
SubjectKeywordThatForcesInternalDistributionOnly=*123*
Replace *123* with your own keyword - the keyword must be a single word (no spaces) and must contain a unique value which will not be used by mistake in a regular email:
SubjectKeywordThatForcesInternalDistributionOnly=<enter your keyword here>
Note: To completely disable this feature, simply leave the token empty:
SubjectKeywordThatForcesInternalDistributionOnly=
Sender Email Address
Since all emails are first sent to RangerMSP Email Connector, which distributes them to all Ticket Recipients, the "From" email address is the Public Email Address defined for RangerMSP Email Connector. This means that the customer receiving the email does not see the technician's address, but rather the Public Email Address in the email. This helps to avoid revealing personal employees email addresses, and consolidate communications with a customer that is handled by multiple technicians.
To make the emails more personal, the replies sent by RangerMSP Email Connector take the Sender Name from the Employee original Reply (which was sent to RangerMSP Email Connector), so when the customer receives the reply email, the reply looks like this:
From: Sender Name <support@yourdomain.com>.
When a Customer replies to these emails, the reply-to address remains the Public Email Address (e.g. support@yourdomain.com), and the emails is then processed by RangerMSP Email Connector.
Using a unified Sender Name
In order to set a unified Sender Name for the Employee replies:
- Edit the file <Server>\RangerMSP\Server\CmtEmailConnector.ini
- Add the following token under the [EMAILCONNECTOR] section:
UseEmployeeSenderName=N
The Email Connector Sender Name will be used. The default Sender Name is 'Support' and can be changed under the token:
ResponseFromName
Employee Recipients vs. RangerMSP Email Alerts
Working with RangerMSP Email Connector and receiving all email communication (as Employee Recipients) does not require using RangerMSP Alerts Server. The emails are distributed to the Employee Recipients regardless of the RangerMSP Alerts Server mechanism.
When using RangerMSP Alerts Server, email alerts are sent to Employees for new updates performed in the database. It notifies employees about Ticket updates such as Ticket Status change, Ticket Priority change, etc., as well as related record updates, such as a Charge which is added to the Ticket, an Appointment which is added to the Ticket, etc. RangerMSP Email Connector on the other hand, only distributes email communication regarding the Ticket.
RangerMSP Alerts Server have a fixed text format containing information regarding the update performed, and details about the objects which have been updated. These emails are created automatically by the system.
Unlike RangerMSP Alerts Server, when an email arrives to RangerMSP Email Connector, it is distributed to all subscribed Employees in its original form. This means they get the original email, with its formatting, attachments and so on.
When an Employee replies to the email, it is automatically sent to RangerMSP Email Connector which distributes it to the relevant Ticket Recipients (employees and customers) according to the Recipient settings in the Ticket.
Email Public Flag
Email Messages which are automatically logged in the Ticket History show the actual email text in the main history view. Customers can view these email messages in the Ticket history via the Customer Web Interface when:
- The email message is marked as Public. See more details below.
- Customers are allowed to view email messages via the Customers Web Interface. For more details regarding setting customer privileges in the Web Interface see the Web Interface user guide under Setting Customer Privileges.
Email messages are automatically marked as Public in the following cases:
- The email is sent by an employee to the External Recipients via RangerMSP Email Connector.
- The email arrives from customers to RangerMSP Email Connector and is filed under the Ticket.
When an email is sent internally only to the Employee Recipients (using Cc or Bcc) then the message is automatically marked as "Not Public".
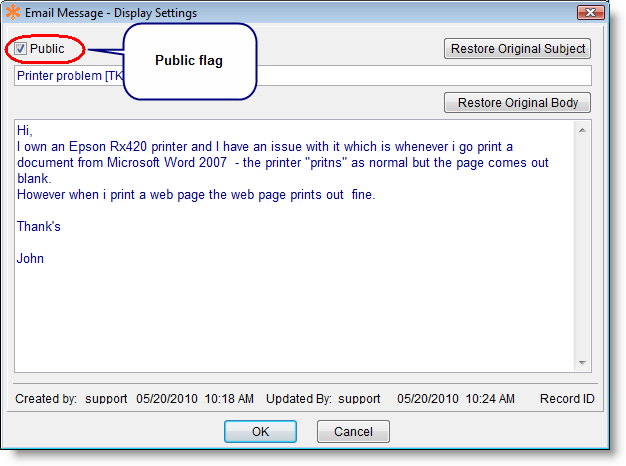
The Public flag can be changed in the Email Message window:
- From the Ticket window
- Go to Resolution/History tab
- Find the email message in the history and click the More Action menu to edit the message
The following window opens:
Using the Public flag in the top-left corner you can set whether this email is available for customers or not.
Ticket Recipients
Each Ticket holds a list of Recipients to define which internal (employees) and external (customers) Recipients should be notified with each email correspondence for the Ticket.
Recipients are managed via the Ticket's Recipients tab, which contains two lists: External Recipients and Employee Recipients.
External Recipients
- A list of email addresses which may belong to existing Accounts in the database or not.
- External Recipients receive outgoing emails sent by technicians regarding this Ticket.
- External Recipients can be defined in the To, Cc or Bcc fields.
- External Recipients are also used for automatic email alerts to customers upon ticket creation or closure. See more details in Alerts to Customers.
Employee Recipients
- A List of Employees subscribed to this Ticket, which means they want to receive any email concerning this Ticket.
- The Employees in the list receive outgoing and incoming emails sent by other employees or by customers.
- Whether the employee appears in the To, Cc or Bcc fields is determined automatically:
- For emails coming from customers, the Ticket Manager appears in the To field. Other employees appear in Cc.
- For email outgoing from employees, all employees in the Employee Recipients list (other than the sender) appear in Bcc.
Adding Recipients
Whenever a new Ticket is created in the system, the Employee Recipients and the External Recipients are automatically initialized with default Recipients for this Ticket. Recipients can then be edited via the Ticket's Email Recipients tab.
- Employee Recipients - Employee Recipients can be added using the Add button, which offers a quick pop-up selection menu of employees. Employees can also be added by their role in the Ticket (i.e. Ticket Manager and Account Manager).
- External Recipients - External Recipients can be added using the Add button, which offers a quick pop-up selection menu of all contacts for this Account. The quick selection automatically adds the email as a recipient in the "To" field. To add the emails as Cc or Bcc, or to choose another email address, use the "Add" button.
External Recipients can be an existing Account or Contact in RangerMSP, or a specific email address. When specifying a specific email address, make sure to add plain email address, without any prefixes. For example: "address@domain.com". Multiple addresses can be added separated by comma or semicolon.
Note that after adding recipients, the ticket should be saved in order to apply the changes and for the new recipients to be saved with the Ticket data.
Default External Recipients
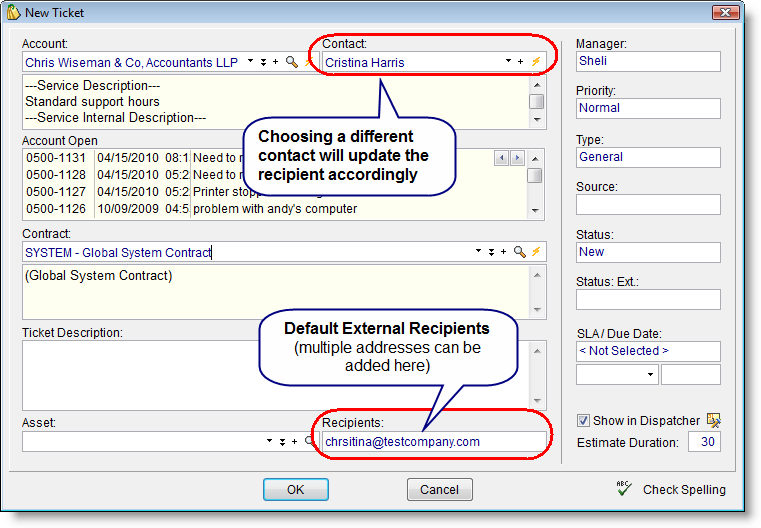
When a new Ticket is created, the Account's main contact is automatically added by default to the External Recipients list as an External Recipient. If choosing a specific Secondary Contact as the contact person for this Ticket, then this contact's email address is taken instead of the Account's main address. This default email address can be changed while creating the Ticket, in the New Ticket window.
Notes:
- When a new Ticket is created by RangerMSP Email Connector from an incoming customer email, the customer's email address from the incoming email will be added automatically to the External Recipients list of the Ticket (instead of the Account's main address).
- When creating tickets via the RangerMSP API the default Account's main contact will be used.
Default Employee Recipients
When a new Ticket is created, the following addresses are automatically added to the Internal Recipients list as the default recipients.
- Ticket Manager
- Account Manager
- All Employees who selected to receive all email communication (via the Options window, see Recipient Options)
Each employee can also subscribe or unsubscribe themselves for a Ticket via the Ticket window, under the Email Recipients tab.
Automatically Add Ticket Email Recipients
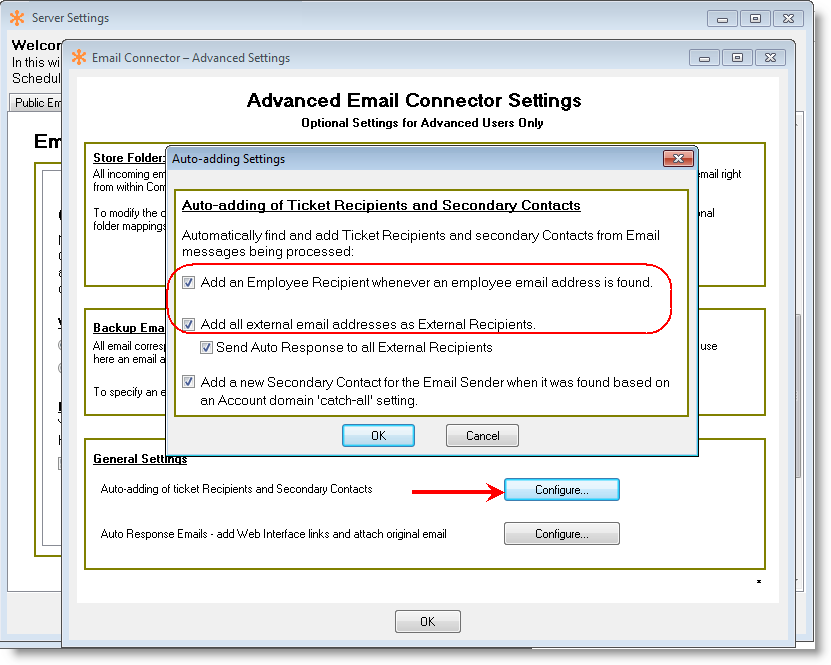
As part of the Email Connector email threading management, it offers the ability to automatically scan processed email message headers to find relevant email recipients (To and Cc) and automatically add them as Recipients in the relevant Ticket in RangerMSP.
This saves you the need to manually add recipients when an email arrives with new recipients. All people in the To and Cc are automatically added to the Ticket to be part of the correspondence in the future.
Automatic adding of recipients is done in two levels: Employee Recipients: If the email addresses that are found in the header are employees, they are added to the Employee Recipients in the Ticket. External Recipients: Other email addresses are added as External Recipients in the Ticket.
Administrators can control whether to activate the automatic scanning of email messages for recipients via the ServerConfig > Email Connector tab > Advanced options > General Settings > Automatically find and add Ticket Recipients.
See more details about configuration in Email Connector.
Add Recipients to New Tickets
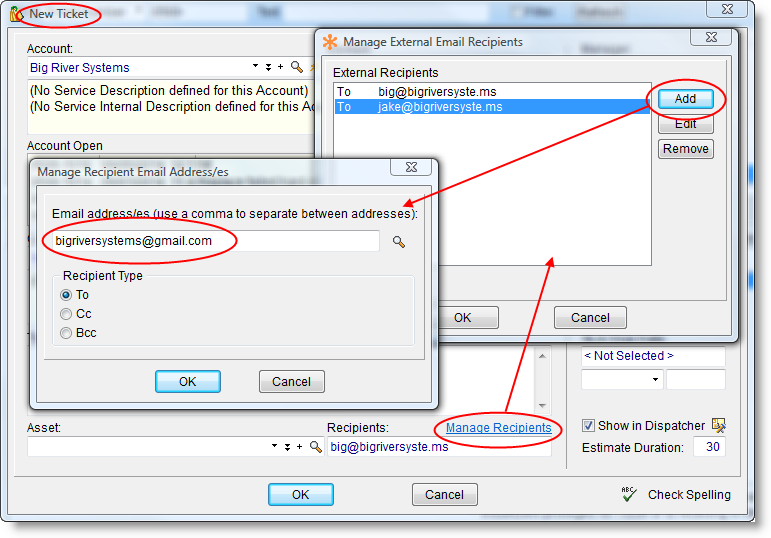
When creating a new Ticket you can now specify External Recipients (email addresses of other people who should be alerted) so that you can be sure the right people will be notified immediately rather than adding them to the Recipients list afterwards by which time the Alerts may already have been sent.
To add recipients:
- In the New Ticket popup, first select the Account.
- Click the Manage Recipients link at the bottom of the New Ticket popup.
- Click Add and select from the list or Add again to enter a new address - here you can enter a new address into the box or click the magnifying glass to select an existing contact. You can also select the Recipient Type from To, CC and BCC.
Recipients added in this way will now appear on the Email Recipients tab for the new Ticket.
Email Correspondence Settings
Ticket settings concerning Email Correspondence can be set up in the Tools > Options > Tickets window.
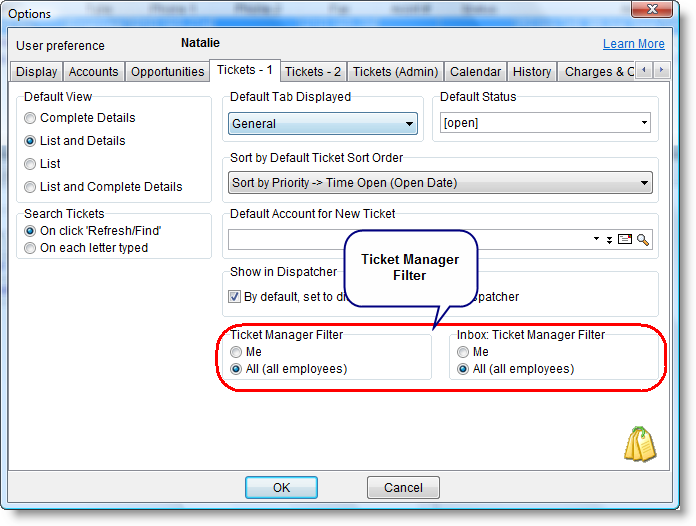
Default Ticket Manager Filter
Each user can define which default Ticket Manager filter will be used in the Tickets window and in the Inbox.
To set up the default filter, go to Tools > Options > Ticket – 1 tab. The following window will appear:
In this window, each use can choose the default behavior in the Filter Employees and in the Inbox: Filter Employees sections.
Recipient Options
In the Recipients Options each Employee can define whether and when they wish to receive emails relating Tickets. These settings will apply when the Employee has the relevant Email correspondence privileges.
These options will apply both when using Standard Email Correspondence, or when using RangerMSP Email Connector. See more details about these modes in Email Correspondence.
When working in the Standard Email Correspondence method these settings will determine in which cases the Employee address will be automatically copied to emails being sent from RangerMSP.
When using RangerMSP Email Connector the these settings will determine in which cases the Employee will automatically receive emails arriving at and distributed from RangerMSP Email Connector relating Tickets.
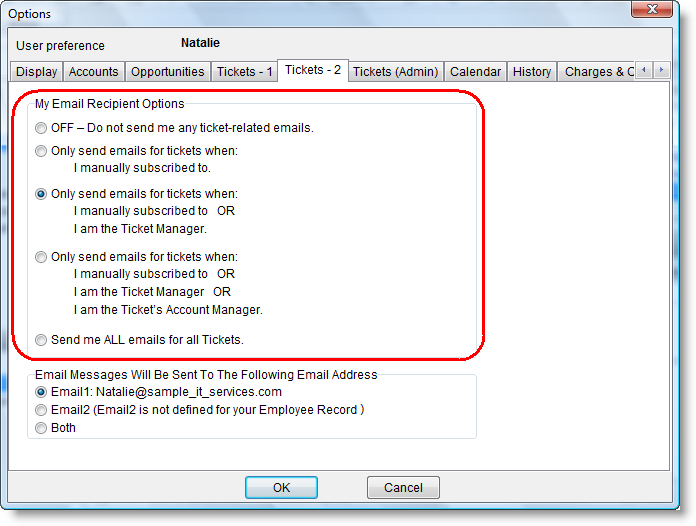
To set up the Email Recipient options, go to Tools > Options > Tickets -2 tab.
The following window will appear:
In this window each user can choose under which terms they wish to receive the email for a specific Ticket, according to their role in this Ticket.
Possible options include:
- OFF: Do not send any emails relating Tickets to me. For example, this option may be used when on vacation, and the user does not wish to receive the emails under any circumstance (even if they appear in the Employee Recipients list).
- All – send me all emails arriving for all Tickets.
- Only when:
- I manually subscribed to: Only when I am subscribed to a specific Ticket, i.e. when I explicitly appear in the Ticket's Employee Recipients list.
- I am the Ticket Manager (default) : ): I am the Ticket Manager for this Ticket. This means that even if I'm not in the Ticket's Recipients, I will get the email for this Ticket when I'm marked as the Ticket Manager.
- I am the Ticket’s Account Manager: I am the Account Manager for this Ticket, or the Ticket Manager. This means that even if I am not in the Ticket's Recipients, I will get the email for this Ticket when I am marked as the Account Manager for this Ticket's Account.
Note that all options apply only if the user has the appropriate privileges to view the relevant Ticket. For example, when choosing "All", the user will receive all emails relating all Tickets which this user is privileged to see. For more details regarding privileges see Ticket Privileges.
Advanced Ticket Options
Increment Automated Ticket Numbering
System Administrators can change the ticket numbers being created and increment the automated Ticket number to start from a non-sequential number.
For example: On January 1st you can increment the Ticket numbering to the next 10,000 number so you’ll easily know, based on the Ticket number, when it was opened.
To increment the next Ticket number, go to Tools > Options > Tickets (Admin) and click Increment Ticket Number.
Note that only System Administrators can perform this action, and, once it is performed, it is irreversible, so it should be performed carefully.
Printing Reports from the Ticket Window
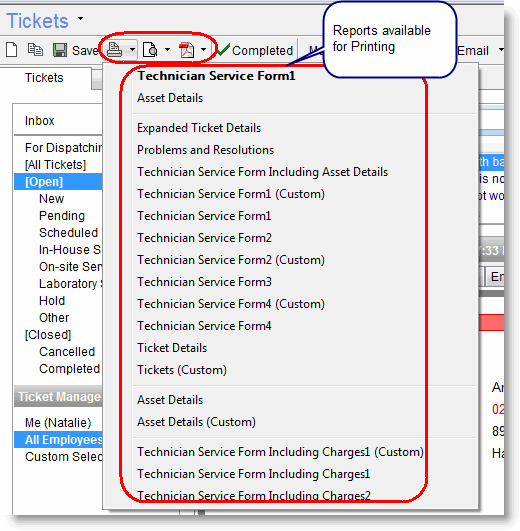
When viewing a Ticket in the Tickets window, you can print a Ticket report directly from the Print/Print Preview options in the Tickets window toolbar. Only detailed Ticket reports (as opposed to lists Ticket reports) are listed here.
The list of reports which appears in these options can be modified to show only reports you actually need to be accessible from this window.
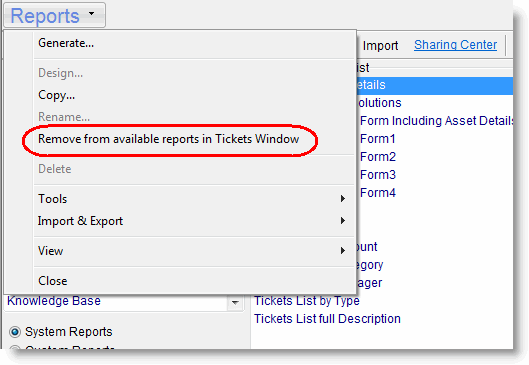
To configure each report, and control whether it is accessible from the Ticket window:
- Go to the Reports window
- Choose the relevant report.
- Select Report > Make report available from Tickets window or Report > Remove from available reports in Tickets Window option.
Move a Ticket from one Account to another
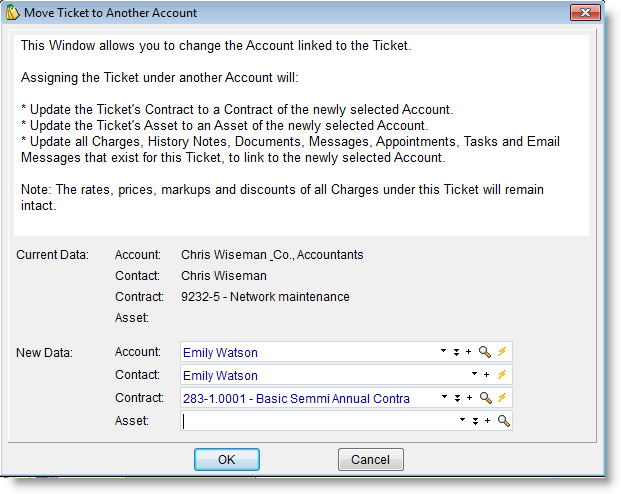
This option allows you to move a Ticket to another Account while moving ALL of the Ticket related data with it. The Ticket is moved with its Charges, History Notes, Appointments and so on. This helpful tool can help you when a Ticket is entered into the system under the wrong Account.
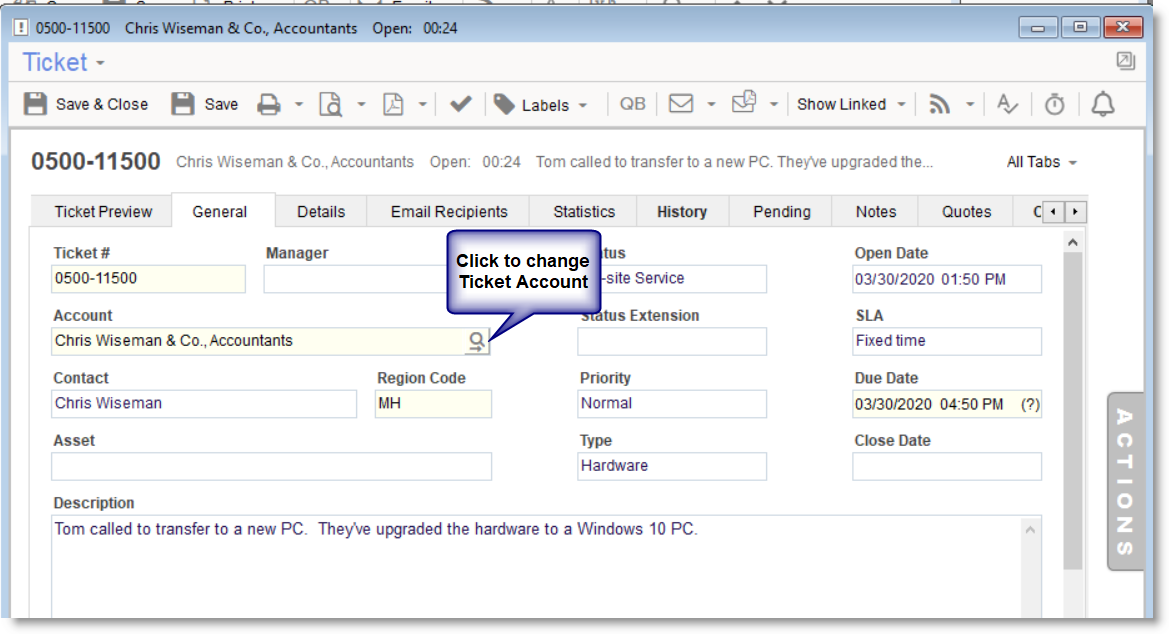
To use the Move Ticket option, open the Ticket and from Tickets menu > Tools > Move Ticket to Another Account or click the magnifying glass button next to the Ticket Account field under the General tab. This option requires the ‘Ticket Merge and Move to Another Account’ privilege and works with unbilled Tickets.
Ticket Privileges
Privileges for Email Correspondence
In order for an employee to receive email correspondence for a Ticket, the Employee needs to have the relevant privileges for the Ticket and to receive email correspondence.
Employee Privileges can be defined by assigning a predefined privilege group (SysAdmin, Full, Partial, Limited or Subcontractors) or you can assign a privilege group you've created yourself.
In order for the employee to receive email correspondence for Tickets, open their privilege group from File > Users & Privileges > Privileges, and make sure they have the following privileges defined:
- Email Messages: Selecting this option means the employee will see email message correspondence under the Ticket History tab and will receive email correspondence distributed by RangerMSP Email Connector. Note that if this option is not selected, the employee will not be part of the correspondence, even if defined as an Email Recipient for tickets. Read more about Ticket Email Recipients.
- Other Employees' Tickets: Choosing this privilege means the Employee can view Tickets added by other Employees. Restricting this line means the Employee can his/her Tickets only.
See more details about setting employee privileges and groups in Employee Privileges.
Mark Read/Unread to other Employees
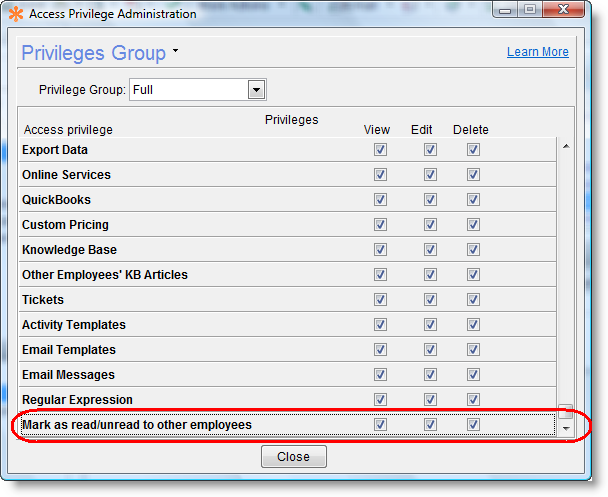
A Ticket's read/unread indication can basically be modified only by the Ticket Manager. Other users can view the status, but cannot modify it if the Ticket is not assigned to them.
In special cases, it is possible to allow other users to change the read/unread status for other users, by providing them with the following privilege option.
The privilege can be defined via File > User & Privileges > Privileges:
Regular Expression (Advanced)
When RangerMSP Email Connector processes email replies coming from Customers or Employees, it adds the text of the reply to the Ticket History. It is a challenge to add only the actual new text in the last reply to the Ticket History each time, since most email replies include the whole thread and it should ignore all of the text related to previous communications. The Regular Expressions feature lets you define advanced rules for removing repeating text from incoming emails, prior to logging the Email text in the Ticket History. This feature is used by RangerMSP Email Connector when processing incoming emails and logging them in the Ticket history.
RangerMSP comes populated with a predefined set of expressions which work well with several email formats, such as Outlook®, Gmail, Hotmail, Yahoo, etc. Regular Expressions can be viewed and set up via the main Settings menu under Regular Expressions.
In cases when the existing set of rules failed to discover “old” text, such as when your customers are using less popular email clients, or when they customize the way a popular email client works, you may want to add new rules so the “old” text will be identified and removed next time an email is received.
Note: In case “old” text has made its way to the Ticket History, you can select to Edit the Email Message text and manually remove it. To edit the message in RangerMSP select the More Actions > Edit Email Message option, from the Email Message entry in History. Each new rule includes a name and the actual Regular Expression formula.
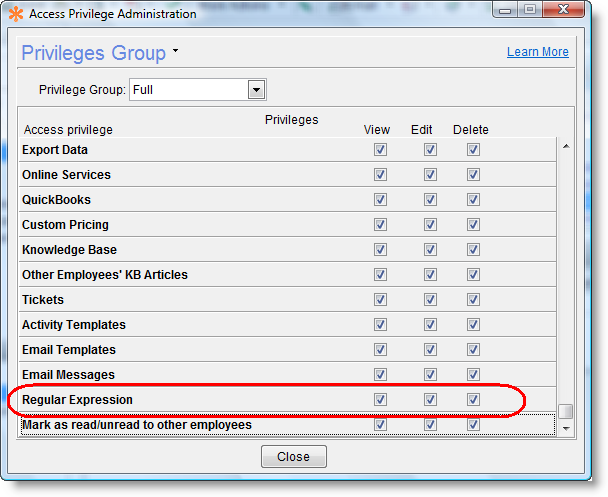
RangerMSP supports standard regular expressions formulas (as used by the Perl scripting language). Regular Expressions is a powerful tool; however, it requires deep understanding of how regular expressions work. To learn more about regular expressions search the Web for “Regular Expressions”, or “Regex”. This is an advanced option and only users who have the relevant privilege in RangerMSP have access to edit the expressions.
Allowing users to edit the Regular Expressions is done via the Privileges window, using the Regular Expression privilege.
