Outlook Sync
Contents
Introduction
The RangerMSP-Outlook Sync module supports two-way data synchronization which means that any additions and changes performed in one program will transfer over to the other. Note that the synchronization module allows information from Contacts, Appointments and Tasks to be synchronized.
Notes
- All of the RangerMSP-Outlook Sync configuration settings are on a per-user basis. This means that when the user modifies their settings, only their personal synchronization settings will be affected.
- The relevant Outlook folder for syncing should be selected per entity (Contact, Appointment, or Task). Once a folder is synchronized for this user, only the same RangerMSP user is allowed to sync with this Outlook folder.
- You can allow other users to sync information for you between RangerMSP and an Exchange Server. This is useful when traveling outside of the office and using PDAs to keep updated.
To configure the RangerMSP-Outlook Sync settings, in RangerMSP go to the Tools > Options > Outlook tab.
The settings in this window should be defined for each entity you wish to sync: Accounts (contacts in Outlook), Appointments and Tasks.
Syncing Accounts
The RangerMSP-Outlook Sync for Accounts performs a two-way sync between RangerMSP Accounts and Outlook contacts. Note that you can prevent private contacts in Outlook from being synced with RangerMSP.
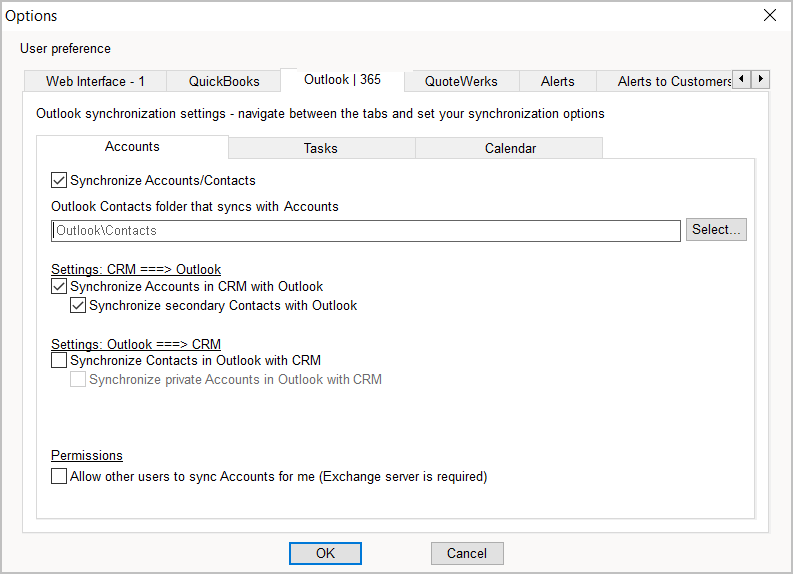
In the Outlook Options window, select the Accounts tab to set the Account sync options:
- Select the Synchronize Accounts/Contacts box in order to activate the Accounts synchronization. Note that a pop up message will appear regarding how to prevent duplicates upon import - see more
- In the Setting RangerMSP > Outlook section you can define the behavior when transferring data from RangerMSP into Outlook. Note that you can prevent secondary Contacts in RangerMSP from being transferred into Outlook (if you do not wish to create an Outlook contact for each secondary contact in RangerMSP).
- In the Setting Outlook > RangerMSP section you can define the behavior when transferring data from Outlook into RangerMSP. Note that you can prevent Private Outlook contacts from being transferred into RangerMSP. Since the RangerMSP Accounts database is shared for all users, this can be useful if you wish to prevent contacts which are not work-related from being imported into RangerMSP. Another way to achieve privacy is to use a different contacts folder within Outlook for your private contacts, and sync RangerMSP only with your public contacts folder.
- You can also allow other users to sync information for you between RangerMSP and an Exchange Server. This is useful when traveling outside of the office and using PDAs to keep updated.
Before Importing from Outlook
Outlook Contacts and RangerMSP Accounts can be synced so that your contact information is unified between the two applications.
If you have already created some Accounts in RangerMSP, it is important to prevent the creation of duplicate contact records in the two programs. To prevent duplicate records, you need to create a link between matching records in Outlook and RangerMSP. There are two ways you can link the Outlook and RangerMSP records:
- Manually link similar records between RangerMSP and Outlook:
In Tools > Options > Outlook, select the Outlook contacts folder which should be used to sync with RangerMSP.
Open the Accounts window, select an Account record in RangerMSP that has a parallel record in Outlook, and from the Tools menu select Link Account to Outlook Contact.
In the window that is displayed, search for the parallel Outlook record and create a link between the two.
After all the relevant records are linked between the systems, you can safely perform the sync. Linked records will not be duplicated. - Alternatively, you can transfer all RangerMSP Accounts to a new folder in Outlook, and only use this Outlook folder for synchronizations:
- In Tools > Options > Outlook, select a new and empty dedicated Outlook Contacts folder to sync with RangerMSP Accounts.
- Perform the sync.
- All RangerMSP Accounts will be created as Contacts in Outlook. After this, updates/inserts will be synchronized between the two programs, and no duplications will occur.
Note: When working with both RangerMSP and QuickBooks, you may need to sync Accounts from both systems. In this case, you should read the How to Avoid Duplicate Accounts section.
Syncing Appointments
The RangerMSP-Outlook Sync for Appointments performs a two-way sync between RangerMSP Appointments and Outlook Appointments. Note that you can You can prevent the synchronization of Private Appointments between Outlook and RangerMSP.
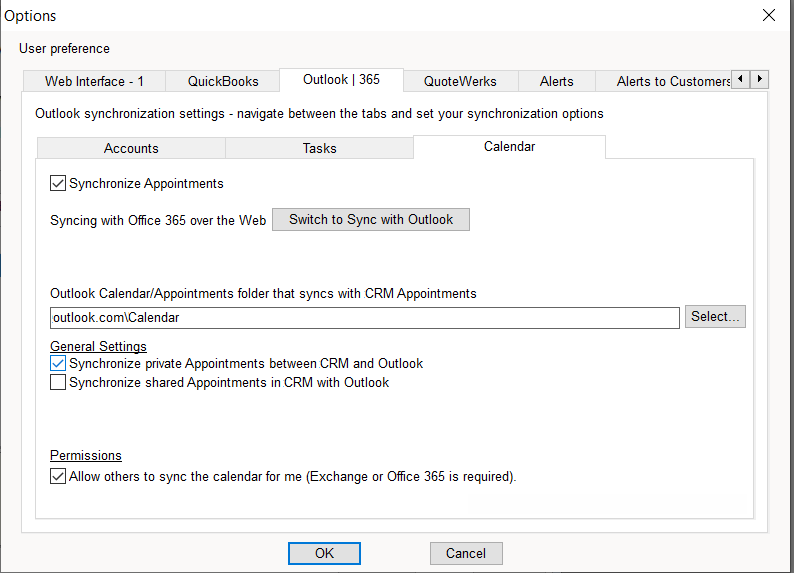
In the Outlook Options window, select the Appointments tab to set the Appointments sync options:
- Select the Synchronize Appointments box in order to activate synchronization between Outlook and RangerMSP Appointments.
- You can prevent private appointments from being synchronized in both systems.
- You can prevent certain shared appointments in RangerMSP from being transferred into Outlook such as appointments that are not useful for you to have in your own Outlook calendar.
- You can also allow other users to sync information for you between RangerMSP and an Exchange Server. This is useful when traveling outside of the office and using PDAs to keep updated.
Syncing Tasks
The RangerMSP-Outlook Sync for Tasks performs a two-way sync between RangerMSP Tasks and Outlook Tasks. Note that you can prevent the synchronization of Private Tasks between Outlook and RangerMSP.
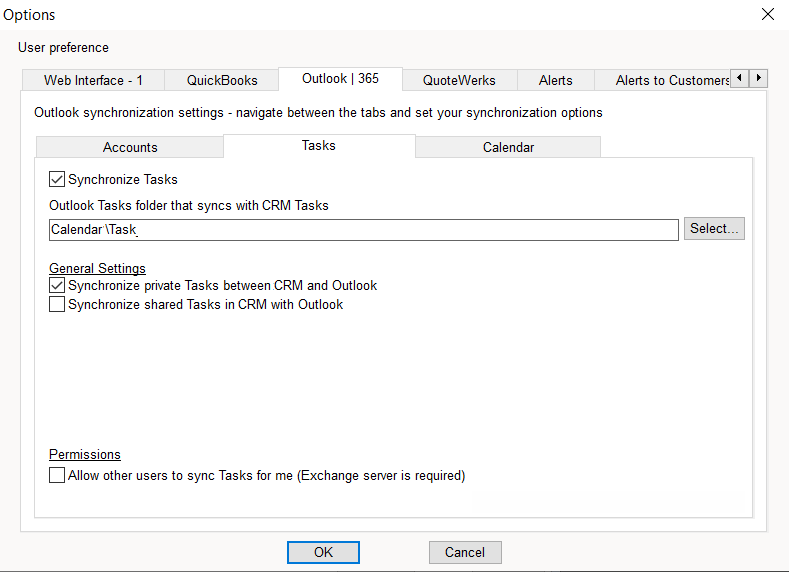
In the Outlook Options window, select the Tasks tab to set the Tasks sync options:
- Check the Synchronize Tasks box in order to activate the Appointments synchronization.
- You can prevent private Tasks from being synchronized in both systems.
- You can prevent certain shared Tasks in RangerMSP from being transferred into Outlook such as appointments that are not useful for you to have on your own Outlook calendar.
- You can allow other users to sync information for you between RangerMSP and an Exchange Server. This is useful when traveling outside of the office and using PDA's to keep updated.
Performing the First Sync
After all of the RangerMSP-Outlook Sync setup has been completed, you can go on and perform the sync:
- Please perform a FULL BACKUP of RangerMSP and Outlook before running the first syncs.
- To perform a sync, select Tools > Synchronize Outlook (All).
- The first syncs may be slow. Please wait patiently until the sync process is completed. Several hours after the first sync has been completed, this process will speed up.
Automatic Sync
The RangerMSP-Outlook Sync can be configured to be automatically activated via the the Auto-Sync option.
The Auto-Sync option sets the system to automatically synchronize with Outlook® at a selected interval. This option can be used to synchronize your own data (contacts, appointments and tasks) or those sync your data together with other RangerMSP users (see Syncing Other Users Data).
To set the application to automatically sync your data with Outlook:
- Go to Tools > Synchronize Outlook > Auto Sync.
- To sync also other users' data, use Tools > Synchronize Outlook > Auto Sync > Sync Other Users Data.
Once the Auto-Sync option is activated, the menu option will appear as "Auto Sync - Active".
Syncing other users data requires some additional setup steps. See more details on syncing other users data in Syncing Other Users Data.
|
Saving Auto-Sync options between sessions
You can also save the auto-sync settings between sessions. This means that next time you sign into RangerMSP, the auto-sync settings will be automatically loaded and the synchronization will occur automatically, as defined in the auto-sync settings.
To save your settings, use Tools > Synchronize Outlook > Auto Sync > Save Auto Sync Settings.
Hide Outlook Auto-Sync Progress Window
The Outlook auto-sync option syncs RangerMSP with Outlook, and displays a popup Window when the sync starts, to inform the user about the sync. In cases the user works on other Windows at the same time, this might take the focus back to the RangerMSP application. If you want to prevent this, you can disable the popup totally by using the hide option.
To turn off this option and hide the popup progress Window:
- Go to Tools > Synchronize Outlook > Auto-Sync > Progress Window.
- Choose whether to Show or Hide the Window.
- Note that this option is active only when the auto-sync option is active.
Syncing Other Users Data
The Sync Other Users Data option allow you to sync other users' Outlook data (including your own). For example, someone in the office can schedule on-site visits for technicians and then select to sync their Outlook with RangerMSP in a single click, so they get the updates immediately to their mobile devices.
Syncing other users data is done by accessing the public folders of each user on the Exchange server. This means that each user must first login to RangerMSP and configure which Outlook folders it should sync with. Only then, their data can be synchronized by others.
To sync other users data:
- An Exchange® Server must be used in order for users to be able to access public folders.
- Each user (including the user running the sync option) should:
- Login to RangerMSP with their own username and password.
- Go to Tools > Options > Outlook and choose a public Outlook folder to sync in each tab (Accounts, Tasks, Appointments).
- Each user should sync at least once to make sure all is working good for them.
- In each tab also check the Tools > Options > Outlook tab > Allow other users to sync Accounts/Tasks/Appointments for me flag.
- Make sure your system administrator provides full access rights to the public Outlook® folders on your Exchange Server, so any user can synchronize those folders.
- Login to RangerMSP with any user and sync for all users from Tools > Synchronize Outlook > Sync Other Users Data.
- To perform the sync automatically in the background, see Automatic Sync.
Click here for Troubleshooting
For RangerMSP-Outlook Sync troubleshooting click here.


