Knowledge Base
Contents
Introduction
The RangerMSP Knowledge Base is a module that allows users to manage articles, categorize them, attach Documents to them, and more, all from within RangerMSP. Each article is assigned a title, problem description, and solution. The Knowledge Base can help technicians solve issues when on-site, and it can also allow customers to access articles, so they can resolve issues on their own
Knowledge Base articles can be accessed via the client application and or by using the Web Interface
The Knowledge Base provides the following benefits:
- Better and faster customer support: Access to the Knowledge Base provides quicker problem resolution for the employee and 24 x 7 Web customer self-service.
- Reduced operational costs: When employees and customers can solve problems more independently, call volume is lowered, allowing support representatives to service more customers.
- Reduced employee training time: The Knowledge Base enables new and existing employees to acquire job knowledge faster, reducing training time and providing higher job quality.
- Centralized and retained employee knowledge: A centralized Knowledge Base prevents knowledge from leaving when an employee leaves the company.
Viewing Articles
Knowledge Base articles can be viewed via the client application or from both the employee’s or customer’s Web interface.
Viewing articles via the client application:
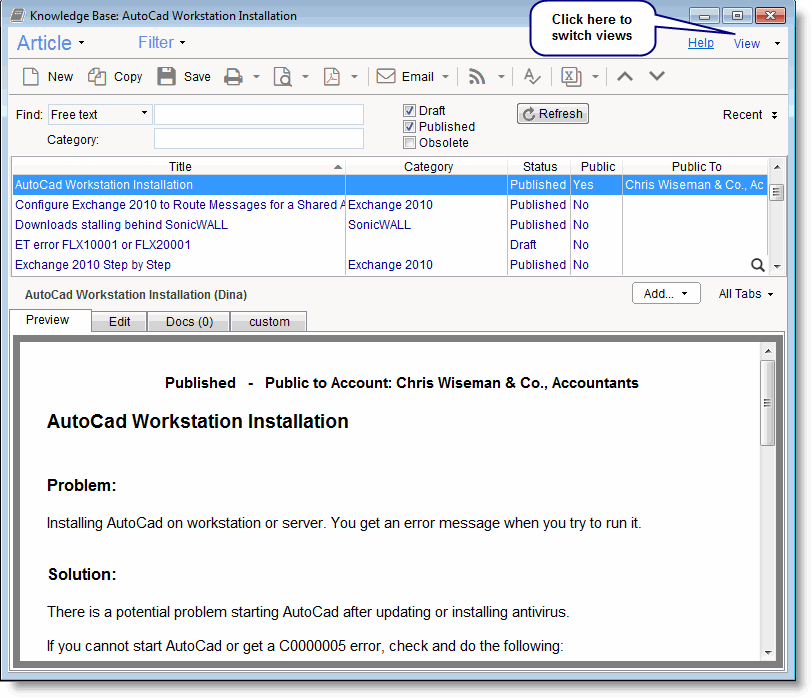
Views can be switched from the View menu. You can set the default view from Tools > Options > Knowledge Base > Default View.
Viewing articles via the Web interface:
Viewing Articles Via the Client Application
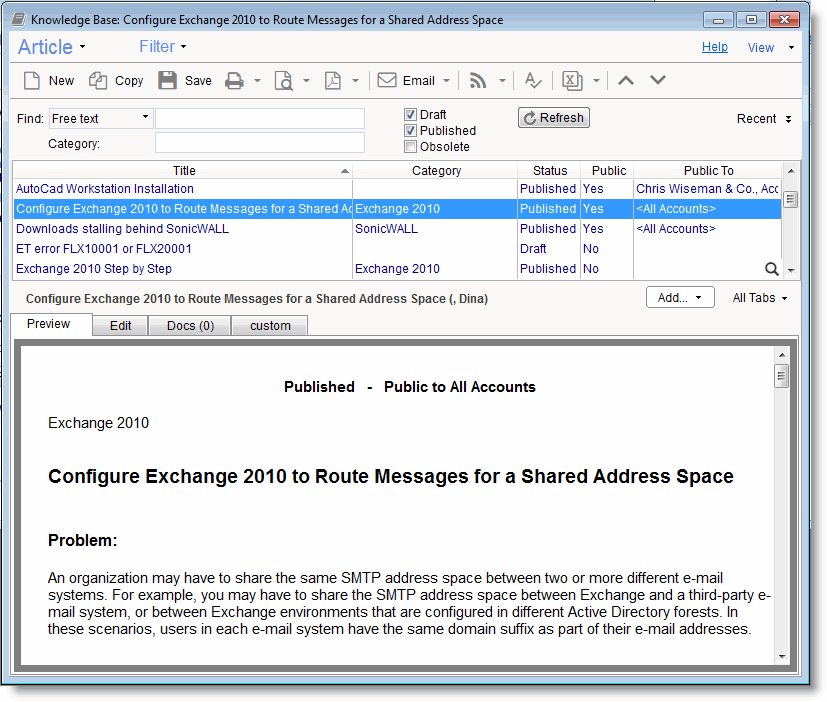
To view articles from within the client application, go to the Knowledge Base window and view the Articles List, which displays general information about each article, such as the Title, Category, and Status. The system administrator can determine whether an employee has access to this window via RangerMSP's Privileges (see Security and Privileges).
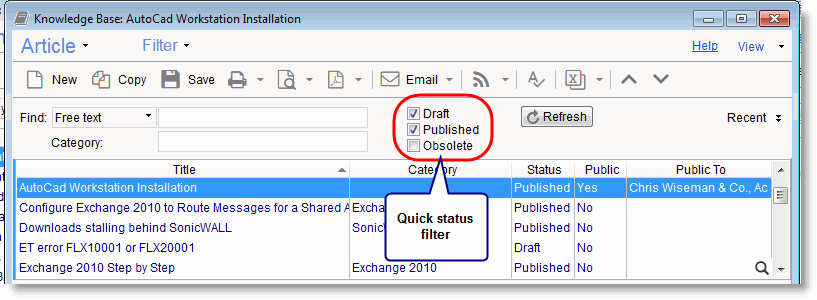
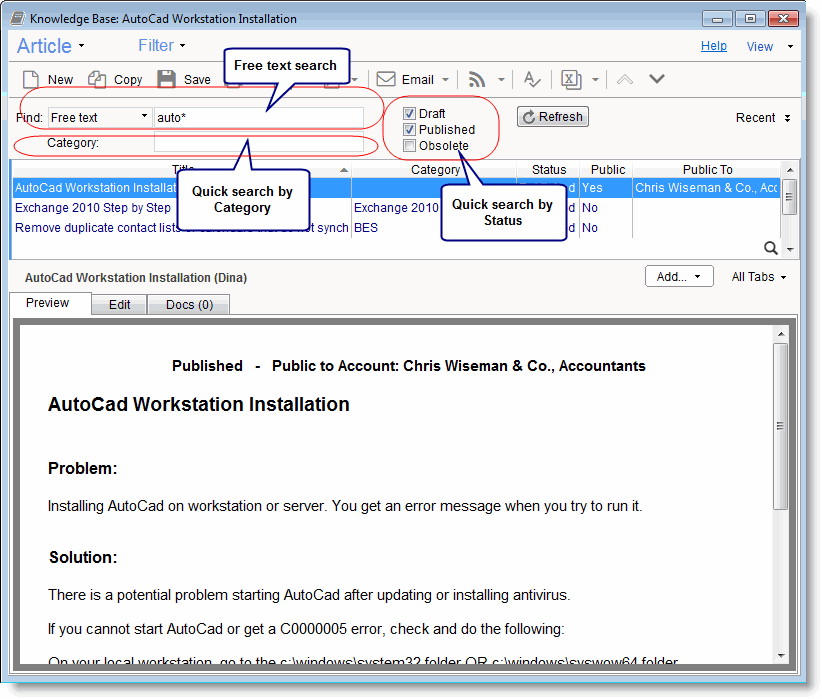
Users can easily filter the Articles List to display only articles of specific types by selecting or deselecting the desired Statuses from the Quick Status filtering options listed in the Articles Search pane:
Default Quick Status filtering options can be determined from Tools > Options > Knowledge Base.
For more advanced search options, use the text search or the category search. (Read more about advanced searching options under Searching for Articles).
After clicking on an article from the Articles List, the contents of the selected article will appear in the bottom half of the screen. The following parts will be displayed:
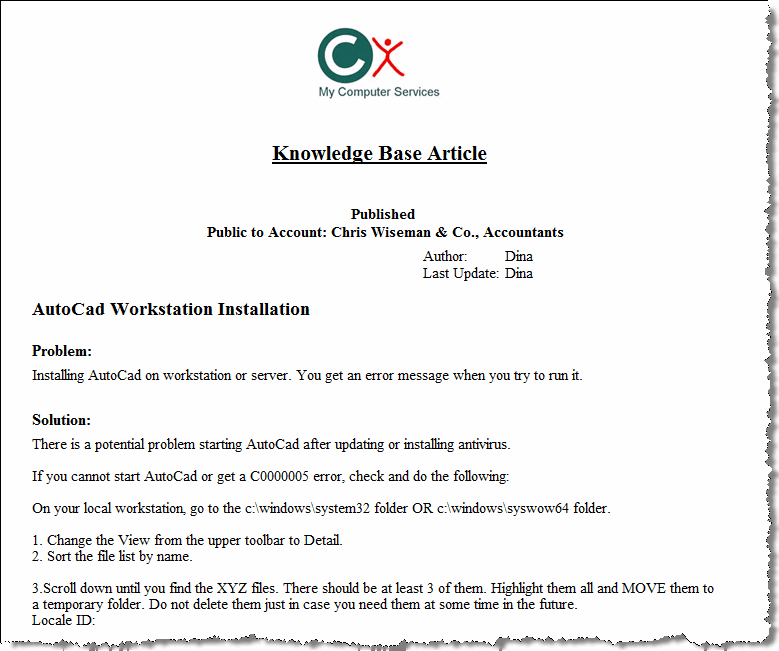
- Preview: In this tab the article is presented as a whole, in a formatted display, showing the Title, Problem, and Solution in a single window
- Edit: From this tab you can edit the article itself (see Adding & Editing Articles)
- Docs: From here you can see which documents are currently attached to the article and you can also attach documents to be linked to the article (Read more about linking documents to articles under [[Knowledge Base#Document Attachement|Document Attachment).
Viewing Articles Via the Employee Web Interface
Employees can view articles via the Web interface from the KB Articles tab. The system administrator can determine whether an employee has access to this tab through RangerMSP's Privileges (see Security and Privileges).
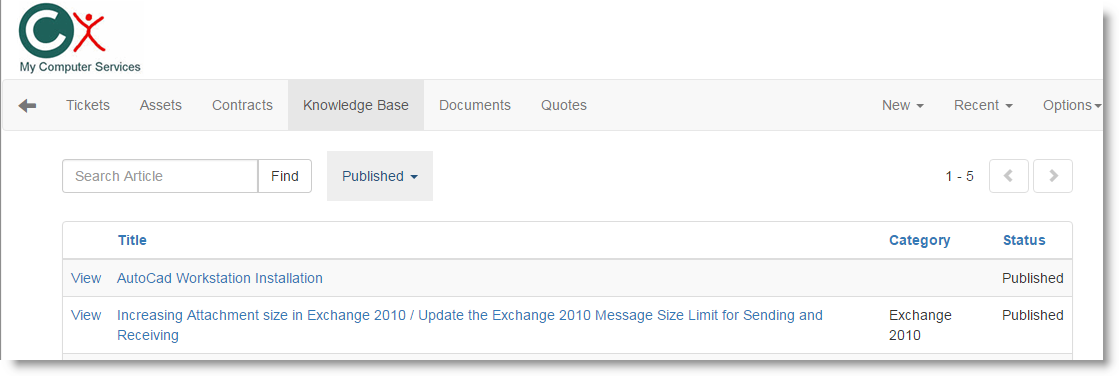
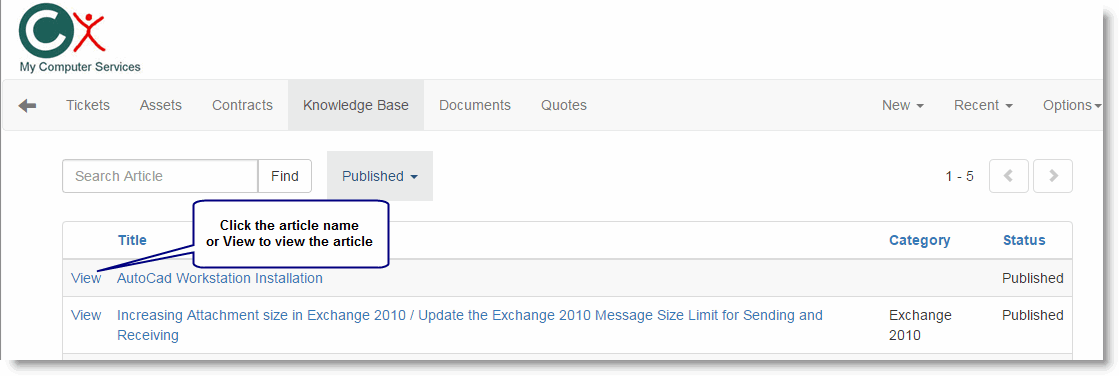
Once in the Knowledge Base tab, employees can view the Articles List, which displays general information for each article, such as the Title, Category, and Status.
Employees can easily filter the Articles List to display only articles of specific types by selecting or deselecting the desired Statuses from the Quick Status filtering options listed in the Articles search pane:
Default Quick Status filtering options can be determined from Tools > Options > Knowledge Base.
For more advanced search options, use the text search or the category search. (Read more about advanced searching options under Searching for Articles.
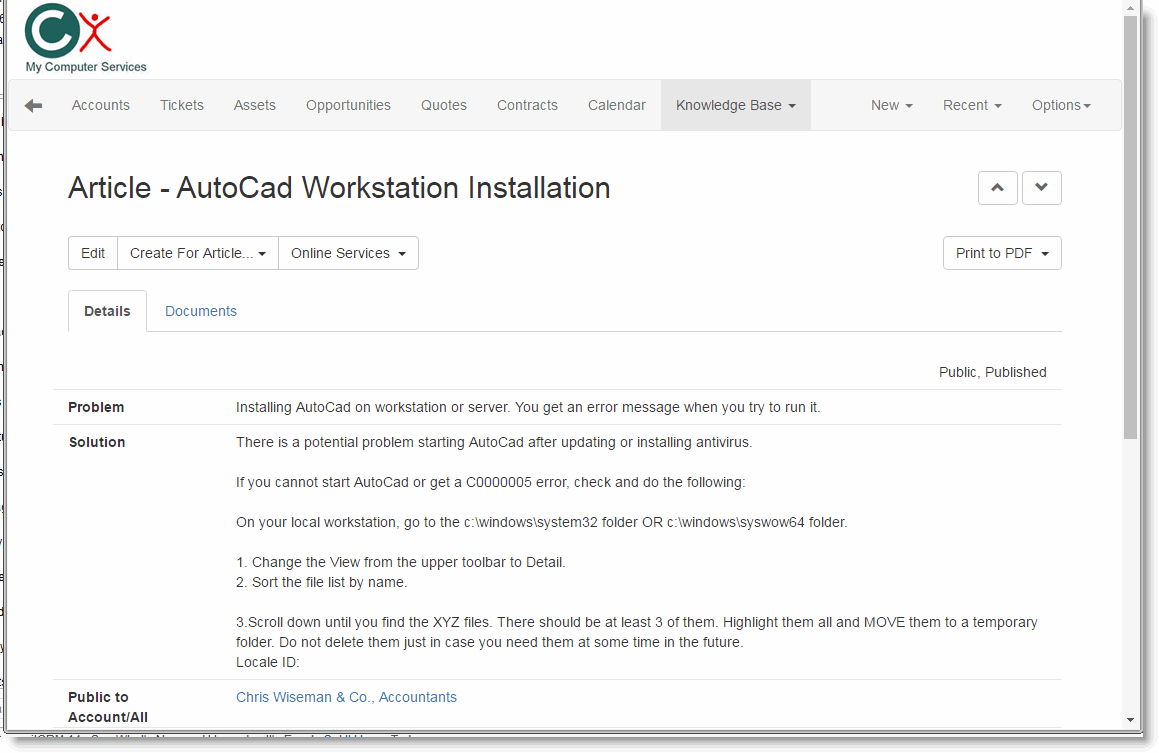
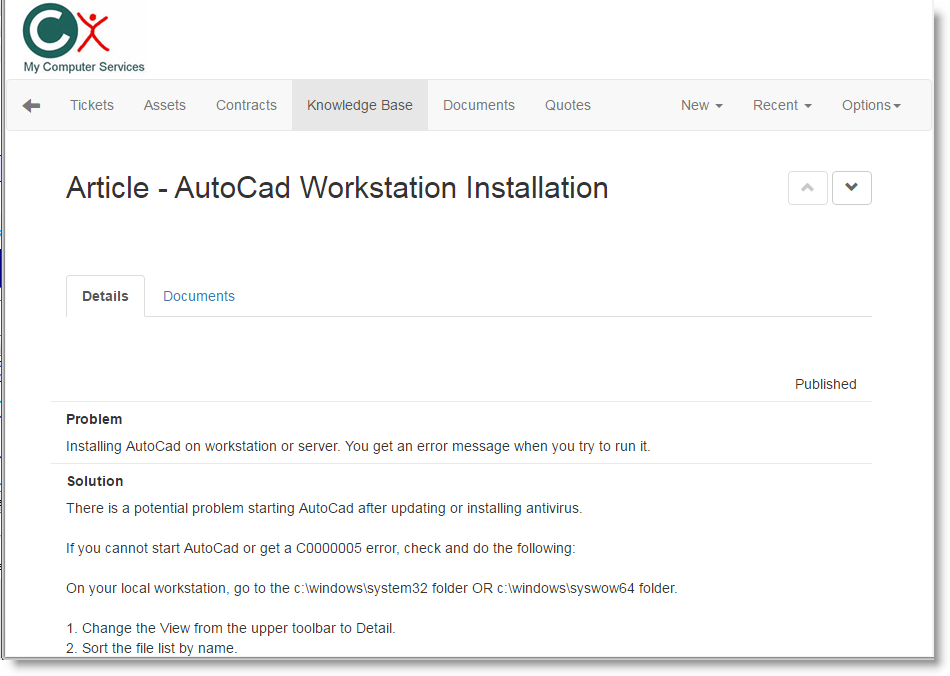
To view the full contents of the article, click the View option in the left column. This will display the entire article in a single window.
In this window, the article appears in the following format:
- Title, Status, Category, and Public Indication flags are displayed at the top of the window.
- Problem and Solution sections can be viewed at the center of the page. Here you can view the problem and solution about which the article has been written.
- Audit information appears beneath the article and displays information such as when the article was created and by whom, and when it was last updated.
- Document titles appear in a list beneath the article itself. To view a document, click View or Download next to the document title.
To update the article, click the Edit link. (Read more about editing articles under Adding & Editing Articles).
Viewing Articles Via the Customers Web Interface
Customers can view articles in the Web interface via the KB Articles tab. The system administrator can determine whether customers have permission to view the Knowledge Base by going to Tools > Options > Web Interface tab.
Once in the Knowledge Base tab, customers can view the Articles List, which displays general information for each article, such as the Title, Category, or Status.
Customers can easily filter the Articles List to display only articles of specific types by selecting or deselecting the desired Statues from the Quick Status filtering options listed in the Articles search pane:
For more advanced search options, customers can use the text search or the category search. (Read more about advanced searching options under Searching for Articles.
To view the full contents of the article, click the View option in the left column. This will display the entire article in a single window.
In this window, the article appears in the following format:
- Title, Status, and Category are displayed at the top of the window.
- Problem and Solution sections can be viewed at the center of the page. Here you can view the problem and solution about which the article has been written.
- Audit information appears beneath the article and displays information such as when the article was created and by whom, and when it was last updated.
- Document titles appear in a list beneath the article itself. To view a document, click View or Download next to the document title.
Adding and Editing Articles
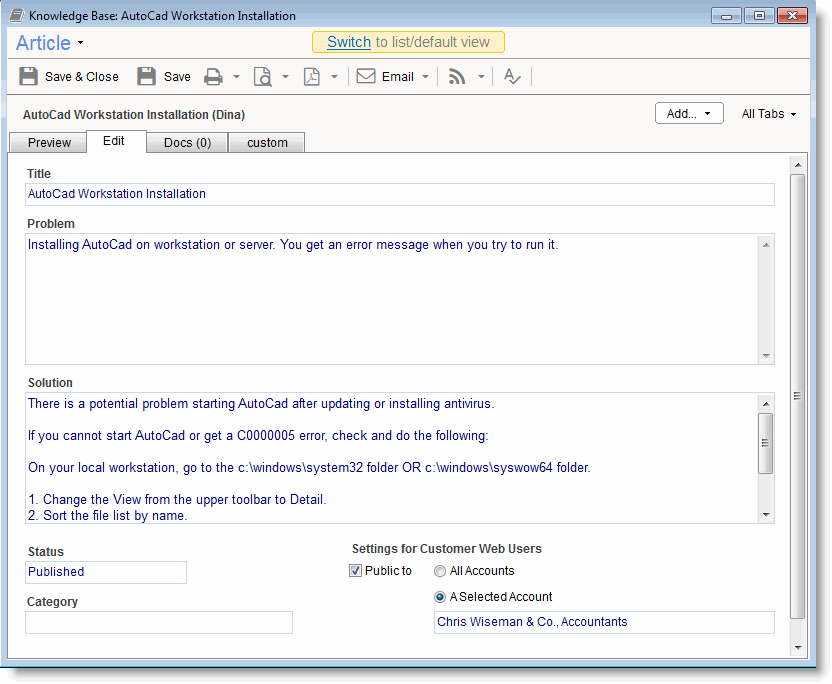
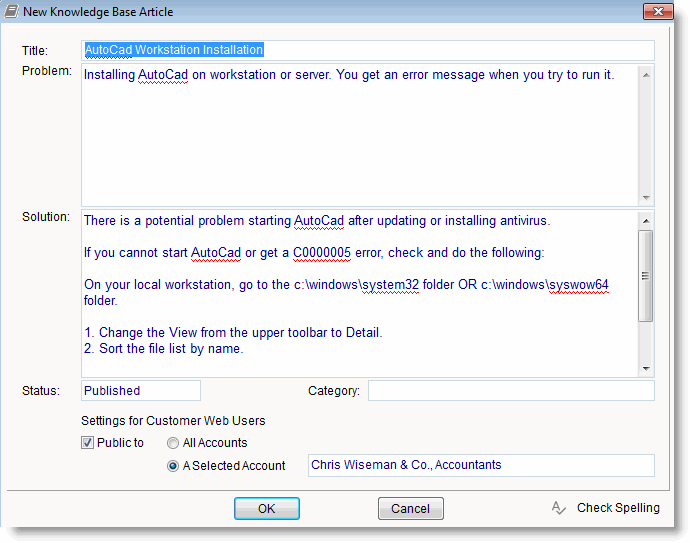
Each article contains several fields, which can be viewed in the Preview tab in the client application and edited in the Edit tab. Knowledge Base articles can be added and edited from either the client application or an employee’s Web Interface.
Each article contains the following fields:
- Title: The Title field should contain a brief description of the article’s subject. The Title will be displayed in the Articles List and in search-results lists, so it should be meaningful.
- Problem: The Problem field describes the issue to be resolved. This field may contain error messages received by the user or a more detailed description of the problem.
- Solution: The Solution field should contain a description of the solution for the issue defined in the Problem field. This section typically includes steps for resolving the problem, Web links to other articles containing the resolution, or a pointer to a linked document (which can be attached to the article) that contains the resolution.
- Category: The Category field helps to categorize articles for better searchability. You can choose from any of the categories in the field’s pull-down menu, or define a new category by clicking the Edit List… link, which also appears in the pull-down menu.
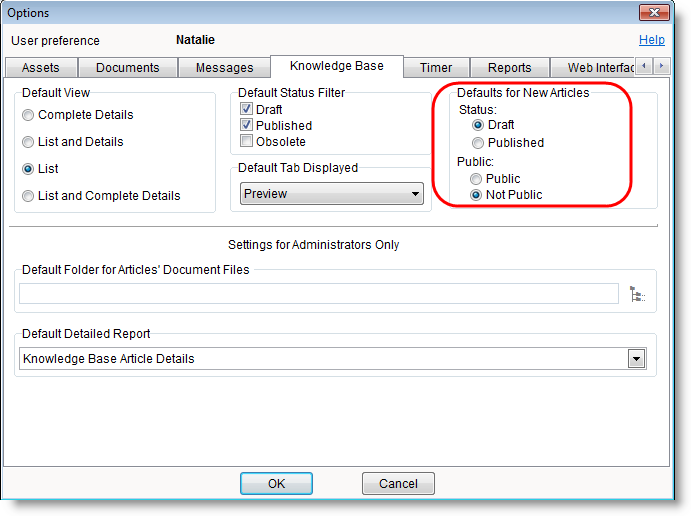
- Status: The Status field can be set to Draft, Published, or Obsolete, depending on the current phase of the article. Using this field wisely helps the user to easily find articles later on. (Read more about this field under Article Statuses.) You can define the default Status for new articles from Tools > Options > Knowledge Base.
- Public indication: The Public indication field allows the user to choose whether customers will be able to view the article via the customers' Web interface. The default behavior for this field can be set from Tools > Options > Knowledge Base. Customers can access generic public articles as well articles shared only with them.
- Attached Documents: You can attach as many documents as you wish to an article from the article's Docs tab. The Docs tab will also display how many documents have already been attached to the article. Documents can be accessed via the client application or downloaded via the Web Interface.
Adding and Editing Articles Via the Client Application
Articles are text based and can be edited via the application in the article's Edit tab or via the Web interface. Within the Knowledge Base editor in the application, there is a built-in spell-checker, which is activated by clicking the Check Spelling icon on the toolbar, or if using version 7+ then the spell check (and optionally automatic corrections) can be done live while typing if configured to do so (Tools > Options > Spell Checking).
Any additional images or supporting information can be attached to the article as external documents.
Adding New Articles
A new Knowledge Base article can be added from the following places in the application:
- From within the Knowledge Base window, click the New button.
- From the Ticket window, select either Tickets > New Article from Ticket, or More Actions > New Article from Ticket.
Either method above will open a new Article window, where you can enter the Title, Problem, Solution, Status, and Category, and set the Public Indication.
Speeding up articles creation
When creating the article from the Ticket window, the Ticket Description will automatically be copied into the article's Problem field, and the Ticket Resolution will automatically be copied into the article's Solution field.
Editing Existing Articles
To edit an existing article, go to the Knowledge Base window, select the article, and click the Edit tab. In this tab you can edit the article and modify its text and properties.
Adding and Editing Articles Via the Web Interface
Adding a new Knowledge Base article from the Web interface can be done from the following places:
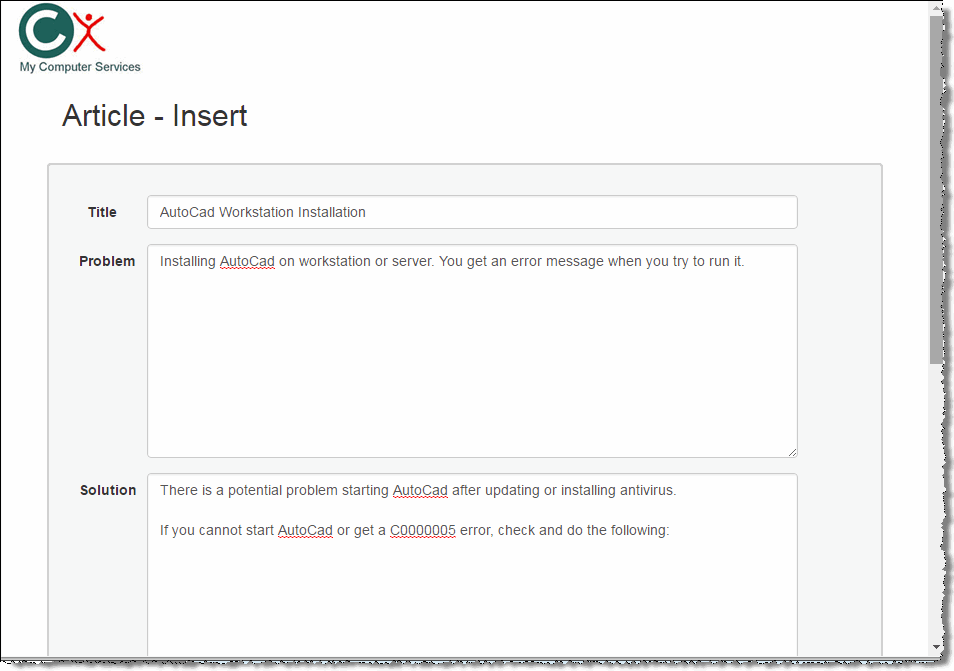
- From the KB Articles tab, click the New Article link.
- From the Ticket window, select Create New for Ticket > Knowledge Base Article.
Either method above will open a new Article window, where you can add the Title, Problem, Solution, Status, and Category, and set the Public Indication.
Speeding up articles creation
When creating the article from the Ticket window, the Ticket Description will automatically be copied into the article's Problem field, and the Ticket Resolution will automatically be copied into the article's Solution field.
Editing Existing Articles
To edit an existing article, go to the Knowledge Base tab, select the article, and click the Edit link. In this window you can edit the article and modify its text and properties.
Searching for Articles
Searching for articles can be performed using the Text search window, which uses an advanced free-text search that looks through all text fields, including Titles, Problems, and Solutions. You can also search by specific article fields by selecting the field name in the Find selection list.
In addition, the Search toolbar allows for a quick search by Category and Status.
Free-Text Search Options
The Text search allows you to use search conditions to look for character strings composed of words, phrases, logical operators, and parentheses for grouping precedence.
In order to use the conditional search, the searched text should include reserved words, including the logical operators OR, AND, NOT, and NEAR. The precedence of the logical operators, from lowest to highest, is OR, AND, NOT, NEAR.
You can use parentheses to change the precedence grouping. For example, using the search condition ”meeting and request or changelog” finds records that have both the words "meeting" and "request" or the word "changelog." However, using the search condition “meeting and (request or changelog),” causes the search condition to find records that have the word "meeting" and either of the words "request" or "changelog."
The logical OR operator produces a "true" result when either text is found. The logical AND operator produces a true result only when both of its sides are true. The logical NOT operator produces a true result when its single-text string has a false result. The NEAR operator (proximity operator) is similar to the AND operator in that both of its sides must be found. In addition, it requires that its operands be within a certain physical distance of each other for it to return a true result. The default distance for the NEAR operator is 8 words. To use a proximity value other than the default, specify the distance as a parameter to the NEAR operator. For example “medical near(15) doctor” will evaluate to true for records where the word "medical" is within 15 words of "doctor."
Search words that do not have specified logical operators are assumed to have an implied AND operator between them. For example, the following two search conditions are equivalent: “mechanical engineer” and “mechanical AND engineer”. The following two searches are also equivalent: “computer programmer or software developer” and “(computer AND programmer) OR (software AND developer)”.
Searching with wildcards
Individual search words that are not enclosed in double quotes can be searched for as exact matches, prefix matches, postfix matches, or substring matches. This behavior is controlled through the use of the asterisk (*) character.
- Exact match. Simply specify the word in the search condition. The word will be matched if it is found exactly as given in the text. For example, the search word "special" will match only "special" in the text (or upper case versions if it is not a case sensitive index).
- Prefix match. Place an asterisk at the end of the word to match all words that begin with the given characters. For example, the search word "special*" will match "special", "specialty", "specialization", etc.
- Postfix match. Place an asterisk at the beginning of the word to match all words that end with the given characters. For example, the search word "*ation" will match words "station", "specialization", "citation", etc.
- Substring match. Place an asterisk at both the beginning and end of the word to match all words that contain the given characters. For example, the search word "*lock*" will match the words "locker", "antilock", "blocking", etc.
Double quotes are used as phrase delimiters. In addition, special characters can be enclosed inside double quotes to ensure that they are unchanged by the search condition parser. For example, to search for a parenthesis, it is necessary to enclose it in double quotes in order to keep it from being treated as a precedence operator in the search condition itself. To search for a physical double quote, use two of them in a row.
Natural Language Engine: Obtain better search results by eliminating unimportant words
When searching, the following words are considered "noise" and will not be included in the search: about after all also and another any are because been before being between both but came can come could did does each else for from get got had has have her here him himself his how into its just like make many might more most much must never now only other our out over said same see should since some still such take than that the their them then there these they this those through too under use very want was way well were what when where which while who will with would you your
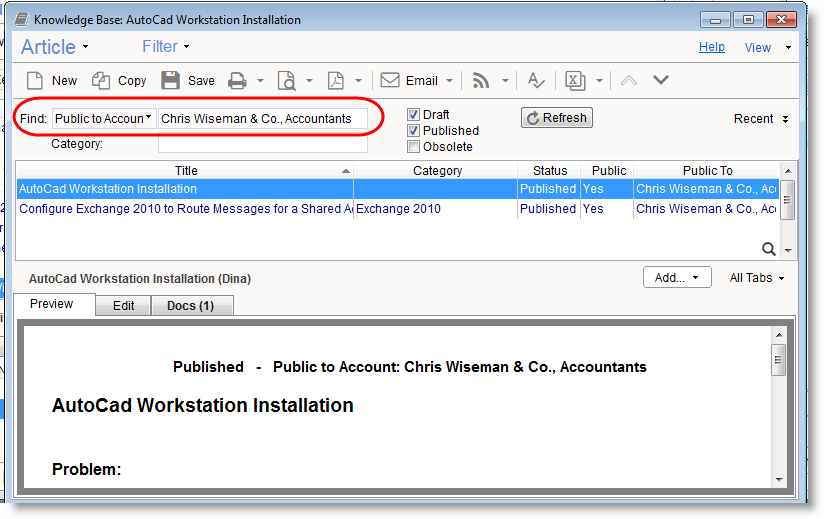
Find articles linked to an Account - You can find articles published and linked to the specific Account by selecting the field 'Public to Account' in the Find selection list and then selecting the particular Account:
Article Statuses
Each Knowledge Base article can be assigned one of the following statuses:
- Draft: articles that are still under construction.
- Published: articles that are final and ready to be used.
- Obsolete: articles that are no longer relevant. These articles will remain in your database, in case you wish to copy it or review it, but it will not appear in your search results unless you explicitly request to view obsolete articles.
The article Status is visible when viewing the article, and it can be updated both from the client application and the Web Interface. The default status to be used automatically for new articles can be set from Tools > Options > Knowledge Base.
Using an article’s Status field wisely can enhance the ease in which you search for articles. You can easily filter the search results by status and narrow down the results to the most relevant articles.
You can set default Status values for new articles from Tools > Options > Knowledge Base.
Document Attachment
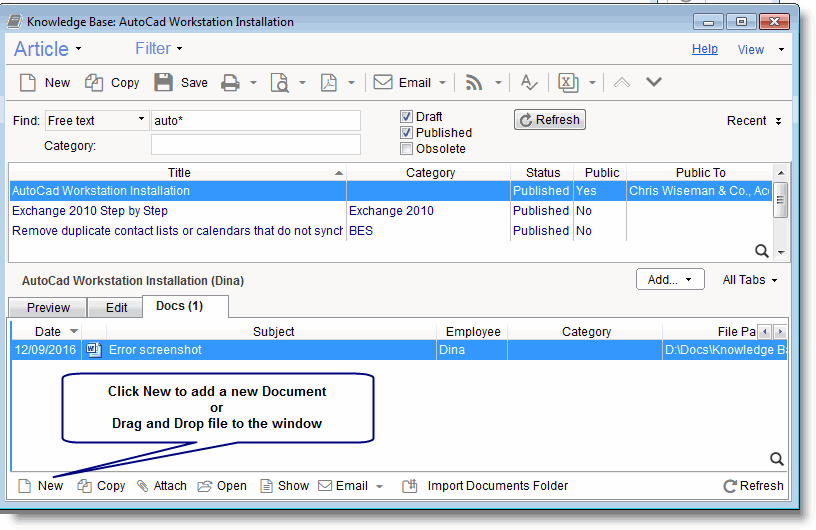
Each Knowledge Base article can have multiple attached documents, which are located in the article’s Documents tab. You can attach a file of any format.
When the article is already open, you can link a new document to it in two ways:
- Go to the Docs tab and click the New button in the bottom left corner.
- Drag and drop a file onto the RangerMSP application window. This automatically creates a Document and links it to the selected article.
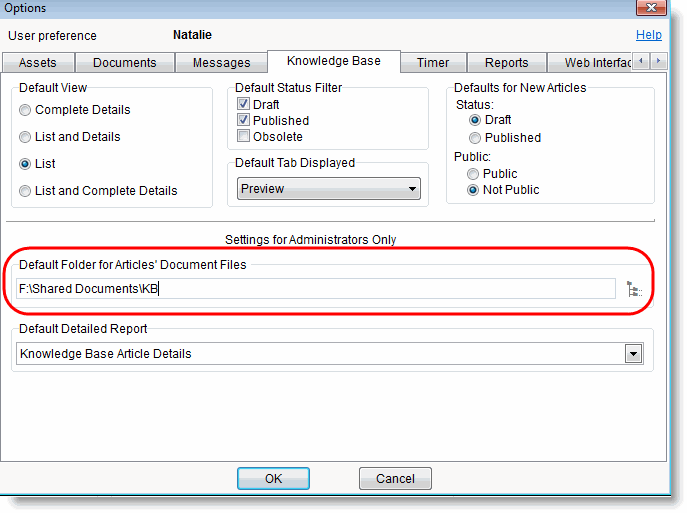
New documents will be automatically copied to the Articles Attachments folder, which is defined by going to Tools > Options > Knowledge Base.
Downloading Documents Via the Web Interface
Note that in order to download the attached documents via the Web, the Web interface’s Document Download settings must be enabled. You can read more about this in the Web Interface Installation Guide, under Document Download Settings.
Security and Privileges
System administrators can define the access level to the Knowledge Base articles in few levels. They can also customize privileges, defining what each employee can and cannot do, and decide whether customers are allowed to view articles.
Employee Privileges
The possible employee privileges include:
- Knowledge Base Privilege: Employees can be permitted access to the Knowledge Base or prevented from viewing it altogether.
- Other Employees Articles Privilege: Employees can be allowed or prevented from viewing, editing, or deleting other employee articles
The system administrator can define the privileges from File > User and Privileges > Privileges. Read more about defining privileges in the Setup Guide, under Employees Privileges Groups.
All privileges take effect both in the client application and when working via the Web Interface.
Note that in order for the documents download to be enabled from the Web Interface, you should make sure the web interface download settings allow downloading from the Knowledge Base folder. You can read more about setting up the web interface download settings in the Web Interface installation guide, under Document Download Settings.
Customer Privileges
Customer access to Knowledge Base articles and documents should be defined separately.
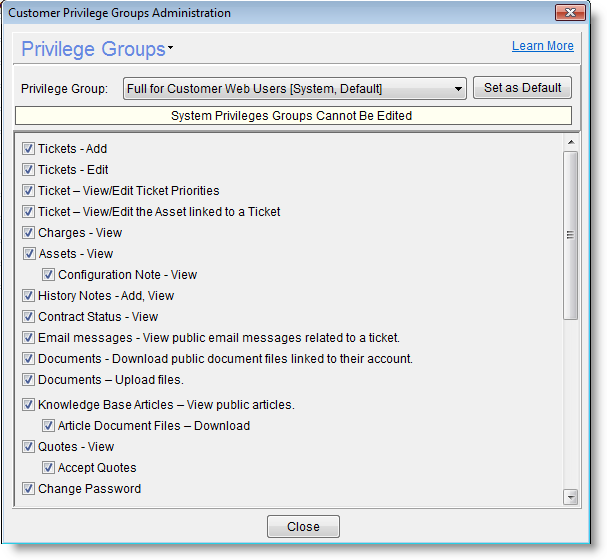
The system administrator can define the privileges from File > User and Privileges > Customer Privileges – For Web Users. Read more about defining privileges for Customer Web Users in the Customer Privileges#Customer_Privileges.
The system administrator can define:
- Whether customers will have access to your Knowledge Base articles, using the Public Knowledge Based Articles (view) option. Note that only articles marked as Public in the article's properties will be available to customers via the Web interface. You can read more about the various articles' fields and indications under Adding & Editing Articles.
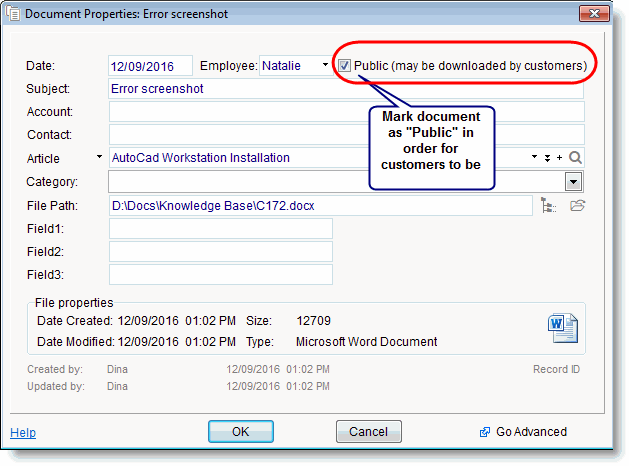
Whether customers will have access to documents attached to Knowledge Base articles, using the Download files linked to articles option. Note that only Documents marked as Public in the Document' Properties window will be available to customers via the Web interface:
In order for the documents download to be enabled from the Web Interface (using the Download files linked to Articles option), you should make sure the web interface download settings allow downloading from the Knowledge Base folder. You can read more about setting up the web interface download settings in the Web Interface installation guide, under Document Download Settings.
Knowledge Base Reports
The RangerMSP Knowledge Base comes with a set of predefined reports, which allows the user to print out lists of articles or whole articles. All reports can be customized to display the results in your preferred layout.
To use the reports, go to the Reports window > Knowledge Base. Here you can see the list of predefined reports, such as Knowledge Base Article Details and Knowledge Base Articles List. You can select the report and click the Generate button to view the results.
Reports are also available when viewing the article in the Knowledge Base window, by clicking the Print or Print Preview icons in the toolbar.
Importing Articles
RangerMSP's Import tool allows you to import articles (including the Title, Problem, Solution, and other fields) from input files, such as Excel™, or from other external databases. If you already have some kind of knowledge-base articles collection that you wish to import into RangerMSP's knowledge base, you can export the articles to external files and import them as articles into RangerMSP. You may also connect directly to other systems databases and import the articles from there.
When importing from Excel, each line in the input Excel file should contain the fields of a single article. When you import the file, the import tool will let you match the columns (each column represents a field) from the input file to the equivalent fields in the article database record.
To import articles into RangerMSP, follow these steps:
- Go to Tools > Import & Export > Import Knowledge Base Articles.
- Provide the input file when asked
- Map the input file fields to RangerMSP's database fields
- Provide default values for fields that do not exist in the file
You can now view your imported articles in the Knowledge Base window.
