Billing Lifecycle
Contents
Main Work Flow
The following is a common work flow which may be used in your business when working with RangerMSP:
When a customer reports a problem, open a Ticket in RangerMSP
V
II: Solve the problem
Handle the Ticket remotely (e.g. by the phone or remote control) or by dispatching a technician for an onsite visit
V
III: Log the work done (Charging)
Log Charge records for the time spent, work performed or parts used in order to solve the problem (resolve the Ticket)
V
IV: Billing
Bill the customer for the relevant Charges recorded (unless covered by a contract)
The work flow explained in this document focuses on the Charging phase (III) and the Billing phase (IV).
Alternative Work Flows
The flow above assumes you will be working with Tickets in order to report on a customer issue.
Alternatively, it is possible to add Charges for an Account (customer) directly in the Account or Contract (see Contracts). This can be helpful in certain cases, such as, when a customer visits your office/repair shop and purchases products or parts, or where you offer consulting services and need to track the time spent on consulting.
Add Charges
Charges are the way to log the work performed for the Ticket. Charges can be billable or not-billable (read more about Charges in the Introduction to Charges and Billing in RangerMSP), depending on the service agreement that was agreed upon with the customer.
In this demonstration, we will add a simple Labor Charge using the System Global Contract, and will set the Rate during the process:
- Open the Ticket window.
- Go to the Charges tab.
- Click the New icon at the bottom on the screen.
- Select Labor Charge.
- The new charge window will open. Note that the Account, Ticket and Contract are already selected according to the Ticket information.
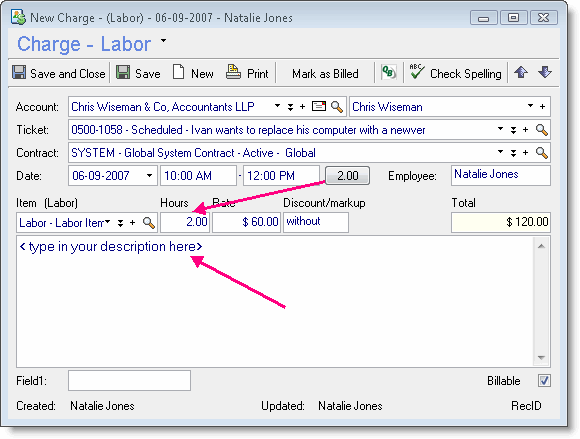
- Select the default Labor Item.
- Fill in the To-From time and click the total time button to copy it to the Hours field (you can manually enter the hours if you prefer).
- Add a description of the work performed to keep a log of the activity.
- Save & Close.
- Note that the Billable flag will be set by default. This is the default behavior for Global Contracts.

|
Using the Timer to Add Charges
You can use the RangerMSP Timer in order to record activity for a certain Ticket and then convert it into a Charge. This is usually useful for activities like phone support.
You can activate the Timer from various places. First display the Ticket details and then:
- Click the Timer Icon.
- Or go to the Ticket Menu > Tools > New Timer option.
- Or use the Ctrl+T keyboard shortcut, but make sure to have the correct Ticket/Account selected when performing this action.
You can start and stop the Timer as many times as you need, and all time spent will be added to the total time (clicking on the magnifying glass will display all the time logged and you can right-click each line and delete it if needed).

Once you are finished timing and have completed the service, click the Add Charge button, and a new Charge window will open with the relevant Ticket and Account already selected. The total time from the Timer will be copied to the Charge Hours field.
Using the Web Interface to Add Charges
To add new Charges from the Web Interface:
- Go to the Ticket Details Window (click View for a specific Ticket)
- Click the Create for Ticket menu, and select the new Charge (Labor, Expense or Product/Part). You can also scroll down to the Charges tab and click the New Charge at the top of the Charges list.

The New Charge window will open.
- Select the default Labor Item, and fill in the Units and the Rate.
- Click Save.
- Note that the Billable flag will be set by default – this is the default behavior for Global Contracts.

Bill the Customer
After a Ticket has been resolved by the technician, you can now bill the customer for the work performed.
Billing the customer can be performed in any of the following ways:
- Generate Charge reports which list the charges per Account/Contract/Ticket and can be sent to the customer.
- Export Charges from RangerMSP to any external accounting software you are using.
- If your office is using QuickBooks, you can use RangerMSP-QuickBooks Link in order to create Invoices in QuickBooks using RangerMSP. You can easily see all open balances using the main menu File > New > QuickBooks Invoice option.
Charges Reports
You can produce Charge reports in RangerMSP and send them to your customers. There are several reports which can be used for this purpose. All the Charges reports are accessible through the Reports window, under the Charges category (this Reports section is available only to authorized users).
Alternatively, you can produce a Charges report per Ticket from the Ticket window, using the Print or Print Preview Icons. You can also print directly into PDF files by using the Print to PDF icon.
Clicking on the arrow near the Icon will open the list of available reports to be printed. Clicking on the Icon itself will print the default report. You can view which is the default report by opening the list with the arrow - the first report in the list, which appears in bold is the default for printing (you can set a different default for Tickets in Tools > Options > Tickets > Default Detailed Report).
Following are commonly used Charge reports:
- Charges list per Ticket or Account – for example "Account Charges", "Charges Report by Ticket".
- Various Detailed Account Charge reports which list the Charges for the Account by various criteria (by Contract, by Tickets etc.)
- Technicians service form including Charges (1, 2). This is a variant of the Technician service form (see On-Site visits), which includes a page per Ticket with the Account details and the list of Charges + their prices.
- Specifically, the Technician Service Form with Charges is available from the Web Interface so technicians can supply the customer with a description of the work and the Charges.
You can customize the reports to fit your needs. To learn more about customization in RangerMSP, visit the FAQ section.

Setting the Charges as Billed
After you bill a customer, you can set the Charge status as Billed by clicking the Mark as Billed button in the charge window tool bar. A billed charge will still appear in the Charges tab of the Ticket Charges tab with a B next to the Billed Charges.
Exporting Charges from RangerMSP
You can export Charges from RangerMSP using the Export tool or the Advanced Data Export Wizard which allows you to export selected fields from RangerMSP to Word®, Excel®, HTML, and more. Using the Wizard you can control the exact data that is exported and the order of the fields in the output file.
The export tools can be activated from the Tools > Import & Export > Export option or from the Charges Window by clicking on Charges > Import & Export.

If you select the Advanced Data Export Wizard, the following window opens:

From this window you can perform the following actions:
- Choose which fields to export and in what order should they be exported to the file
- Define a filter to be applied on exported data, including advanced filtering options
- Define the sorting criteria for the output
Select the output format and a file name for the exported data file.
Using RangerMSP-QuickBooks Link
When using RangerMSP-QuickBooks Link, you can create Invoices in QuickBooks based on Charges in RangerMSP.
Invoices can be created at the Account, Contract or Ticket levels, and can be activate from the Account window, Ticket window or Contract window. In addition, you can easily see all open balances using the QuickBooks Invoice Creation Wizard which shows you all the open balances waiting to be billed. You can use this wizard daily to view all open balances added that day, or still open from previous days.
- From the main menu select File > New > QuickBooks Invoice.
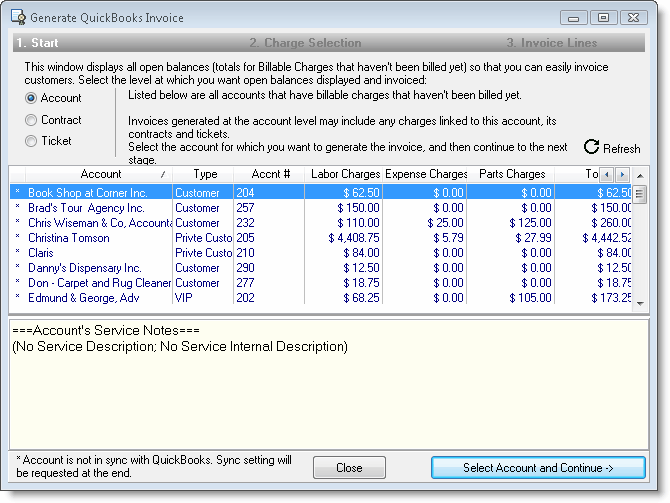
- In this window you can see the open balances for Accounts, Contracts or Tickets. For example, if you are in the Account level, the list will display all the Accounts that have at least one Charge waiting to be billed (i.e. a billable Charge that has not yes been billed).
- Select the Account option, then select the relevant Account from the list and Continue.
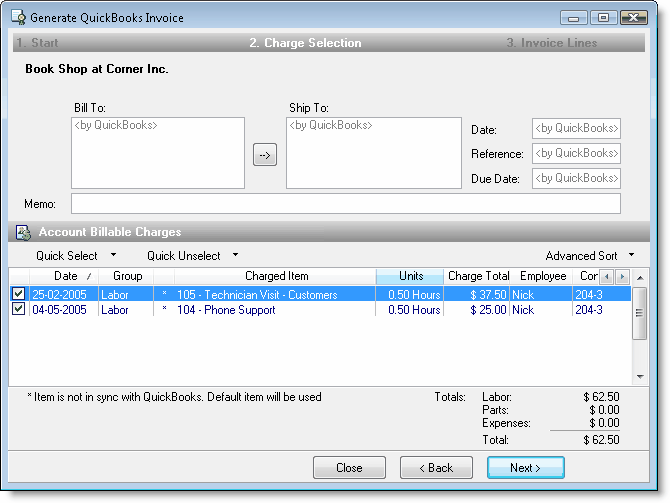
- The list of open Charges appears on the list in the bottom part of the window. Each Charge will be a line in the QuickBooks Invoice which will be created for this Account.
- In this window you can also edit the Bill To and Ship To details by clicking the <by QuickBooks> section. Note that "by QuickBooks" means that the details and formatting for these fields will be taken from QuickBooks once the Invoice is created. If you edit these fields, they will be taken as Edited in this window. To go back to "by QuickBooks" option, click the "Bill To:" and "Ship To:" labels and select set by QuickBooks from the drop down menu.
- Click Next to generate the Invoice. Now you can continue to manage your Invoices in QuickBooks as usual.
- The Charges are now Billed, and will not appear in the QuickBooks open balances. You can still view the Charges in the Ticket Charges tab with a B next to the Billed Charges.


Create an Invoice from the Ticket window
As said earlier, you can also create an Invoice from the Ticket, Account or Contract window. They all will activate the same wizard, but will skip the first step of the wizard and go right to the Invoice list window.
For example, to create an Invoice from the Ticket window, click the QB Icon and the wizard will open, with the all the Ticket Charges in the Invoice creation window. The same goes for the other windows.
Note: It is recommended to read the RangerMSP-QuickBooks Link user manualfor more information.